Saturday had a few jobs to do caused by the storms.
First cut up a tree that came down the previous weekend.
When I caught my head on the rose, we realised that a tree at the end of the drive, was precarious.
It was being held up by another tree so we had to use Shelley's car to tow it down.
==
Search This Blog
Saturday, 15 February 2020
Wednesday, 12 February 2020
Bike wheel workstand
I wanted something that could support my bike wheels while I work on them.
I looked at budget truing stands but most of them were too small for 29" wheels or not what I was looking for and still more costly than I thought they should be.
Some of the more expensive truing stands would have done the job but they are over kill for the few times I am going to need a wheel supported off of a bike.
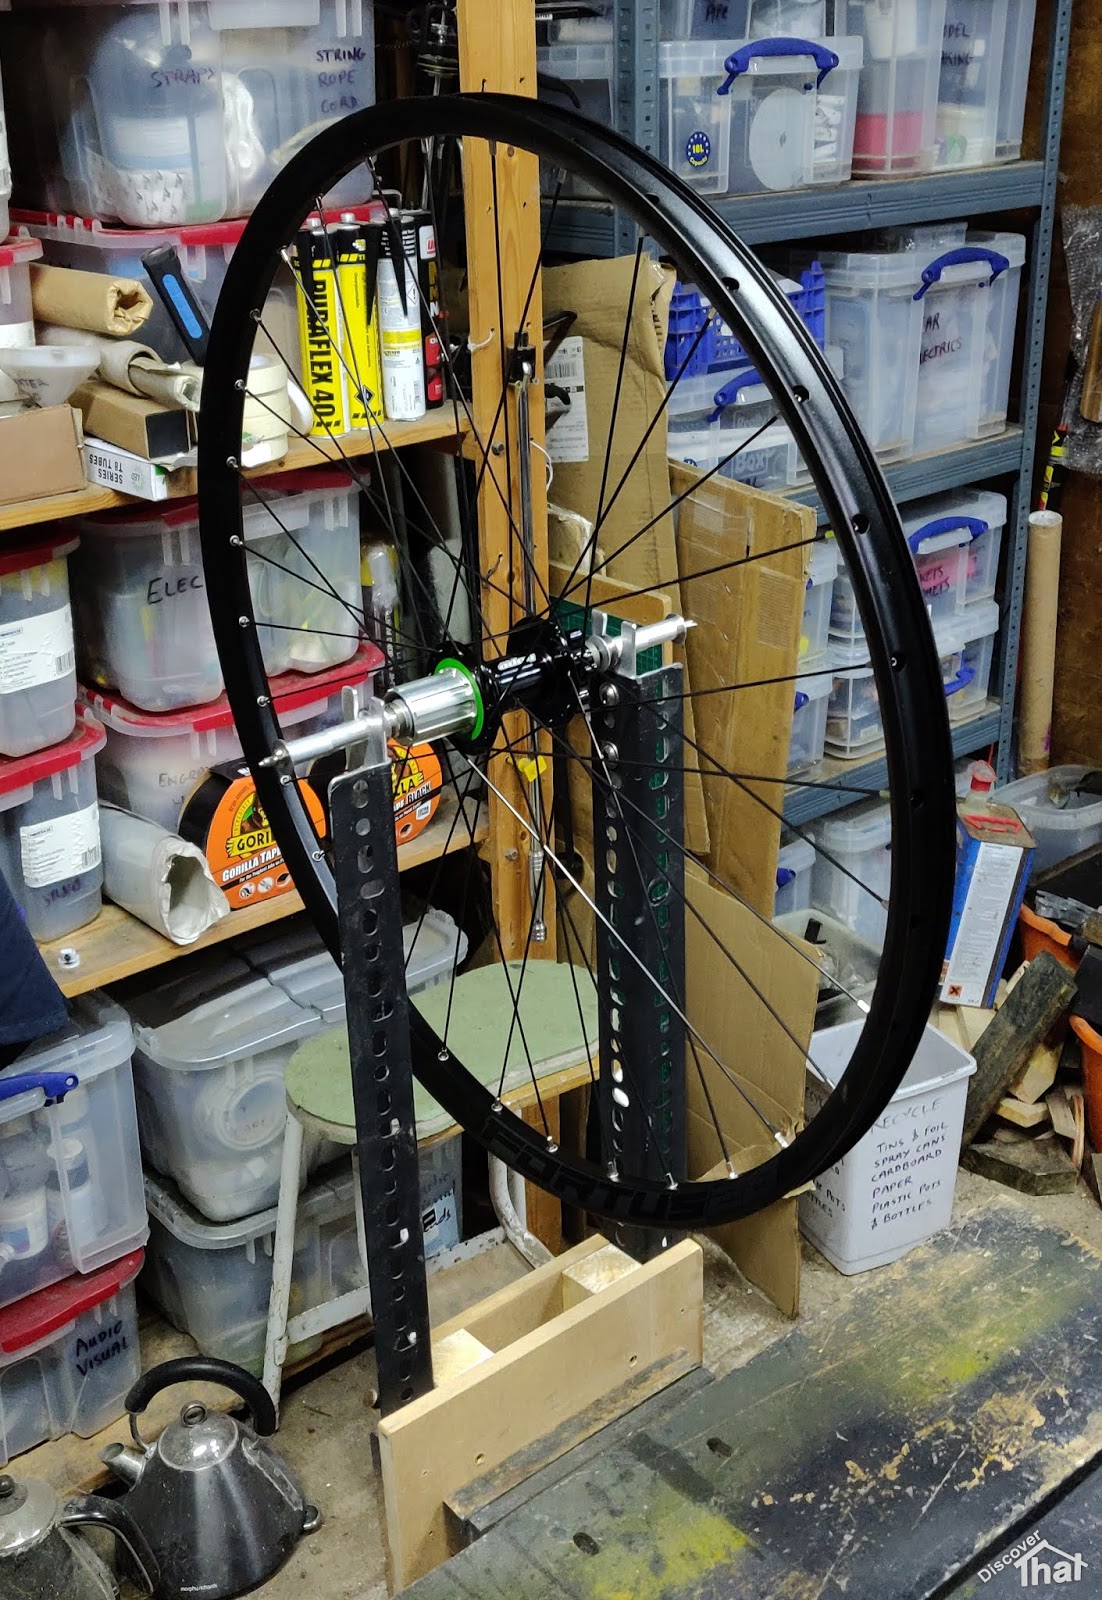
I screwed a few bits together to make what I needed.
Steel angles and some timber with removable aluminium drop in cups. It's setup to fit up to 148mm wide axles but I could fit spacers, for even wider wheel's, if that was ever necessary.
I've used a 5mm threaded rod and some spacers to make an adjustable axle.
I've used cones which will seat and centre inside 12mm, 15mm and probably 20mm axles. I was going to 3D print the cones but I came across exactly what I needed, in aluminium, on ebay. I can just reverse the cones when working on wheels intended for QR skewers.
The stand is designed to fit in the vice on my workbench.
==
I looked at budget truing stands but most of them were too small for 29" wheels or not what I was looking for and still more costly than I thought they should be.
Some of the more expensive truing stands would have done the job but they are over kill for the few times I am going to need a wheel supported off of a bike.
I screwed a few bits together to make what I needed.
Steel angles and some timber with removable aluminium drop in cups. It's setup to fit up to 148mm wide axles but I could fit spacers, for even wider wheel's, if that was ever necessary.
I've used a 5mm threaded rod and some spacers to make an adjustable axle.
I've used cones which will seat and centre inside 12mm, 15mm and probably 20mm axles. I was going to 3D print the cones but I came across exactly what I needed, in aluminium, on ebay. I can just reverse the cones when working on wheels intended for QR skewers.
The stand is designed to fit in the vice on my workbench.
==
Tuesday, 4 February 2020
141 QR hub bike wheel
I am told that one of the areas that manufacturers can skimp on to reduce the price on lower budget bikes, is the wheels. I have already discovered that could be the case on my bike. It's less than 6 months old and already the rear hub sounds rough and grainy.
The bearings, in my rear wheel, are loose ball, cup and cone. Serviceable but obviously vulnerable to the ingress of grub. Not only that but the freewheel has a large angle before it engages. I'd noticed, while riding, that I had to rotate the pedals quite a way before I could get them in to a semi-comfortable position to pull away. I hadn't thought much about it until I looked closely at Shelley's and Dean's bikes. As I rotated the cassette, I noticed how much smaller the ratchet angle was. It's obvious to me now that better hubs have smaller angles before the ratchet engages.
The rough bearings and the poor freewheel, combined, has led me to want to change the rear wheel for something better. Something with sealed bearings.
My Giant Stance came with a rear wheel with a 141 QR (Quick Release) hub. This is a relatively new size and I could not find a pre-built wheel, stocked by any of the major suppliers that I looked at.
I did a lot more searching and, with a bit of knowledge, it's not as tricky to get new wheels as it would first appear. I could easily have had them custom made however, it is also possible to get an off the shelf option at a more acceptable price. The 141 QR fitting is a boost 148x12 TA (Through Axle) hub with the end caps replaced for the same QR end caps fitted to 135 QR hubs.
Not all hubs have replaceable end caps but there is a good choice that do. I found several well respected models and a video showing exactly what I wanted to do. I opted for the Hope Pro 4 hub because a complete rear wheel using them and the end caps were stocked by Chain Reaction Cycles.
It's an easy job to pull off the end caps and swap them for another size.
It just needed a little bit of gently leverage to pry the end caps off. The new ones just push on and I now have 141 QR wheels with a better quality freewheel hub.
I've fitted it to the bike to check it fits. I just have to seal the rim, swap over the tyre and inflate it to pop on the bead. After that, I'll add a couple of small bottles of Stan's No Tire, Tire Sealant and re-inflate.
I should then have a much better performing rear wheel that will need less servicing.
==
148x12mm TA converted to QR end caps = 141 QR
==
QR141, QR 141, 141 QR, 141QR.
The bearings, in my rear wheel, are loose ball, cup and cone. Serviceable but obviously vulnerable to the ingress of grub. Not only that but the freewheel has a large angle before it engages. I'd noticed, while riding, that I had to rotate the pedals quite a way before I could get them in to a semi-comfortable position to pull away. I hadn't thought much about it until I looked closely at Shelley's and Dean's bikes. As I rotated the cassette, I noticed how much smaller the ratchet angle was. It's obvious to me now that better hubs have smaller angles before the ratchet engages.
The rough bearings and the poor freewheel, combined, has led me to want to change the rear wheel for something better. Something with sealed bearings.
My Giant Stance came with a rear wheel with a 141 QR (Quick Release) hub. This is a relatively new size and I could not find a pre-built wheel, stocked by any of the major suppliers that I looked at.
I did a lot more searching and, with a bit of knowledge, it's not as tricky to get new wheels as it would first appear. I could easily have had them custom made however, it is also possible to get an off the shelf option at a more acceptable price. The 141 QR fitting is a boost 148x12 TA (Through Axle) hub with the end caps replaced for the same QR end caps fitted to 135 QR hubs.
Not all hubs have replaceable end caps but there is a good choice that do. I found several well respected models and a video showing exactly what I wanted to do. I opted for the Hope Pro 4 hub because a complete rear wheel using them and the end caps were stocked by Chain Reaction Cycles.
It just needed a little bit of gently leverage to pry the end caps off. The new ones just push on and I now have 141 QR wheels with a better quality freewheel hub.
I've fitted it to the bike to check it fits. I just have to seal the rim, swap over the tyre and inflate it to pop on the bead. After that, I'll add a couple of small bottles of Stan's No Tire, Tire Sealant and re-inflate.
I should then have a much better performing rear wheel that will need less servicing.
==
Summary:
142x12mm TA converted to QR end caps = 135 QR148x12mm TA converted to QR end caps = 141 QR
==
QR141, QR 141, 141 QR, 141QR.
Tuesday, 21 January 2020
Bike chain B-gap gauge
While setting up the 12 speed gears on Shelley's and Dean's bikes, I found that setting the B-gap distance was critical to getting the gears to change reliably.
If the gap is too far, it won't change up the gears from the largest sprocket to the next smaller. If the gap is too close, it binds trying to change down gears from the smallest to the next larger. I found that getting this gap just right was critical to indexing the 12 speeds.
SRAM think it is important because they supply a plastic gauge to help set the gap. The method described by SRAM, for a full suspension bike, either requires the rider siting on the bike to take the measurement or let out the air in the spring. The chain stay needs to be at it's longest length or near enough.
I'm sure that works in factory conditions but I found that sometimes it resulted in the gears binding, or poor changes, when the suspension was set back up and the bike ridden off-road. Perhaps I'm not following the instructions properly. I use an alternate method, that works for the full suspension bikes I have done.
My preferred method is to set the B-gap to the minimum while the suspension is fully extended. The air spring is inflated and setup for the rider. The setting is then done on the bike stand.
Typically the B-gap uncompressed is more like 11mm which is closer than the15mm measurement on the SRAM guide .
I ended up drawing an additional curved line on the SRAM guide to help with the setup. During a spare few minutes, in the evening, I created my own variation and 3D printed it.
My version has steps for 5mm, 10mm and the SRAM suggested 15mm. All of our bikes worked best, when measured uncompressed, at just over the 10mm mark.
The tool fits the SRAM 50mm chain guide cog and it works the same way as the SRAM guide. With the chain in the lowest gear, on the largest sprocket, the tool is held by hand round the upper cog of the derailleur and aligned with the tip of the nearest tooth of the largest gear at its closest point. The B-tension screw is rotated to change the gap to the desired distance.
==
Download 3D models:
Chain gap gauge, Fusion 360, STEP and STL (Zip)
Licence attribution - small business exception
==
I ended up drawing an additional curved line on the SRAM guide to help with the setup. During a spare few minutes, in the evening, I created my own variation and 3D printed it.
My version has steps for 5mm, 10mm and the SRAM suggested 15mm. All of our bikes worked best, when measured uncompressed, at just over the 10mm mark.
The tool fits the SRAM 50mm chain guide cog and it works the same way as the SRAM guide. With the chain in the lowest gear, on the largest sprocket, the tool is held by hand round the upper cog of the derailleur and aligned with the tip of the nearest tooth of the largest gear at its closest point. The B-tension screw is rotated to change the gap to the desired distance.
==
Download 3D models:
Chain gap gauge, Fusion 360, STEP and STL (Zip)
Licence attribution - small business exception
==
Monday, 20 January 2020
Shimano XT and SLX brake pads
The brakes on all our bikes now use the same styles of Shimano pads. The G-series, G03A, G03S, G04S or the J-series J04C, J03A etc.
I've been trying to work out the most appropriate pads to buy. My problems started when I was trying to find out what the difference was between G03A pads and G03S pads!
Shimano have a brake pad selector page, that is intended to guide you through to get the most appropriate pads:
https://bikecheck.shimano.com/global/en/parts-selectors
That goes so far but often throws out multiple choices with no explanation of the differences.
Working the other way round. It is fairly easy to get generic information on resin, sintered or semi-metal but translating that in to which Shimano part number that relates to, can be confusing and is often contradictory.
As far as I can work out, in summary:
Resin (Organic) = For dry or rainy days. Quick to bed and more control.
Metal (Sintered) = For muddy, wet, gritty conditions. Last a lot longer. Take a lot more bedding in.
One other thing that I found out quickly about metal, they can be noisy. They Squeal.
In addition, some disc rotors are not compatible with some brake pad compounds. Most, if not all, discs are compatible with resin pads but not all are compatible with the metal compound pads. Many rotors have 'Resin Pads Only' engraved on them. Some of our disc rotors have that engraved on them.
Shimano simply state the following for the use of each type:
Resin: silence and controllability
Metal: durability and braking power
The symbols on the packaging provides some details to expand on that but that is not easy to search for on the internet. I have interpreted the information I have found, as best I can, and presented it here for my own use in the future. There is no reason for you, the reader, to trust my list any more than any of the hundreds of others out there on the internet.
Shimano Markings:
First letter = Shape. Both the G and J fit the dual piston XT and SLX brake callipers.
J has cooling fins
G does not have cooling fins
Metal pads are probably longer lasting for the muddy riding I do in the winter but I am less likely to be comfortable with the feel. On top of that, my disc rotors are not compatible with metal!
The following look like the best choices, which are compatible with both SLX and XT brakes:
J03A resin pads with heat sink
I've been trying to work out the most appropriate pads to buy. My problems started when I was trying to find out what the difference was between G03A pads and G03S pads!
Shimano have a brake pad selector page, that is intended to guide you through to get the most appropriate pads:
https://bikecheck.shimano.com/global/en/parts-selectors
That goes so far but often throws out multiple choices with no explanation of the differences.
Working the other way round. It is fairly easy to get generic information on resin, sintered or semi-metal but translating that in to which Shimano part number that relates to, can be confusing and is often contradictory.
As far as I can work out, in summary:
Resin (Organic) = For dry or rainy days. Quick to bed and more control.
Metal (Sintered) = For muddy, wet, gritty conditions. Last a lot longer. Take a lot more bedding in.
One other thing that I found out quickly about metal, they can be noisy. They Squeal.
In addition, some disc rotors are not compatible with some brake pad compounds. Most, if not all, discs are compatible with resin pads but not all are compatible with the metal compound pads. Many rotors have 'Resin Pads Only' engraved on them. Some of our disc rotors have that engraved on them.
Shimano simply state the following for the use of each type:
Resin: silence and controllability
Metal: durability and braking power
The symbols on the packaging provides some details to expand on that but that is not easy to search for on the internet. I have interpreted the information I have found, as best I can, and presented it here for my own use in the future. There is no reason for you, the reader, to trust my list any more than any of the hundreds of others out there on the internet.
Shimano Markings:
First letter = Shape. Both the G and J fit the dual piston XT and SLX brake callipers.
J has cooling fins
G does not have cooling fins
There are also 4 piston callipers, they use different pads.
Middle numbers = brake pad compound.
01, 02 and 03 appear to be updates of the resin formula. 03 being the most recent.
04 are always metal pads
Last letter = backing material:
A = aluminium (heat transfers to the calliper and hydraulic fluid which risks the brakes locking on)
S = steel (heat transfers to the rotor which risks brake fade)
Ti = titanium (heat transfers to the rotor which risks brake fade)
C = combination, stainless steel with aluminium fins
The heat sink fins, fitted to some pads, are obviously intended to mitigate the disadvantages of each of the above materials.
I can't find enough reliable information on other makes of brake pad. I'm sure there must be good alternative pads but the only way to know is to try them, so for the time being, I'm sticking with the genuine Shimano pads.
A friend likes Noah and Theo pads. These are available from eBay. I'll give them a try one day.
Middle numbers = brake pad compound.
01, 02 and 03 appear to be updates of the resin formula. 03 being the most recent.
04 are always metal pads
Last letter = backing material:
A = aluminium (heat transfers to the calliper and hydraulic fluid which risks the brakes locking on)
S = steel (heat transfers to the rotor which risks brake fade)
Ti = titanium (heat transfers to the rotor which risks brake fade)
C = combination, stainless steel with aluminium fins
The heat sink fins, fitted to some pads, are obviously intended to mitigate the disadvantages of each of the above materials.
J03A, J02A
|
Resin pad with anti-fade heat sink
|
J04C
|
Metal pad with anti-fade heat-sink
|
G03A, G02A
|
Resin pad with aluminium back plate
|
G03S, G02S
|
Resin pad with steel back plate
|
G04S
|
Metal pad with a steel back plate
|
G04Ti
|
Metal pad with a titanium back plate
|
I can't find enough reliable information on other makes of brake pad. I'm sure there must be good alternative pads but the only way to know is to try them, so for the time being, I'm sticking with the genuine Shimano pads.
Conclusion
I still don't know, for sure, if I should buy steel or aluminium backed but for my riding, it probably does not matter.Metal pads are probably longer lasting for the muddy riding I do in the winter but I am less likely to be comfortable with the feel. On top of that, my disc rotors are not compatible with metal!
The following look like the best choices, which are compatible with both SLX and XT brakes:
J03A resin pads with heat sink
G03S resin pads with steel backing
Alternatively, J02A or G03A would be perfectly adequate.
==
Alternatively, J02A or G03A would be perfectly adequate.
==
UPDATES:
2021
My new bike has 4 pot Shimano brakes so takes different pads.
Based on the above, the standard D03S pads will suit.
2022
I failed to stop the 4 piston Shimano callipers from squealing, so I swapped them for Shimano SLX 2 pot callipers and I am much happier.
==
https://bike.shimano.com/en-EU/components/mtb/category/brake.html
Brake Callipers
We have XT and SLX brakes in use. These are or are similar to the current M8000 and the M7000 brake callipers:
https://bike.shimano.com/en-EU/product/component/deorext-m8000/BR-M8000.html
https://bike.shimano.com/en-EU/product/component/slx-m7000/BR-M7000.html
==
Reference
The source, the Shimano web site:https://bike.shimano.com/en-EU/components/mtb/category/brake.html
Brake Callipers
We have XT and SLX brakes in use. These are or are similar to the current M8000 and the M7000 brake callipers:
https://bike.shimano.com/en-EU/product/component/deorext-m8000/BR-M8000.html
https://bike.shimano.com/en-EU/product/component/slx-m7000/BR-M7000.html
==
Sunday, 19 January 2020
Bike brake piston expander
When bleeding Shimano and other makes of bike disc brakes it is necessary to fit a bleed block.
This is nothing more than a 10mm thick spacer that prevents the pistons closing during the bleed process. It avoids overfilling the system with too much hydraulic fluid.
It is common for the pistons to be slightly too close together to fit the bleed block. Most people use a screwdriver or similar handy tool. This is fiddly and risks damaging the pistons.
There are specialist brake piston presses available, which are like a thin spatula. These only press on one side at a time. These serve multiple purposes but they can still be fiddly when trying to open to the full 10mm width.
I've come up with a simple design that can be quickly pressed between the pistons to separate them by the required amount.
It's not an essential tool by any means, often a chamfer on the bleed block is all that is needed. The tool I have designed is just a little time saver.
==
This is nothing more than a 10mm thick spacer that prevents the pistons closing during the bleed process. It avoids overfilling the system with too much hydraulic fluid.
It is common for the pistons to be slightly too close together to fit the bleed block. Most people use a screwdriver or similar handy tool. This is fiddly and risks damaging the pistons.
There are specialist brake piston presses available, which are like a thin spatula. These only press on one side at a time. These serve multiple purposes but they can still be fiddly when trying to open to the full 10mm width.
I've come up with a simple design that can be quickly pressed between the pistons to separate them by the required amount.
It's not an essential tool by any means, often a chamfer on the bleed block is all that is needed. The tool I have designed is just a little time saver.
==
Saturday, 18 January 2020
Fitting a 12 speed group set
I had a chance to see a 12 speed group set being fitted to a Giant Trance bicycle, which helped me when updating Shelley's Merida to 1x12 from 3x10. In both cases the set being fitted was from the SRAM eagle range. Both with an NX derailleur and GX shifter. One with an NX cassette and the other with a sunrace cassette.
As usual, SRAM have a very good video for fitting and adjusting the gears, however we had to fettle to get a better end result.
Both the SRAM NX and the Sunrace cassettes fit on the common Shimano HG style driver. The SRAM GX, and above, cassettes fit on a SRAM XG specific driver.
The SRAM does not use an extension and, more importantly, it must not be offset away from the hub.
If the SRAM is any further out, from the frame, it will not shift in to the lowest gear. Even as it is, it might need a 0.5mm or 1mm spacer, behind the cassette, to get it in to a position that works.
Informative Park Tools Video:
Some chain has a right and a wrong way round. For example, with Shimano chain the lettering should be on the outside. If you look very closely the chamfers on each link are slightly different on each side. Some chains are symmetrical.
The end stop for the smallest sprocket can be done before attaching the cable.
On a SRAM, the limit screw for the largest sprocket, is the one on the outside of the derailleur. The limit screw for the smallest sprocket, is closest to that sprocket.
As usual, SRAM have a very good video for fitting and adjusting the gears, however we had to fettle to get a better end result.
![]() |
| Shimano style driver |
Both the SRAM NX and the Sunrace cassettes fit on the common Shimano HG style driver. The SRAM GX, and above, cassettes fit on a SRAM XG specific driver.
Hanger
The SRAM derailleur fits in a different position to where a 10 speed Shimano would usually fit.The SRAM does not use an extension and, more importantly, it must not be offset away from the hub.
![]() |
| Shimano, offset and set back |
![]() |
| SRAM, no offset and almost straight down |
If the SRAM is any further out, from the frame, it will not shift in to the lowest gear. Even as it is, it might need a 0.5mm or 1mm spacer, behind the cassette, to get it in to a position that works.
The hanger also needs to be aligned. If it is bent, it will affect the gear changes.
[Re-aligning the hanger is the most common fix I have had to do after rides. to get the gears to work properly again.]
There are several methods to get the length of the chain. I used the method that appears the most common. For a full suspension bike, it needs to be done at the longest length, which is when the suspension is fully compressed.
Chain
Most modern chains use a master link to join the chain. Also known as a quick link or magic link.
I took note of the suspension pressure and then let all the air out. I compressed the suspension and tied it up with a Velcro strap.
Without the derailleur, I wrapped the new chain round the largest sprocket and the chain ring.
With half of the quick link attached, I found where the chain could be joined and then added two rivets. I find it easier to think in rivets but often it is referred to as extra links.
Both ends of the chain should be an inner link.
The Park Tools video is much clearer at explaining this than the SRAM video. It is two links or rivets past the inner link that the end of the chain could be connected to. This means the break could be nearly 4 links past the overlap in some cases.
Some types of bike with the large 50-tooth sprocket, might need to add 4 rivets instead of 2 to the length. If full suspension bike chains are measures without compressing the suspension, they could need 6 rivets added, however this is not the preferred method.
Some master links fits a specific way round and have an arrow indicating the direction the chain normally travels. In the case of SRAM, the quick link is curved and the curved surface must be outwards with the arrow facing the direction of travel of the chain, when facing it from the drive side (the arrow viewed from the non-drive side points the wrong way!)
The master link is fitted loose. To secure it, I held the rear wheel on the brake and pedalled. That pulls the chain taught and locks the quick link in place.
Some chain has a right and a wrong way round. For example, with Shimano chain the lettering should be on the outside. If you look very closely the chamfers on each link are slightly different on each side. Some chains are symmetrical.
End stops
The limit screws are used to stop the chain coming off either end of the cassette.
On a SRAM, the limit screw for the largest sprocket, is the one on the outside of the derailleur. The limit screw for the smallest sprocket, is closest to that sprocket.
The position for the jockey wheel, is to have the outer edge of the smallest sprocket on the cassette aligned with the inner edge of the guide cog.
To adjust the lowest gear end stop, attach the cable.
First turn the barrel adjuster on the shifter, full clockwise, then turn it back two full turns anti-clockwise. This is so there is enough scope for later adjustment.
Click the down shifter and pull the cable to ensure it is fully extended, then attach the cable to the derailleur.
Once attached firmly, click the other lever to pull the derailleur to the other end and adjust the end stop.
Turn the screw so the centre of the guide cog, on the derailleur, aligns with the centre of the largest sprocket.
This can be hard to see on a mountain bike with 2.3" tyres fitted. I found that looking at how central the chain was, as it was pulled on to the largest sprocket, helped to gauge when the limit screw was set correctly. If the chain looked central, rather than pulled to one side or the other, then it was about right.
It is the closest the tops of the teeth get to each other.
In the past it used to be fairly common to set this to 5 to 6mm. As cassettes have got more and larger sprockets, this gap has increased.
For SRAM 12 speed they recommend a gap of 15mm. They supply a tool to help set that gap.
That is the gap set when the chain stay is at it's longest length.
To adjust the lowest gear end stop, attach the cable.
First turn the barrel adjuster on the shifter, full clockwise, then turn it back two full turns anti-clockwise. This is so there is enough scope for later adjustment.
Click the down shifter and pull the cable to ensure it is fully extended, then attach the cable to the derailleur.
Once attached firmly, click the other lever to pull the derailleur to the other end and adjust the end stop.
Turn the screw so the centre of the guide cog, on the derailleur, aligns with the centre of the largest sprocket.
This can be hard to see on a mountain bike with 2.3" tyres fitted. I found that looking at how central the chain was, as it was pulled on to the largest sprocket, helped to gauge when the limit screw was set correctly. If the chain looked central, rather than pulled to one side or the other, then it was about right.
B-Tension
This adjusts the gap between the guide pulley and the largest sprocket on the cassette.It is the closest the tops of the teeth get to each other.
In the past it used to be fairly common to set this to 5 to 6mm. As cassettes have got more and larger sprockets, this gap has increased.
For SRAM 12 speed they recommend a gap of 15mm. They supply a tool to help set that gap.
That is the gap set when the chain stay is at it's longest length.
That requires having someone sit on the bike or remove the air from the rear shock.
I found that a good result could be achieved without compressing the suspension but the gap, for both the Giant Stance and the Giant Trance, was closer to about 10mm.
The Merida ONE-TWENTY would work at 15mm but was more reliable at about 11mm.
If the B gap is wrong it will affect how quickly or slowly the gears change and it might miss a gear. Except in extreme cases, the gear change will still work, even if the gap is not ideal.
I got the idea from the factory setup of my Giant Stance. It came from the shop working efficiently, with just over a 10mm gap with the suspension in its resting state.
SRAM have the adjuster on the shifter.
When changing gear:
If it won't adjust to give good up and down shifting, consider adjusting the B gap.
==
If the B gap is wrong it will affect how quickly or slowly the gears change and it might miss a gear. Except in extreme cases, the gear change will still work, even if the gap is not ideal.
![]() |
| Giant Stance |
I got the idea from the factory setup of my Giant Stance. It came from the shop working efficiently, with just over a 10mm gap with the suspension in its resting state.
Gear Change Adjustment
To get the gears to change up and down quickly and smoothly, it is necessary to adjust the cable tension. Typically there is a barrel adjuster at either the derailleur or the shifter end of the gear cable.SRAM have the adjuster on the shifter.
When changing gear:
- if it is slow moving from Large to Small sprockets turn the barrel adjuster clockwise.
- if it is slow moving from Small to Large sprockets turn the barrel adjuster anti-clockwise.
If it won't adjust to give good up and down shifting, consider adjusting the B gap.
==
Cassette Drivers
After decades of one predominant system, there are now a number of different types in use.
- Shimano HG - most common, been the standard for years. The smallest sprocket that fits is 11 tooth. SRAM SX and NX cassettes use this fitting. Sunrace also have cassettes that fit this.
- SRAM XG - specific to SRAM Eagle, used for 11 and 12 speed cassettes from the GX range upwards. The smallest sprocket can be 10 tooth.
- Shimano Micro Spline - Used for Shimano's 12 speed cassettes. The smallest sprocket can be 10 tooth.
Many makes of wheel hub have interchangeable drivers but not all. I've changed one on a Hope Pro 4 hub. That was relatively easy to swap over, using the correct size seal press.
==
Update: Jan 2021
The latest SRAM NX Groupset came with a different tool to measure the B-gap.
This new tool measures the gap when the chain is in the 2nd lowest gear and while the bike is at normal sag, not full compression. It was easy enough to check the pressure of the rear shock and then let a little air out to simulate someone sitting on the bike.
I found this tool very easy to use.
==
https://www.parktool.com/blog/repair-help/rear-derailleur-adjustment
More about the B-tension adjustment.
https://bikerumor.com/2017/09/29/aasq-14-what-does-the-b-tension-screw-on-a-derailleur-do/
==
Links
All the adjustments to get gear changing to work properly.https://www.parktool.com/blog/repair-help/rear-derailleur-adjustment
More about the B-tension adjustment.
https://bikerumor.com/2017/09/29/aasq-14-what-does-the-b-tension-screw-on-a-derailleur-do/
==
Subscribe to:
Posts
(
Atom
)