Search This Blog

Sunday 21 June 2020

Upgraded the stereo in the Defender

It's been a long time in the planning. When I started looking at fitting a better car stereo in a Defender, the first thing that came up, and was repeated numerous times, was that the best improvement is to fit sound proofing. We had that fitted a few months ago, along with thick fitted rubber mats.


At long last, I have got together all the other bits, and fitted them, to upgrade the stereo.

Bigger speakers, a sub-woofer and a Raptor console dash.


Getting the old radio mount and cable trim out is more difficult than fitting the new console.


I managed to knock the top mount sideways just far enough to reveal the screws holding the lower trim in place.


With the lower trim out of the way, it was possible to bend and pull the old radio mount until it came out. Not very elegant but the alternative was to take most of the dash apart!


Fitting the Raptor dash, was as easy as they say. It fits so well that the two bolts at the top are sufficient to hold it securely in place.


Defenders do not have much space to route cables. Deciding the route took longer than threading the cables. The lower lip of the Raptor dash gave me the opportunity to hide the cable between the foam of the dash trim and the metal under it. I just forced a screwdriver down to make the space. The fuse box cover hides the drop down to where it goes under the rubber matting past the gear sticks.


My home made switch panel for the heated seats hides where the cable goes under the centre console between the seats.


I had very few switches to fit in the console but I didn't want to waste the space. I, therefore,  deliberately ordered a Raptor console dash with two DIN radio mounting holes. There is not enough space behind to fit two stereos but I had plans to use the lower one for a cubbyhole.


My own two part cable gland in the same style as the switch I was fitting.


The new speakers are larger. They need a deeper spacer and offset mounting holes. The prototype was evenly spaced but I soon changed that to an angled version.


The Land Rover mounting holes are 117mm diameter spacing.


The new speakers are Pioneer TS-R1350S 13cm full range 3-way speakers. They have two sets of fixing holes, at 120mm and 137mm diameter. The spacer, that I designed, has holes at 117mm to fix the adaptor to the dash and holes at 137mm to secure the speaker and the grill to the spacer.


The 5" speakers fitted where the Land Rover 4" ones were.


I needed a bit of trim round the head unit to hide the bracket.

The head unit is a Sony XAV-AX100. It has a double DIN screen but only a single DIN component housing sticking out the back. This makes it ideal for a Defender where there is limited space in the dash area. The Sony is one of the few I could find, a couple of years ago, where the DIN part was at the top and the screen overlapped the bottom and also supported ApplePlay for Shelley's iPhone.


The sub-woofer had to be fairly small as there is next to no space in a pickup Defender cab. Sub-woofers, by their very nature, tend to be large! The Pioneer TS-WX130EA does the job in a relative small housing.


I usually favour more positive mounting. Ideally, a nut and bolt, however, the bulkhead behind the drivers seat is just in front of the fuel filler pipe. It looked a little trickier than it was worth to fit brackets. The sub-woofer sits on the floor and the seat back is very close, so the Velcro does not need to take any weight.


I do like my cables well protected and tidy.


Much nicer looking dash, in my opinion.
Music sounds so much better.

==


Sunday 14 June 2020

AM3300 ColorFabb nGen filament

I have just done my first print with ColorFabb nGen filament.
The results are excellent.


Slightly slower to print with than PLA, I used the recommended 50mm/s for the nGen where I can reliably use 60mm/s with PLA. However, both are much faster than the 30mm/s I have to print with PETG.


I'm using nGen because I want the higher temperature tolerance, so I can use the finished article in a car. I normally use PETG for in car use but, as I've said, that is slow and troublesome.


I did not have any issues with a 25 hour print using nGen. It stuck to the bed without warping and negligible stringing and blobs. Both significant issues with PETG.

nGen is ColorFabb's brand name for "Eastman Amphora™ AM3300 3D polymer" filament.

If it survives the summer temperatures in the car, I think this will be my go to filament for things that need that little extra strength or temperature resistance.

==

Update 25 June 2020

Over the last week or so, I have done a lot of prints using nGen filament. These range from 3 hour to 25 hour prints. I have not had a single failure. Everything sticks to the glass bed, without any assistance. Good layer adhesion. No warping or noticeable shrinkage.
I've had a couple of the prints in a car for a few hot days and no sign of any distortion.

Just based on my feel, I would say that nGen has about the same layer adhesion as PLA but is overall stronger. With the grain, nGen can take quite a lot of flexing, much more than PLA.

The surface finish is good. It gets the odd tiny bobble, which I can usually scrape off with my fingernail. It can have a tiny bit of very fine stringing but that depends on the model being printed, some have none. Again, easy to clean up. I can rub it off between my fingers.

I plan to buy nGen filament as my primary material to print with, from now on.
I have lots of PLA left in stock and a little PETG. I will use that up over time but I'm unlikely to keep much of either going forward.


==


nGen, AM3300, Setting:

Nozzle temperature = 235C

Print speed = 50mm/s

Travel speed = 100mm/s

Cooling = 50%
Bed temperature = 85C


==

Compare Filaments

I have found it difficult to get reliable information about filaments.

The information I am particularly interested in is at what temperature does the material deform. More specifically, will it survive the temperatures inside a car during the summer.
The most appropriate measurement I can find for that is:
Heat Deflection Temperature (HDT). It is when the shape will start to change due to the heat under a given pressure. This is typically quoted at one of two pressures. Either 0.46MPa (66psi) or 1.8MPa (264psi) or both.
That is not the Glass Transition Temperature (GTT), which is always higher.

The following are my own conclusions from various sources.

Generic PLA
Material: Polylactic Acid (PLA)
HDT = 49C to 52C at 0.46MPa 
Reliable print speed: 60mm/s
Comment: Easy to print with.

ColorFabb nGen
Material: Eastman Amphora™ AM3300
HDT = 71C at 0.46MPa and 63C at 1.8MPa
Reliable print speed: 50mm/s
Comment: Easy to print with. Stronger than PLA but not as strong as PETG or ABS.

ColorFabb XT
Material: Eastman Amphora™ AM1800
HDT = 70C at 0.46MPa and 62C at 1.8MPa
Suggested print speed (mid range): 40mm/s
Comment: I have not tried this. Apparently, another one that is more difficult to print with.

ColorFabb HT
Material: Eastman Amphora™ HT5300
HDT = 
Suggested print speed (mid range): 40mm/s
Comment: I have not tried this. Although tough it is apparently more difficult to print with.

Generic PETG
Material: Polyethylene Terephthalate Glycol (PETG)
HDT = 63C at 1.8Mpa
Reliable print speed: 30mm/s
Comment: Difficult to print with. Strings and blobs easily form and the nozzle gets covered in filament, requiring cleaning.

Generic ABS
Material: Acrylonitrile Butadiene Styrene (ABS)
HDT = 88C to 100C (1.8MPa)
Suggested print speed (mid range): 60mm/s
Comment: I have not used this due to the well documented fumes. I am confident they will, at the very least, irritate me but more likely, cause me harm.


==

Sources:

==

Wednesday 3 June 2020

Bike forks service tool

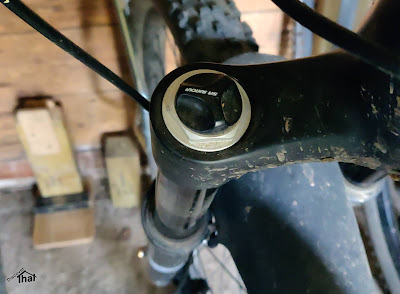
A friend of mine asked if I could 3D print a 24mm socket for his Rockshox forks.
He's been adjusting the air spring behaviour by adding or removing tokens. The regular removal of the air side insert was leaving signs on the anodising. A plastic socket would be less likely to leave a mark and the air side insert is not done up very tight.

Dean sent me a sketch which included some useful features:
  • 19mm hex at the top for a spanner (A 19mm spanner is the largest in a normal set of tools)
  • 8mm hex hole for an Allen key.

It took three prototypes to get a version that printed out neatly and could be easily cleaned up. The main design change was to add a slope at the bottom of the 8mm hex tube so, when printed upside down, that tube did not have supports inside that are tricky to clear out cleanly.


In the process I discovered that Fox use 26mm nuts and Suntour use 27mm, in addition to the 24mm used by Rockshox.


I made a set of three, each with the size printed on them.


The 19mm hex is oversize to be tight in a 19mm spanner. The 8mm is oversize to allow for 3D printed shrinkage and was trial and error to get a tight fit.


We don't know how long they will last. I've printed them in PETG being the strongest plastic I have been able to print with.

PETG is a bit finicky to print with. The slower the better. These are the settings I used this time:
Temperature = 240C
Bed temp = 80C
Infill = 100% (Solid)
Print speed = 30mm/s
Support speed 14mm/s
Travel speed = 90mm/s
Cooling = No fans
Supports = only from the print bed
Adhesion = 8mm brim
These settings are for use with an Ultimaker 2+ printed on to the glass without any adhesion aid.
Each took about 4 hours to print.

PETG tends to stick to the nozzle and sometimes this forms lumps and messes up the layers. If this happens somewhere significant I tend to abort the print and start again.

==