Search This Blog

Thursday 26 September 2019

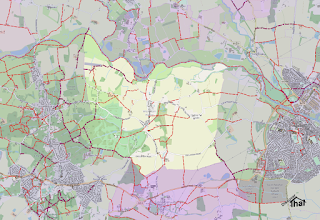
Woodham Walter footpath map

For my own interest I have been working on a map of the village, where I live, and eventually I will extend that to the surrounding areas.


I was surprised at how much good quality mapping data was available to download under open licenses that permit its use.

All of the significant mapping is from the original data sources. This is not a drawn map, it is constructed from the Ordnance Survey (OS) data obtained either directly from OS or via Essex County Council, from the same data used for their online representation of the definitive map.

The coloured background is from an online mapping site, OpenStreetMap.org with the OS data overlaid.

==

Downloads:
High quality PDF version of the footpath map
Copyright and licenses information

==


Wednesday 18 September 2019

QGIS clear cache

This is an odd post to start a new project with, however, it is something I got stuck on.

I have started to use a mapping tool called, QGIS.
This is an excellent, open source, Geographic Information System (GIS). In its simplest form, it is used to create maps.


I am creating an up to date, digital version, of the map of our village showing all the public rights of way.


I'm using, as the base layer, the open source map from https://www.openstreetmap.org. The link to this is built in to the current version 3.8 of QGIS.

The Problem with the Cache

As I've been going along, I've been updating the Open Street Map site with changes. For example, re-routing paths, removing the former shop and changing the phone box in to a defibrillator.
That was the problem. I made the changes, and they appeared online shortly after, but the old images remained on my base layer in QGIS!


It took me ages to trawl through the menus and options until I eventually found the 'Delete Cache' button. It's under, Settings -> Options... -> Network


There's a section for the cache. It's obvious when you know how but searching, on Google and the QGIS help pages, for 'QGIS clear cache' found nothing.

Before I found the button I managed to find the folder and deleted that. It worked, so the map refreshed, and the empty folder is recreated automatically next time you open QGIS. After having used that work round, I managed to find the built in button.

Data Sources

I have found lots of good sources for UK map data, that are free to use. I would like to recognise and thank those providers.
The following offer data that is freely available to download and under licenses that permit their use in most projects:


I have also found other data sources, also released under suitable licenses, that have been useful:


==


Sunday 8 September 2019

New bikes

All the cycling, Shelley has been doing, has inspired me to go out riding myself. That has led to me getting a new bike.


It's the first full suspension bike I have had. So much nicer to ride on the terrain round us, than the hard tail, front suspension only, bike that I have had for the last 14 years.


Shelley has a Merida One-Twenty 7.800, 2015 model year.


I now have a Giant Stance 29er 2, 2020 model year.

I am very pleased with it. We did over 18 miles on Saturday, nearly all off-road. I kept up most of the way but I was struggling with the pace towards the end. A nice ride.


I made a couple of adjustments on Sunday. Most important was a new, more comfortable, saddle. That means more padding.


I shortened the handlebars, from the massive 780mm width down to 720mm.


I fitted a dropper post that my brother, Roy, and I serviced to get it working.
It's all setup ready to go.

==

Dropper Post
Having tried it for a while, I now know I need one with less than 100mm drop. The one fitted has 125mm drop and that makes the saddle way too tall for me.

==

Saturday 7 September 2019

Rockshox Reverb service

My brother, Roy, offered to lend me a dropper post to try out. There was a condition. It needed to be serviced because, at the time, it was not working.


There are plenty of existing online tutorials, including the manufacturers videos, to show you how to carry out the service. Roy had already bought the kit of spare parts. Mainly rubber rings and other seals.

The following are bits of information that would have helped us to know, in advance. We might have known this, if we had read other articles!

Read the list of tools. Do not rely solely on the video.


You will need some specialist tools or some way to do the same thing.

None of them are expensive. The bleed tool is the most difficult to find an alternative to. You need something to block the hole but you also need to be able to release it to make sure nothing leaks out.

The 'oil height' tool is only used to suck out any remaining oil up to a level. A carefully held tube in a syringe would be able to do the job adequately. Just don't suck out too much fluid.

The 'IFP height' tool is also not essential but some correctly fitting metal or hard plastic pipe would be necessary. For the price of the tool, I would recommended to use it.

We did not have the appropriate offset spanners to use with a torque wrench. We used care and a guess, based on experience, of how much to tighten. Erring on the side of not breaking anything.


One tricky job is clamping the inner tube without damaging or marking it. We took it apart, very nervously, with it clamped between two flat blocks of wood.
Before we started the re-assembly, I made my own specialist clamp.


For the inner tube of the piston, it needs a 10mm hole, which I drilled in to some hard wood. I cut through the middle of the hole, along the grain, to form the two halves of the clamp. It works well.


 While I was at it, I added different size holes.


It took a few hours but we got everything done and back together and working, first time.

Having seen it apart, we know that the cause of the post getting stuck, was only the outer tube. In future we would probably carry out a service just to clean up the outer slide. That can be done without any specialist tools and may not need any replacement parts. Only if that does not work, would we buy the kit and service the hydraulics.


Once serviced it is necessary to bleed the shocks. Rockshox have another video to explain that.


I have since, fitted it to the bike.

==


Tubeless bicycle puncture repairs

If there is any advert for using tubeless tyres, it is how easy they are to repair a puncture.

Firstly, I would thoroughly recommend using the goop they put in them to seal small punctures automatically.


Shelley has Stan's No Tubes Tire Sealant in hers. On our ride today we heard a loud hissing and could see the white sealant spraying out. All it took was to rotate the tyre so that gravity brought the sealant down to the hole and the hissing stopped.


Tips:
  • Each tyre needs between about 90ml to 120ml (3oz to 4oz) of Stan's Tire Sealant. That's one and half to two of the small, 2oz (59ml), bottles. I just put two bottles in each tyre and spin the wheel a few times.
  • I've successfully used it to repair a puncture in an inner tube. That only needed one bottle. The tube was still in the tyre on the bike. Quick and easy, get you going fix.

We didn't even have to add any more air. Shelley rode the, nearly, 10 miles home without any ill effects of the puncture.

Since then, I've tried to add some more air and the extra pressure has burst the seal where the puncture is.

That was easily fixed with some tyre repair strips.


It was very easy to use the tool to insert the tiny 'anchovy' style strip in to the hole. About two thirds in and one third out. That can then be cut down, leaving about 3mm protruding.


The puncture was sealed immediately and I was able to pump it up to a much higher pressure than needed.


I thoroughly recommend carrying this type of repair kit. The Genuine Innovations kit, I have, uses butyl rubber rope strips. Sometimes called 'anchovies', sometimes called 'strips of bacon'. That are sticky and inserted in to the tyre as they are without messing about with anything else. There is a refill kit available.

==