Search This Blog

Tuesday 28 March 2017

AmazonDrive review

UPDATE: November 2020

Amazon Drive no longer works with Synology Cloud Sync.
I don't know the details but my understanding is that this is something Amazon have prohibited.

==

ARCHIVE:


It's very early days but I have so far been very impressed by AmazonDrive. So much so that it has made me want to write a few comments.

Firstly I need to be clear about my usage, as that may determine if what I say is helpful to you or not applicable.

I want a way to backup the contents of my Synology NAS to the cloud automatically. I do not want any process running on a PC to facilitate that. It must be a direct NAS to cloud file copy.

The true backup providers, like HiDrive, that support NAS backups, are too expensive for the amount of data I want to store. I therefore have to use a consumer cloud storage synchronisation solution. There are several available, Microsoft OneDrive, Box, Dropbox, Google Drive and of course AmazonDrive that I have just started to use. There are others but I don't know enough about them to consider using them.


The most important data that I want to protect are our irreplaceable photos. We have getting on for nearly 20 years of photos in digital form, taking up over 800GB at the moment and currently growing by over 200GB per year!

I thought I had a solution in OneDrive because, a couple of years' ago, they offered unlimited cloud storage and I specifically took out OneDrive then, for this very purpose. I knew Microsoft had stopped that offer but I had stupidly assumed that Microsoft would honour their contract and retain unlimited space for those existing customers.

I was wrong, Microsoft have now started to cull drives over 1TB. They claimed customers were abusing the available storage space but if you offer unlimited, people are going to take you at your word. Don't blame customers for selecting the best value product for their needs!

I am just on the cusp of the terabyte that Microsoft have limited us to but in a month or two I would easily be over that storage limit! I can be as annoyed as I like with Microsoft but I can't see that getting me my storage back. I therefore have to find an alternative.

Of the providers listed above, at this moment in time, only Amazon offers an unlimited or large capacity solution at a price I am prepared to pay and that I can use directly from my NAS box.

I have signed up for the free trial of AmazonDrive that will continue on to the paid solution in three months' time.


I am most interested in the NAS synchronisation and the web client. I specifically do not want a desktop client that synchronises to my hard drive. I have nearly a terabyte of data in the cloud and only a 256GB SSD on my laptop. Microsoft OneDrive is a pain, being automatically installed and linking to the cloud automatically. Even when I set the client to online files only, the local directory information for the thousands of files I have online, takes up a large chunk of the local hard drive!

With AmazonDrive I can opt not to use the client at all.


The web client supports drag and drop file, and more importantly for my initial setup, folder upload.
It is a clean interface with just the options I need.

The Synology client for AmazonDrive is part of the same tool used for OneDrive and Google Drive etc..


So far AmazonDrive has worked well. It does not have all the sort and view options of some of the others and does not have any online editing, as far as I can tell but for pure storage and ease of use, it suits what I need it for.

==
Update:
I used a cloud storage aggregator to help with the transfer of the data.

Sunday 26 March 2017

Drainage trench

About 18 months ago I dug a trench and laid a 4" (110mm) drain pipe underground along the back of the stables.


This was the end of the run of pipe intended to get the water away from the main stable tap.

I knew how hard it was digging through the gravel, concrete remnants and clay soil. I was not keen to start the remaining part of the job.

Unfortunately, the water that pooled under the tap by the stables was not soaking away and no amount of digging by Shelley cleared the water. The drainage job needed doing now.


We called in help by way of Steve 'The Dig,' who we had met a few weeks before. With him doing most of the digging we got two drains in and the pipe connected up in a day.


The water pipes under the tap restricted where we could get the drain.


We used a joiner and a short extension to get it as close as possible.


There was a lot more concrete path to break than I knew about but we got through that with a combination of SDS breaker and a sledge hammer.


I learnt a lot from the expert. Things like: using the spade upside down to break away small amounts of soil, don't try to get too much up at once and dig the whole length working down a small layer at a time.


The day after I made a rubber mat to direct the water in to the drain.


Hard work but satisfying now it's done.

==
Update: 1 April 2017


I've extended the rubber so that more water gets in to the drain rather than going on to the gravel. It's also more comfortable to stand on.

==
Update: 8 April 2017
Extended the trench by two metres to finish the planned run.

Wednesday 22 March 2017

Fix sunroof drain

With the headlining removed I can hopefully see where the water is getting in. I have already posted a part 1 and a part 2 about removing the headlining.

By pouring water in the sunroof gully I already knew water was escaping the right hand drivers side drain.


Three out of the four drains feel secure...


I think it is obvious from the photo that the one above the drivers head is not right!


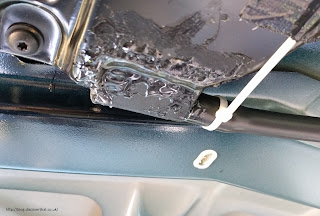
As you can see in the pictures it has snapped off.

I did attempt to get the whole plastic corner out to do a better repair but as far as I can tell the corner is inserted from the outside and it would require a lot of the sunroof to be dismantled to be able to extract it.

I decided I could do a good repair without removing it.


I cleaned off the previous sealant and as much of the original glue that I could. I used isopropyl alcohol to make sure the surfaces were clean and once that had evaporated I stuffed as much adhesive as I could in and over the joint. I'm using a two part epoxy.


To join the end back on I've fashioned a thin lip to align the pipe and hold it in place. The lip has a larger surface area for the adhesive. I've just used the thinnest plastic packaging I could find and super (CA) glued it inside the still inserted pipe joiner. I used a bradawl to push the inside tightly up against the pipe.


Once the collar was set in place, I used more super glue round that and on the rubber to put it back where it belonged.

The glue is deliberately the type that has some body and will fill small gaps.

I just held it in place by hand until I was sure it could take its own weight. I'm well practiced at avoiding sticking my fingers to things. If in doubt I wear some thin gloves or hold it with a tissue.


I'll leave it to dry a few days.


To avoid the glue getting wet too soon I have temporarily sealed up the sunroof.


I'm not sure if it will help or perhaps make it worse but I have taped the drain pipes to the ceiling so they are, hopefully, putting less strain on the joint.


I've also put windscreen sealant round all of the drain corners covering the rubber pipe joint. I hope that will add some additional strength. I will do the same to the repaired one once the adhesives have had a good chance to fully cure.

I think the windscreen sealant is a better choice than a silicone sealant. The specialist windscreen sealants are better adhesives. They hold car windows in place.

I'm pleased with the drain repair, unfortunately I already know that the drain was not the only place water is getting in.


I have not had a chance to track down where the remaining drips are getting in but I suspect one of the left hand, passenger side, roof bar bolts. I need another day to test that theory.

Tuesday 21 March 2017

Discovery 2 Interior Upper Reference Photos

While I had the trim removed I took some pictures to show the cable runs that are normally out of sight above the headlining.