Search This Blog

Showing posts with label Giant Bikes. Show all posts

Wednesday, 2 March 2022

Giant Trance 2017 components

I've started another bike build. Yet again, I've gone for a Giant Trance frame but a newer generation. This one is a 2017 frame which has the latest geometry. I've just got to the stage of taking the frame apart and have created a document to record all the parts.


==

Download the diagrams as a PDF.

==


Sunday, 23 May 2021

Giant Trance X 29er 2013 components

Whilst helping my brother replace the pivot bearings in his two mountain bikes, I made a note of the components and produced these diagrams.


==

Download the diagrams as a PDF.

==


Monday, 29 March 2021

Bike build - Part 6

This morning, I did one of the jobs that I find the most nerve-racking!


Applying the Decals


I bought a readily available vinyl set. These can be found on eBay, for many popular bike brands, in a choice of colours. I have gone for Gun Metal Grey.


I was thankful about how easy they were to apply. The clear supporting laying is a big help.


Where the chainstay protector fits, I needed to align the brand with the gap in the rubber cover.


I glued down the chainstay protector. I'm not entirely sure about my choice of adhesive. I'm sure it will be strong enough but it's a lot messier than I would have liked. I'm going to have some cleaning up to do once it's had a chance to set.


The other logos went on fairly easily. I just had to get them central.


As a finishing touch, I had some vinyl year and sizing stickers produced. 

I purchased these from an eBay advert that offered better quality materials and equipment. The advert is for a single logo produced lots of times. It was the most cost effective way I could find of getting what I wanted but I expected to have to cut out the different types of sticker myself. However, the supplier contacted me to say that the artwork I had supplied him made it easy to setup the machine to cut out each individual sticker. At no extra cost he kindly did this.


I would thoroughly recommend them.


I took the opportunity to include some of my own branding.

The artwork was created, to scale, as a vector graphic using Inkscape and saved as a PDF.


==

Bike build - Next instalment

Bike build - Previous instalment

Bike build - Part 1

==


Sunday, 28 March 2021

Bike build - Part 5

Tyres

I'm not sure putting tyres on the wheels really counts as being part of the bike build but as it is essential, I thought I'd include it.


I've selected the same tyres and wheels that we have on other bikes and I have some tips, in another article, about fitting them.


All our mountain bike tyres are setup as tubeless.


The Schwalbe, Hans Dampf, tyres need a lot of effort to get them on the rim.


I like Hope Fortus wheels. Their Pro 4 hub just feels and moves as a quality component should. The 26mm rim size suits the 2.35" width tyres that I like to run.


==

Bike build - Next instalment

Bike build - Previous instalment

Bike build - Part 1

==


Saturday, 27 March 2021

Bike build - Part 4

Bits

The last part that I needed arrived today.

The Covid-19 pandemic has made getting bike parts a little hit and miss.


I had no trouble getting the rear wheel I wanted but finding somewhere with stock of the matching front Hope Fortus 26 wheel with a black hub, took me a couple of weeks.


I have a box of bits destined to go on the bike.


I've been cleaning parts as I go. Silicone oil is not much of a cleaning agent but leaves a very shiny finish on most things and tends to stop dirt sticking. I have made sure that I have not got any of it on surfaces that I will need to stick something to in the future.

Forks

The plan for today's job was to fit the forks.


I grease all the moving parts.


I've left the steerer tube at the length it was, for the time being. Once I've ridden it a few times I'm fairly confident I'll cut that down a bit.


The forks are now fitted.


I reused the Giant branded top cover to the FSA headset. I swapped the old rubber seals with the new ones.

Brakes

With the handlebars fitted I could run the brake hoses and fit the brakes.


The front forks are SR Suntour Aion 35 (E45). They have post mounts already sized for 180mm disc rotors. 

The rear mounts on the frame are sized for 160mm rotors but I am fitting 180mm front and rear. Therefore I needed to fit a spacer on the rear calliper mount. The Shimano adapters are sold for the front mount but, at least on Giant Trance's, those same adapters are also used on the rear mounts.


I bled the brakes. Typically instructions say to rotate the levers so the bleed port is uppermost but I think rotating the whole bike makes the hoses face more up hill. Better for bleeding.


The brakes are now fitted and ready to go.

==

Bike build - Next instalment

Bike build - Previous instalment

Bike build - Part 1

==


Wednesday, 24 March 2021

Bike build - Part 3

I've got quiet a few things done on the bike build in the last couple of days.

Fitting the Bearings

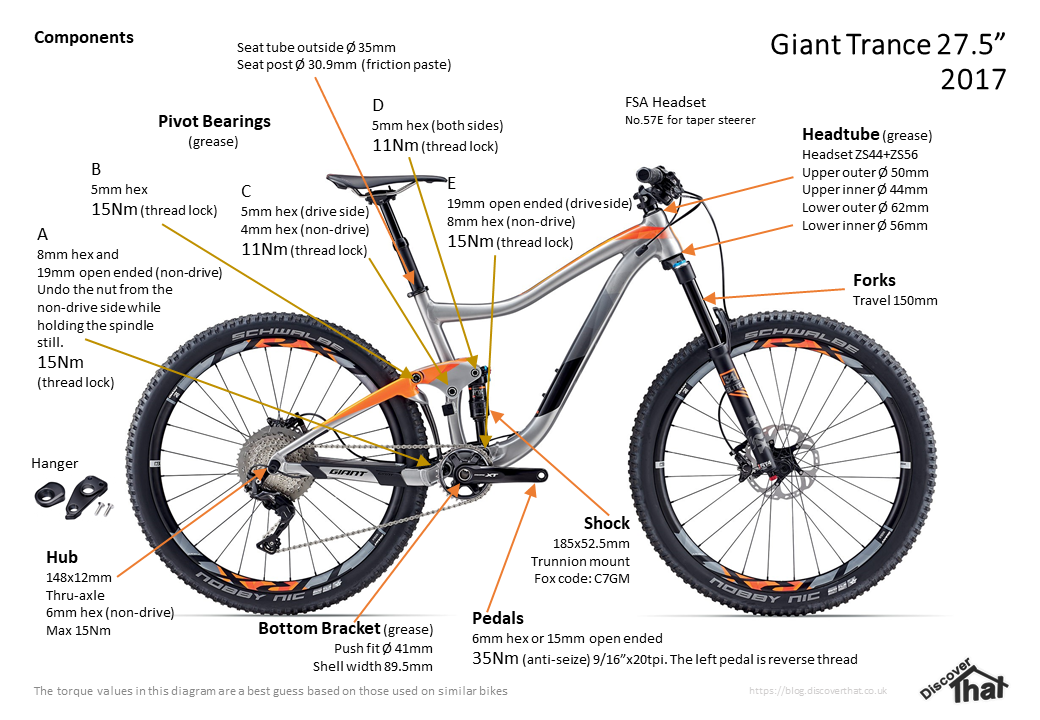
Now that the paint is hard enough to handle, without risking damage, I've started reassembling the bike. The first job was to fit new pivot bearings. I'd taken detailed notes of which bearings fit where.


I've done this job on another bike and my big tip is to buy the correct bearing press tools. I have a set that covers all but one of the bearings that I have and by reversing one adapter, it does a pretty good job on that last bearing size too.


I've used the common method to make fitting easier. I put the bearing in the freezer overnight and used a heat gun to warm up the cups on the frame. All the bearings went in easily and completely square.


I heated up the frame with a hot air gun.


I checked, by looking from the reverse, that they had gone fully in to their sockets.


Headset

Finding the right size tool for any given headset is difficult and needs a bit of luck.  I do have a selection of large bearing press tools and have to use the one that is the closest fit. 


I took a photo of the headset, to remind me of the order the parts fit.


Same as the bearings, I put the headset in the freezer overnight and heated the headtube before fitting. It was troublesome but eventually the headset cups went in square.


I did the lower cup first. I checked that there was no gap anywhere between the headset and the head tube.


The upper cup was much easier.


It looks a lot neater with the headset cups in place.

Assemble the Suspension

I had taken careful notes when taking the suspension apart so it was a fairly easy job to bolt it back together. 


I greased all the bearings and the spindles.


I cleaned all the threads and applied thread lock.


Cables

I had a little bit of time left before I needed to go back to my desk, so I threaded a couple of the cables.


Getting the dropper post cable in is nearly impossible with the bottom bracket in place so I made sure I did that one first, before I forgot.


Getting the dropper post cable the correct side of the pivot through the seat tube, gives a tiny bit more depth for the dropper post to be inserted. 


A bent bit of wire helped to extract the end of the gear cable.


A last quick job, for today, was to add the hanger and associated metalwork.


It's starting to come together.


==

Bike build - Next instalment

Bike build - Previous instalment

Bike build - Part 1

==