Search This Blog

Showing posts with label Bumper. Show all posts

Saturday, 3 September 2016

Raptor bumpers

It's taken a few days work but I have coated the previously rusting TP4x4 heavy duty bumpers in U-POL Raptor load bed liner.


When I fitted the bumpers I wrote about how I did that. Initially the front and then a couple of months' later the matching rear bumper.

They have been on the car since August 2014. Barely 2 years and the useless powder coat on the bumpers was peeling off in sheets and the exposed metal was rusting very efficiently. I've never had any luck with anything on a car that was powder coated.

Out of line and rusty


I would have preferred to have the bumpers sand blasted but the dates that the companies could do that did not suit when I would be available to do the rest of the work. The compromise was to clean off as much of the powder coat as possible with scrapers, wire brushes and sanding. Then treat the rust.


I made the job of taking the front bumper off easier by constructing a stand to help hold it.


I had some Dinitrol rust converter and primer so I used that to treat the rust. It was easy to use and appears to have done an effective job.

The usual thing that makes most jobs longer is waiting for things to dry. I left a day between the primer and the U-POL Raptor. Then a day before fitting.

The U-POL Raptor was touch dry in less than an hour and I would have been confident fitting the bumpers the same day but it was nearly evening by the time I was ready so I waited until the next day.

The U-POL Raptor was excellent to use. I was very impressed by how easy the manufacturers had made it for me to prepare it. The bottles have a level marker for the hardener and another if you are mixing a colour. I had the black, so I only needed the hardener. You add it to the level and just shake. I used a Schutz underbody seal spray gun because the bottles of Raptor are designed to fit that.

Just as a side comment here, for years I've struggled with wearing glasses and a filter mask at the same time.

3M 7501=small, 7502=medium, 7503=large

Easy to use neck catch

I now have a 3M 7501 mask and this fits me while wearing my glasses without any problems. I'd go so far as to say it's comfortable. Not only that but the straps are so easy to put on and take off.


Back to the job. I probably spent as much time cleaning the spray gun as I did spraying. I used Acetone to clean everything and it worked well. I can hardly tell the Schutz gun has been used.

Sprayed at about 65psi

I did two coats of Raptor. One bottle did one coat on the pair of bumpers so I used two bottles in all. I am very pleased with the results.

As I had the rear bumper off I took the opportunity to make some different spacers.

Slightly angled 60 to 65mm long, 50 x 25mm box section

Offer up

Cut to fit round the rear light frame


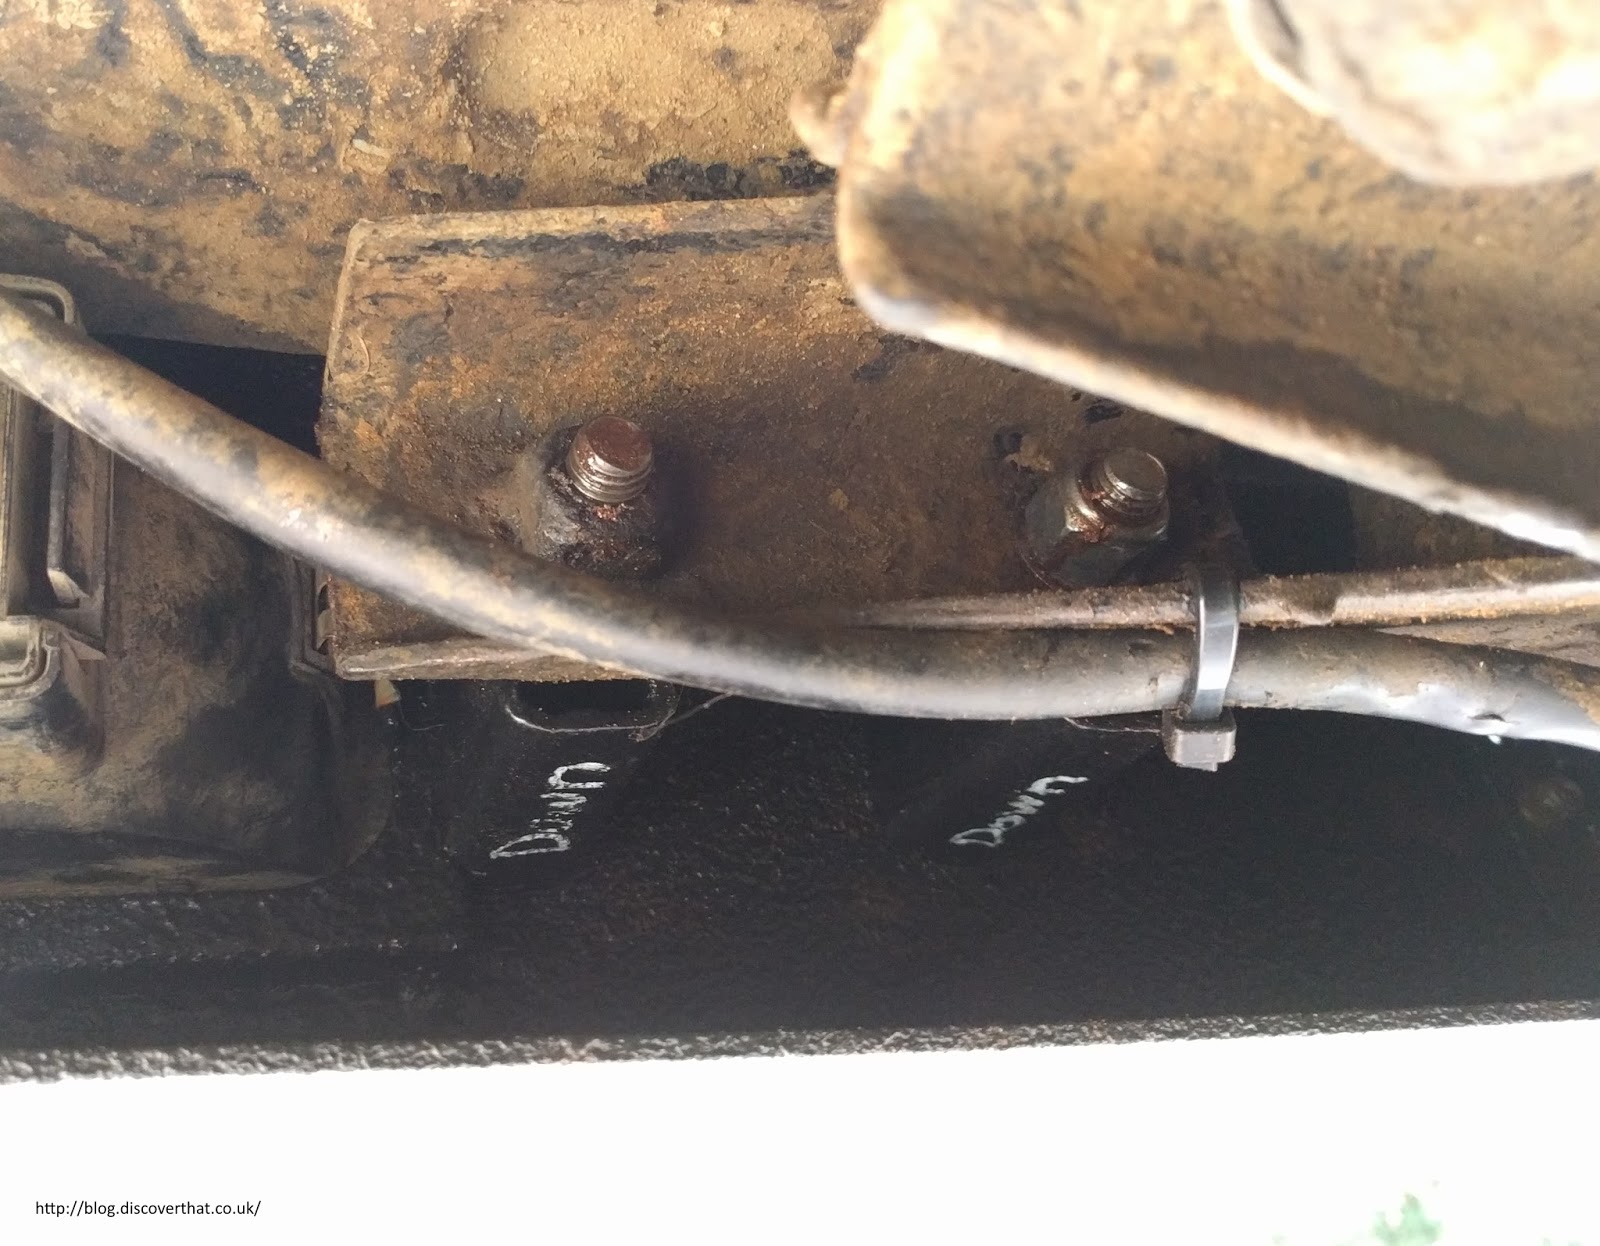
Rear bumper mounting bolts from behind

Lines up with the bodywork

The original spacers crushed too easily and held the bumper at the wrong angle. I made mine out of box section steel with an angled face. I padded inside the top with some scrap copper pipe so they rested about half way above the bolts when fitted. Even though I say so myself, I think mine work much better than those supplied with the rear bumper.


Sprayed the washer bottle black

Fit the towing electrics before fitting the rear bumper
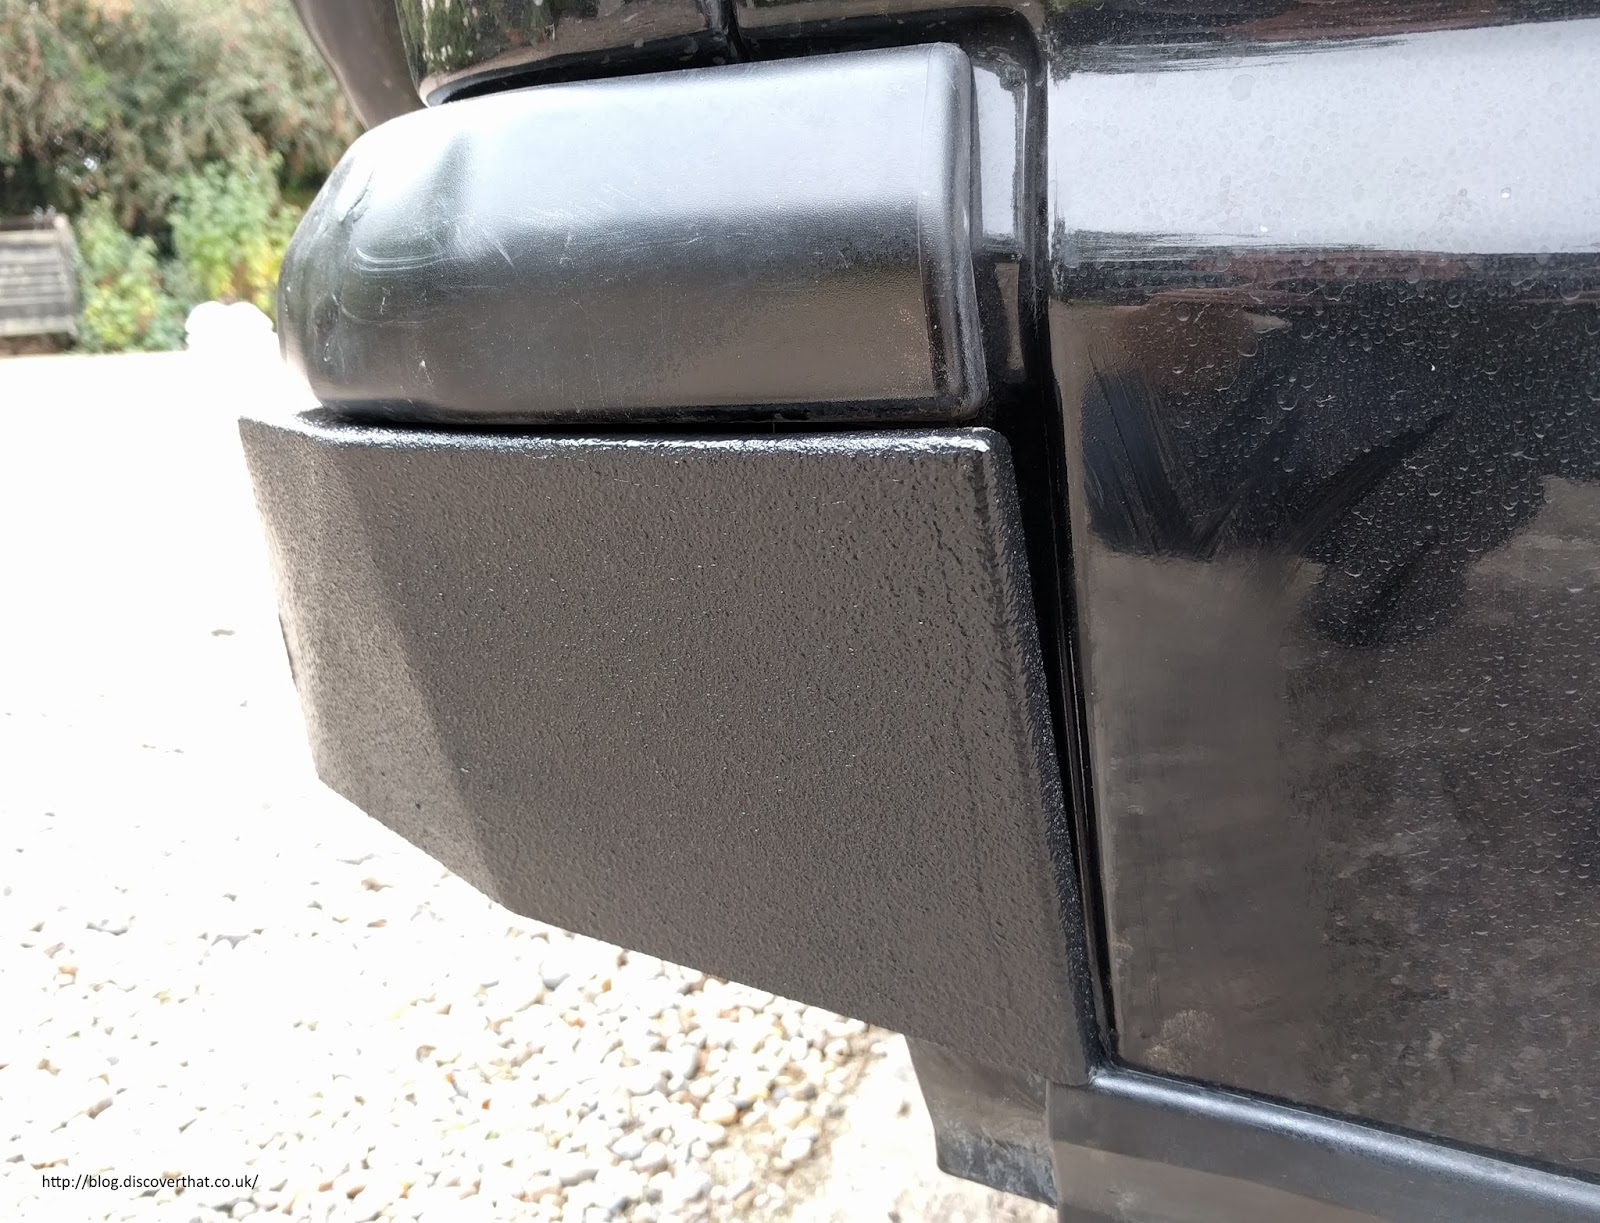
Textured surface


The surface finish looks excellent and feels very strong. I have high hopes that it will last well.

==

Where to buy?
If you plan to buy any of the things mentioned on this page, here's a few places to start looking:
U-Pol Raptor load bed liner
Dinitrol rust converter and primer
3M 7500 series mask
3M 6055 vapour filters to fit 7500 series and other 3M masks
Schutz spray gun

==

Follow-up Dec 2016:
Because of this blog I've exchanged a good few messages with Craig, the owner of Buzzweld. They do some competitive alternatives as well as Raptor.
I can't comment on their products yet but just on the enthusiasm and knowledge of what I want from these things, I'm going to try some of them out and I'll post my findings.

Sunday, 28 September 2014

Matching Rear Bumper Fitting

Shelley has wanted me to get a rear bumper that matches the front heavy duty bumper ever since I fitted the front one.


The damage caused by our earlier off-road trip has forced the issue.  At the LRO Show in Peterborough the other weekend I finally selected one I liked.  After a lot of back and forth I selected the Torque Performance (TP4x4) one.  That is the same make as the front bumper I have.


One of the reasons I liked it was because it looked easy to fit. The other bumpers available used two of the towbar bolts but this one uses two spare holes near the existing bumper mounts.

The people on the stand did mention that it needed some body work cutting to finish the job but a bit more on that towards the end.

Removing the existing bumper is easy.  I won't repeat myself too much as the removal details are shown on my post about fitting a tow bar.

In summary:
  • Remove the rear bumper lights
  • Disconnect the light and reversing sensor cabling
  • Undo two bolts
The old bumper should now be off.


I then tidied up the now redundant reversing sensor connector with a bit of tape and cable ties.


With the TP4x4 bumper the plastic sill cover is not used.  The new bumper overlaps the chassis and does not need and will not fit with the cover in place.


This is held in with trim clips which need to have the centres pushed through and the clips pulled out of the body.


With that out of the way the bumper can be bolted in.  But STOP!


If you want to fit towbar electrics to the inset mounting on the bumper do that BEFORE fitting the bumper.  Once the bumper is on the car you cannot get behind to get the towbar socket bolted in!  Guess how I found that out!


Back to fitting the bumper.

There are two spacers one either side.  The bolt passes through the bumper, through one of the bolt holes in a spacer and in to the original threaded bumper mounting hole.  I spray painted the bolt heads black to match the bumper before fitting.


Attach both of the bolts in to the threaded holes first but do not tighten.  You need a little bit of free play to get the other bolts through their holes.  Fix those with the washer and nut.

Tighten them all up.  I assumed a torque setting of 45Nm as per the original bumper bolts.  This very slightly indented the metal so perhaps a little less torque might be better.

[Update: see my newer post in September 2016 where I make my own spacers that I think work better.]

Connect up the lights and clip them back in and the bumper is on and ready to go.


As you can see from the photo, the line of the bodywork does not meet up with the bumper.  My intention was to do as the person from Torque Performance had suggested and trim the body work back to the wheel arch in line with the bumper.

So far I have not done that.  The step looks fine and the only thing I think it needs is some form of plastic end cap to finish off the trim.  If you don't have a towbar then trimming the rear panel will give you a better departure angle but it will make little difference for me.  I may still trim it but at the moment I am happy with the result.

==

Update September 2016: The powder coat had fallen off and the bumpers rusting so I have cleaned them up and coated in U-POL Raptor load bed liner.

Monday, 4 August 2014

Discovery 2 Fitting A Bumper

It's been a bit of a Land Rover couple of weeks.  I've spent a lot of time under or in our Discovery 2.

On Saturday I fitted the heavy duty bumper and steering guard that I ordered from Torque Performance.  I spent ages looking round for a bumper that looked good and provided the strength I wanted for off-road use.

I want a car to use off-road but I also only want one car so it needs to look nice as well.

This shows the end result.


Torque Performance made it and were ready to ship in about a week. I had to delay things because I needed a Saturday delivery.


I started removing the old bumper about 9am and worked all day.  I had tidied up all my tools and was back in doors at about 7:30pm.  I think most people could do it quicker than that but I stop to take a lot of photos as I go plus the odd distraction.


The steering guard does not come with any instructions for fitting so I had to work that out but luckily removing the old bumper is covered by the Discovery 2 Accessory fitting guide.  Page 152 covers fitting a light bar which includes removing the bumper.  This is handy because before I read that I had a completely different expectation of where the bolts would be.

Removing the bumper should be a fairly easy job but as always the problem is removing stubborn screws.

The screws holding the wheel arch liner were the most difficult.  6 out of 7 on each side were easy, one  I had to drill out and one unbolted from the wheel arch instead of unscrewing from the liner.

Once the liners are removed, you can easily see the bumper bolts.

It is worth knowing that the side studs run in a slot, so the nuts only need to be loosened rather than fully removed.


I also removed the grill but that was because I was replacing it with a pimped version.


There are a few cables and the headlight washer pipe to disconnect but the removal is fairly easy.  I did the entire job on my own, supporting the bumper on timber, so it did not drop.


Once the bumper is off the crush cans can be removed from the end of the chassis as these are not used by the new bumper.


The heavy duty bumper does not provide positions for the washer jets.  These are too easily damaged for off road use so I am glad to get rid of them. I was not sure how to seal off the pipe.  I did not have anything suitable to block the tube, so I opted for clogging up the washer pump with mastic and refitting.  Some people might not like the idea of deliberately ruining a perfectly serviceable component but I had no further use for it, except to block the hole.  I also disconnected the cables and taped up the connectors.


Now I was ready to start fitting the new bits.  The first fitting job was the steering guard.  This was the hardest job.  It fits using two of the steering box bolts on the drivers side (UK right hand drive) and an existing hole in the chassis on the passenger side.


The hole on the passenger side is covered by a plastic liner.  Although the three screws are easy to remove, forcing the liner out of the way is tricky.  With a bit of bending it is possible to get it out and back in again.  The liner needs to be cut round the nut to get it back in.


The steering guard is heavy and awkward.  The bracket is a tight fit for the chassis and it has to go under the anti roll bar and over the track rod.  I used a trolley jack to support it while I aligned it.  I had a bit of a delay at this point because I didn't want to remove the steering box bolts until I knew what torque setting was needed to put the bolts back.  Eventually I found it in the Haynes manual which stated 90Nm.


For mounting at the chassis end, Paul at Torque Performance, gave me a pointer on the phone when  I placed the order.  He said slip the bolts part way in through the steering guard holes, then offer up the bumper and push the bolts through to support the bumper.


There is a lot of allowance for variations in Land Rover sizes and for other accessories so the steering guard needs bending slightly to get enough bolt to stick through to fit the nut on.  I used a G clamp just for a moment to get the nuts on.

The bumper has huge slots so it was easy to just slip the bolts in at any position and then adjust to the desired height and angle when tightening the nuts.  I could have done with some thick oversized washers as the slots are quite wide.  I did not have any to hand but may retro fit some another day.


I used some 6mm timber to make sure the gap was even round the bumper.  From then on it's all plain sailing to finish the job.


The lamp bar is extra but easy to fit with three allen bolts on either side. I did have to file down a washer to make it fit as the hole was close to the bumper bracket.


I fitted the number plate with steel bolts and number plate stickers just to be sure.  This whole renewed interest started when we forded some deep water that washed the number plate off early in the year.

It was a busy weekend and there will be a couple more blogs on what I changed next on the Discovery.

==

Updates:

October 2014: I now also have the matching rear bumper.

September 2016: The powder coat had fallen off and the bumpers rusting so I have cleaned them up and coated in U-POL Raptor load bed liner.