Search This Blog

Monday 31 August 2015

Vacuum form windows

I used my home made vacuum forming setup yesterday to create the first draft of the windows for my Land Rover Discovery model.


The use of the kitchen oven and the remnants of the plastic smell afterwards had not go down well after I first tested my vacuum forming machines so before I did any more I spent just under £11 on a single ring electric hob. This is my first use of that hob. It's only 1500W but is more than hot enough to melt the plastic for vacuum forming.


I am much happier with the whole process being in the shed.

I didn't quite heat the plastic up for long enough yesterday but it was sufficient to get most of the mould covered. In future I think it needs to have drooped by at least 15mm before taking off the heat.


Trimmed up, I fitted it to check alignment. The front windows all fitted perfectly but towards the rear they are a fraction out.


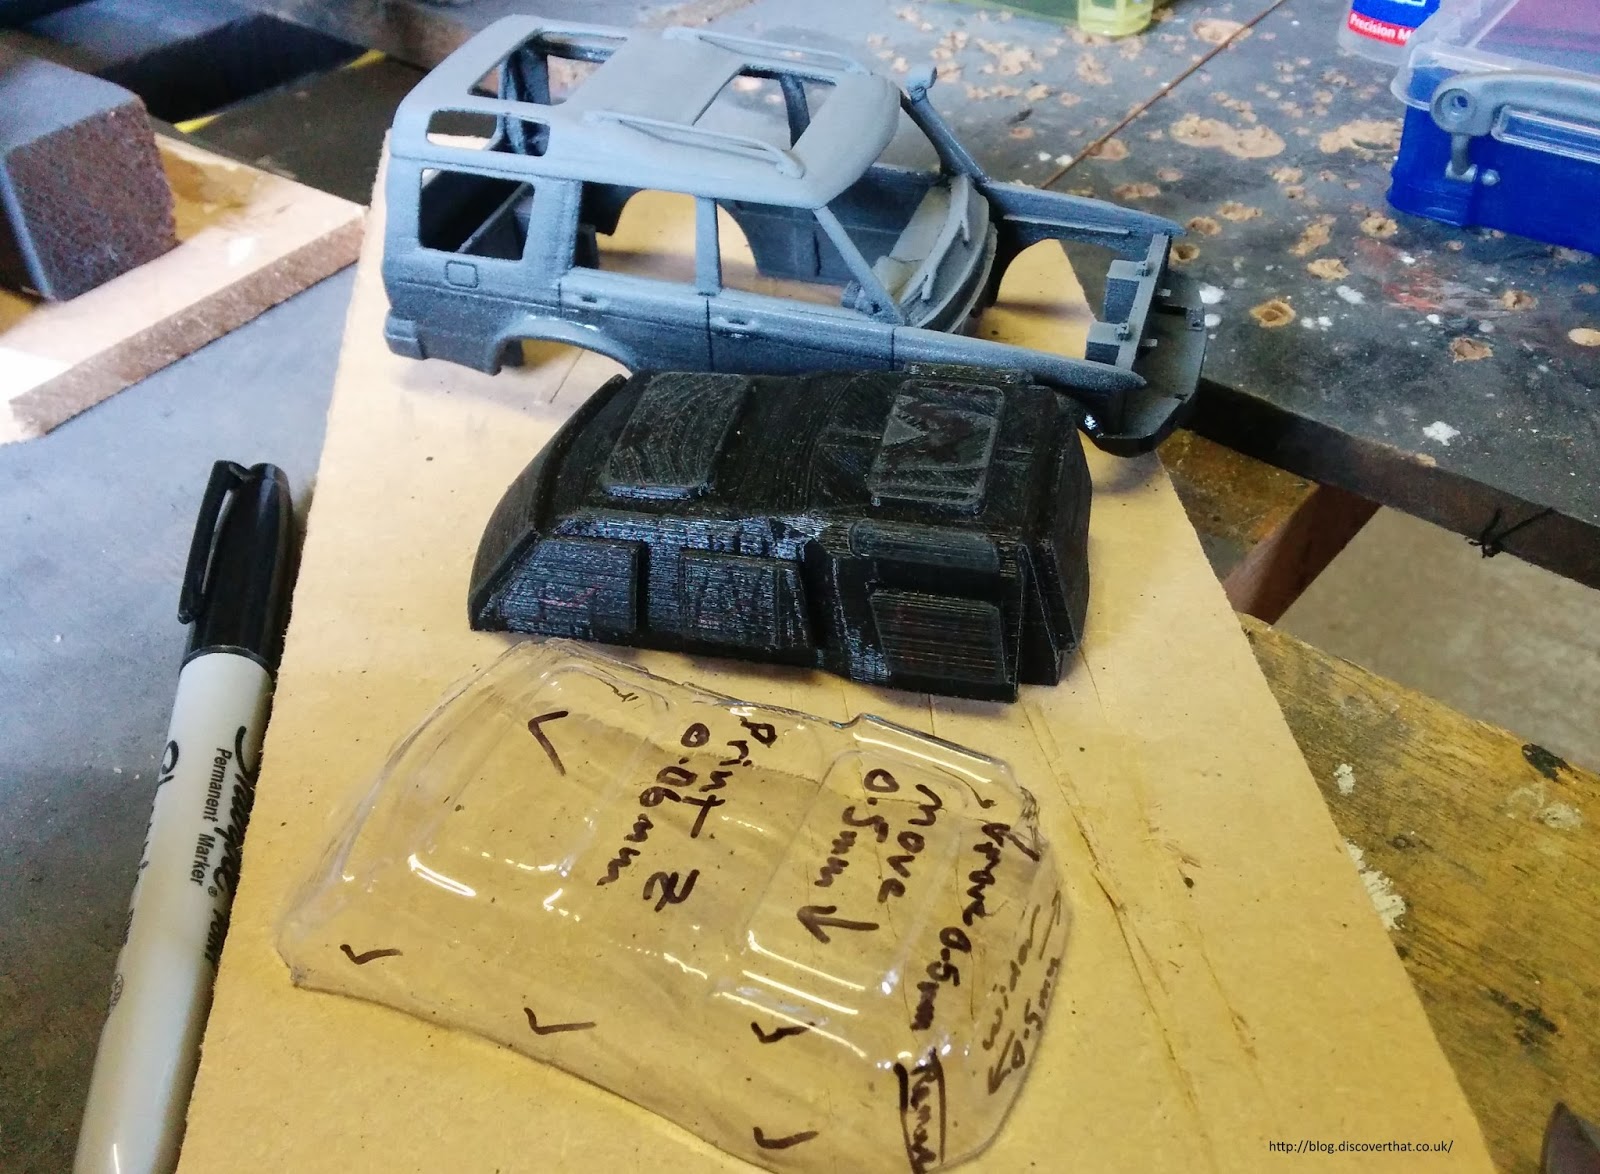
I marked up the changes needed and adjusted the 3D model. I have increased the resolution to the best for my printer which is down to a Z height of only 0.06mm however that means the mould will take 12 hours to print.


I also vacuum formed the head lamps glass and I've offered them up. With a bit of trimming they fit as intended.


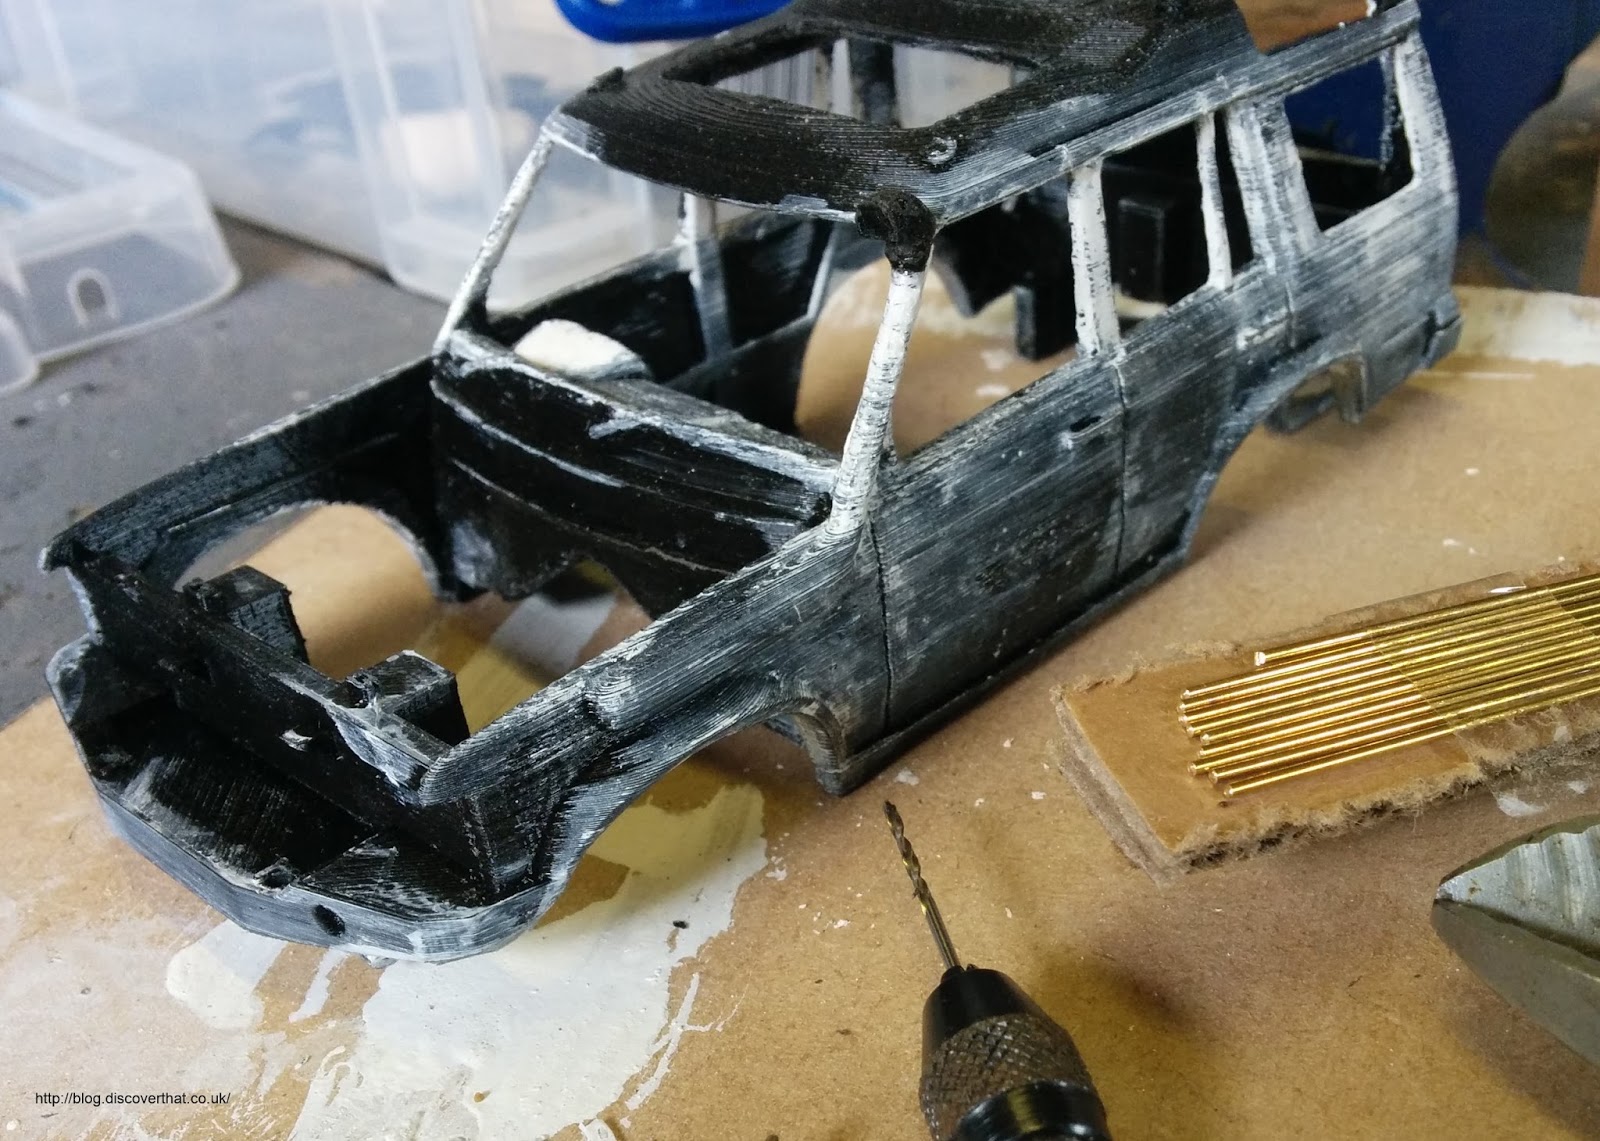
In both cases the lines from the 3D print were visible in the finished components so I am going to sand down the next moulds to have a better finish.


Talking of sanding down. I've probably done as much as I can without too much detail being lost so now the body just needs a final top coat of paint.

Tuesday 25 August 2015

Smoothing progress

Most of the time since printing the car body shell has been spraying layers of high build primer or paint and sanding it back down.

First off, I offered up all the parts and trimmed them to fit where necessary. Then glued on the roof.


I wanted the roof on fairly soon because it gives the thin pillars a lot of extra strength.


I used Milliput to fill the fine edges round the windows and rear lights.  This is where the rows of melted plastic from the 3D printing process end and are most visible. I also fitted the top of the raised air intake using a small hole and a brass dowel to keep it in line.


I built up the paint with three thin layers at a time, wait 24 hours then sand down and repeat. I've done that twice with the high build primer and once with gloss black paint. The trouble is I am now starting to loose some of the fine detail.


I will probably reprint the bonnet, as it is still separate, because the bulge detail has been completely lost after sanding. I will also print it at a smaller Z thickness. I deliberately printed the body at 0.12mm to minimise the number of lines on the vertical surfaces however I used the same settings on the horizontal roof and bonnet not thinking that this would leave noticeable steps. My printer can go down as thin as 0.06mm layer thickness, so I will try that on the bonnet.


The paint plus the Milliput made the already oversize mullion on the rear passenger window a bit too prominent. I decided to cut this off and add it back as a fine painted line on the windows.


Before finishing the painting I've added the roof bars. I left the stub ends of the bars on the 3D print attached to the roof with a groove for the brass rod.  After sanding little of that is left. It would have been easier and stronger to have a smooth roof and fit the brass rod for the roof bars in to holes. Either way I'm still going to have to form the ends from glue or Milliput or both.

Summary of lessons learned:
- Exaggerate the depth of any fine details so they are still visible after sanding.
- Don't try to add fine window mullions, just paint those on to the glass.
- Don't include tiny details that could be molded with Milliput or fitted afterwards.
- 3D Print curved near horizontal surfaces with as fine a detail as possible (Z = 0.06mm.)


Monday 17 August 2015

Printed at last

Ever since I printed and assembled the prototype of my Discovery slot car, I have been trying to print another version.

Prototype

I've made a few changes to make it fit the chassis better and to be able to fit an interior plus a few other minor cosmetic changes like increasing the door gaps.


The main significant visible change was adding the raised air intake.


Every print failed. However after enough fails to convince me it was not entirely the printers fault I took a closer look at the failures.

They had all failed in one of two places.

The first was at window height and the other by far the more common was half way up the doors.
Both faults coincided with changes I have made to the model!

At the window height it looked like it was running out of filament. I concluded that the tiny little blobs of plastic that form the pillars was not enough to keep a good feed flowing.  I added back the window support structure that I had deliberately thinned out to make cleaning up easier.


It's mainly a thin solid sheet as shown in orange in the above image.

The second fault, of which I have at least four stringy messes, was at the height of a little bar I had added to fill the gap between the doors and the interior floor panel that would be glued in.


I had originally included a simple rectangular step, where the blue section is shown in the above image. It only sticks out by about 1mm but I guess that was enough to weaken the model and cause it to split at that point. The model looked like the head had touched the work and broken the bond with the glass bed. From then on, it was all wrong, probably freely sliding about as it printed!


I fixed this in several ways. I changed the rectangular bar to have a long sloped lead in and I reduced the thickness so it only just overlapped with the inner door panel. That last bit was in the hope it would change the path of the head. On the print settings I used a raft, instead of a brim to give it even more adhesion.


The areas in blue in the above image are structural additions. They are bits that are needed to make it in to a slot car or to join the separate parts of the model together.

The parts shown in yellow are supports needed to be able to 3D print it. They have to be trimmed off to complete the finished model. These are in addition to the automatic support structures that can be added by the Ultimaker Cura software.


I used the following printer settings in Cura 15.04:
Layer height = 0.12mm
Border width = 0.8mm
Speed = 40mm/s
Support = From the build plate
Adhesion = Raft

I'm using ColorFabb PLA/PHA filament at a temperature of 210C on my Ultimaker 2 printer.


I am very happy to have another finished print of the Discovery shell.

Sunday 16 August 2015

High Build Experiments

The raw 3D prints are made up of thin layers which are visible on the finished print.


A car's body work is not normally covered in lines so I've started some experiments to find a way to clean them up.

First trials are with High Build primer.

I have lots of failed prints so plenty of body panels to try out various methods.


I started with 3 layers of high build primer. As per the instructions on the side of the can. Each coat about five minutes apart.

High tech way to keep the dust off

I let it dry for a day then sanded it down. I'm experimenting with 3 different sanding methods.


By feel the hand sanded method, on the rear panel in the above photo, has worked best.

The cylinder sander, used on the front door, is too rough and takes off the detail too easily. The disc sander, used on the top of the front wing, works OK but it is difficult to follow the contours. I have left the rear door un-sanded to see how the high build primer works on its own.

The PLA/PHA plastic is surprisingly easy to sand by hand and the result feels and looks best.


I've given it another 3 thin coats of the high build primer and all the detail is still clearly visible. Tomorrow I'll have another look.

==

Edit: 18 August 2015

I've added a top coat of gloss to show up any imperfections.


The photos show that hand sanding the high build primer can produced a good finish without loosing too much detail. The panel round the fuel filler cover, shown in the above image, was hand sanded in the direction of the grain, along the print lines. That looks good to me.


The panel under the filler cover was sanded against the grain.  You can see a slight roughness. I suspect this is caused by, what I call, furry plastic. It does not sand cleanly.

Areas like the vertical edges round the lamp housings and the pillars will need some filler and extra work to get a crisp edge.

I'm pleased that the results of the experiments have given me a straight forward way to complete the finish of the model.


Ultimaker 2 tips

Having used the 3D printer for a few months now I have come up with a couple of things that I find help things print more reliable.

1.End of reels

I have got towards the end of the first reel of ColorFabb filament.
The feeder started to click and wear a hole as it didn't move. My best guess is that the curve of the filament made the angle too steep to pull the reel round.


My solution was to cut off the length I needed plus some extra and let it hang loosely on the hook I had printed a few weeks ago.


This loose role appears to have low enough friction for the feeder to pull the filament without getting stuck.

2.Filament sticks between prints

Sometimes when starting a print no filament is extruded and usually the feeder makes a clicking noise.


I have found that running through the change filament routine will unclog things and get it going.
There is no need to remove the filament from the back. Just let it rewind it then press to start reloading.

I deliberately let a long length of filament be extruded before completing the change process.

Monday 10 August 2015

My Car Printed

After yesterdays difficulties printing, I am pleased to say that I have assembled the body, roof and bonnet and test driven it on the track.


It fits under all the bridges with room to spare.


I didn't keep track but I've been working on the 3D model, on and off, for several months. Looking back I think there was probably over 40 hours of work to get to this stage.,


I designed it to fit on a Ninco Bowler chassis which has the exact wheelbase I needed. It's so handy that Land Rover like to stick to the same tried and tested sizes for their cars. The chassis is trimmed a bit at the edges but basically in tact. The screw mounting posts lined up perfectly.


I designed it to print as separate parts to minimise the support structure needed.


I was able to take the above photo because I haven't stuck the bonnet down yet :-)

Obviously there is a lot more work to smooth the body shell, paint and generally make good.


Sunday 9 August 2015

Trouble Printing

I have at long last finished a model of my car ready to 3D print.


I have been trying to print it but the latest version of Cura, version 15.06.03, has a flaw in it's output. At least it's output does not work for me!

Cura 15.04

Cura 15.06.03


Cura 15.06.03

Shortly after the stage shown in the above photo I abandoned the print because other areas had such a poor joint they fell apart on the printer.

I was fairly sure all the shapes used to create the model were closed manifold objects but still, at first I assumed it was my model. After a lot of failed attempts, checking that the model was manifold and some test printing, I reverted back to the older version of Cura, version 15.04, and the model is now printing as expected.

Cura 15.04

I have reported this to the developers:
https://github.com/Ultimaker/CuraEngine/issues/229

I have done a test with the same shape object. One version combined in to a single non-overlapping model (B) and the other as two intersecting meshes (A). With 15.06.03 only the non-overlapping model (B) prints as intended.

Two closed manifold meshes (A)

Overlap but not penetrating (A)

Single combined object with no overlap (B)


In the above example, both printed using gcode from Cura 15.06.03, both objects look the same in Blender but I did a boolean join on object B. Object A shows edges that do not touch the build plate in the design!

What the full finished model should be is a Land Rover Discovery 2, specifically my car.


The roof and bonnet are removed to minimise the amount of support structure needed for printing. They will be printed as separate components and glued on, as will the front grill and lights.


At the time of writing it has got just a bit further than the above photo now I am using Cura version 15.04.