Search This Blog

Showing posts with label Archery. Show all posts

Sunday, 19 August 2012

Archery At Last

After a couple of windy weekends and other things getting in the way I have at last got out and done some archery.

As I mentioned in an earlier post I have not done this for about 6 years so I was unsure if I could even remember how to assemble my bow let alone hit the target with an arrow!

Luckily I had kept some notes to remind myself and I followed those .


On Saturday I shot 36 arrows at 30m with an 80cm target.  I hit every time.  A low score but I was never very good.  254 using 10 zone scoring.

I thought the bow was making a funny noise.  When I had finished I noticed that one of the limbs was split.  A sliver of the resin coating along one side had come off.  I decided I needed new limbs so off to the shops I went leaving Shelley waiting for Steve the farrier.

One of the Perris Archery shops is not far from me and they were very helpful sorting out what I needed.

It was too hot Saturday afternoon for Steve to come and shoe the horses or for me to try out the new bow setup.  I had at least tried them out in the shop.  Putting them in my case at home was entertaining...


The equipment at the left hand end of the case is a cat.

I got up early on Sunday morning so I could take advantage of the cooler morning temperatures.  Well that was the idea.

I did shoot 18 arrows before the balloon went over very close to our house and landed in the fields over the road!


Watching the two balloons land wasn't the end of the interruptions though.  I did 6 more arrows before needing to go and help pull their vehicle and trailer out of a field. 

That job done.  3 more arrows and the farrier turned up.  Can't distract the horses while they are being shod and I always like a good gossip with Steve while he's making the shoes.


The horses happy and back in the field I get to shoot the last 9 arrows.  By now the temperature is way too hot and uncomfortable for me so I am happy to use that as an excuse for my poor 219 score at the slightly longer 40m on the same 80cm target.

Busy Sunday and it still wasn't even mid-day!

Sunday, 5 August 2012

Bow Sling Knots

Inspired by the Olympics being here in the UK I've been thinking about doing a bit of archery again. 

It's been over 6 years since I last strung my bow so I've been doing some reading to bring myself up to speed.  I was also watching the Olympic Archery on the BBC iPlayer and the TV.


Olympic Equestrian
The only events we wanted to see live was one of the equestrian events. We were lucky enough to be able to get tickets for the finals of the 3 Day Eventing at Greenwich Park. 
My wife has some pictures and more info. on her blog:
http://tomandhenry.blogspot.co.uk/2012/08/greenwich-park-equestrian-eventing.html

Equipment

Every archer I saw on the Olympics had exactly the same setup.  If there was any deviation I did not notice it.  Even the arm guards were almost identical and everyone used a finger sling that looked like it was made out of a shoelace.  While I was looking to find out how they tied the shoelace finger sling I came across a few braided wrist slings which I liked the look of.

The wrist slings were not expensive, even the nicest ones that would have to be shipped from the USA were only about $20 but I just fancied trying to make one.


The above picture shows what I ended up with after a couple of attempts.

Knots

Although I've tied a few knots in the past and somewhere I have a small book on how to tie them, it was much quicker to do a search on the Internet.  I found loads of web sites and videos and quickly discovered that the string to use is called Paracord and the type is described as 7 strand or 550.

I bought two colours I thought would match the bow.  There are lots of bright colours available as well but I decided on subtle for the time being.  I found lots of choice on Amazon and finally bought from:
http://www.hunterscampingandbushcraft.co.uk/ via their Amazon store:
Very prompt delivery.

I watched a few videos but to tie the knots I ended up finding everything I needed at:
http://www.animatedknots.com/

I used a single rope braid for the main length and a Cobra lanyard knot for the thickened wrist section.  Both are in the decorative section of the web site:
http://www.animatedknots.com/indexdecorative.php

The single rope braid is exactly as described on the site but I slightly changed the Cobra knot after some trial and error.

Changes to the Cobra

On the example I followed it had a loop for the lanyard part.  That was unnecessary because I was using it round the braid.  To start I just ignored the extended loop ending up with just the first knot round the braid.

The other change I made was the way I finished the knot to hide the ends.


On the example I followed both ends were looped back under the rest of the knot on the top. This is done by keeping the last few loops loose, tucking the ends in and then pulling tight.

I found that with both ends on the top of the braid, one side would pull the Cobra knot out of shape when I tried to tighten them.  All I changed was to loop the offending end under rather than over the braid which allowed me to tighten it without distorting the rest of the knot.


A little tip if you try making this yourself.  Don't make the Cobra knots too tight.  I needed to slip it along the braid to get it in the centre.  The first time I tried this the Cobra knot was so tight I could not even edge it along the braid.  The next time I tied the knots I checked that I could just move it.  Deliberately tight but it would move.


Attach To The Bow

This type of wrist sling attaches using the long rod.  The more decorative slings typically used a leather tab and the more modern used a plastic plate with holes in.

Looking through my bits and bobs in the shed I settled for cutting a rectangular shape from a bit of plastic packaging.  Tough and flexible, should outlast me.

The holes are just punched with the largest size on my hand punch with two holes next to each other to form an oval just large enough for the braid to pass through.  It needs to be tight so the in and out has enough friction to hold the braid at the desired length.


Looks much nicer than the type of sling I used before.

==

Follow up.  I enjoyed making this and tried it out a few times but I ended up preferring to use a finger sling the same as all the Olympic archers used at the previous tournament.

Friday, 20 June 2003

Archery Links

Clubs and Information

Balbardie Archer's Excellent Archer's Refererence Guide

World Archery Federation (formerly known as FITA from the French Fédération Internationale de Tir à l'Arc) - International governing body for the Olympic sport of archery

Archery GB (formerly GNAS) - Governing body for the Olympic sport of archery in the UK

Rayleigh Town Archery Club - The first club I was a member of

Shops and Mail Order

Bow Sports - Web Site & On-line Shop
Perris Archery - With shops in Rettendon, Essex and Raydon, Suffolk
Ten-Ring Archery - Web Site & On-line Shop
Quicks Archery - Web Site & On-line Shop

Manufacturers

Aurora Archery - Manufacturers of soft bow cases
Easton Archery - Manufacturers of Arrows
Targetcraft Archery Centre - Manufacturers of Skorten products

Wednesday, 18 June 2003

Archery Score Cards

At the time of writing there are very few score sheets available to download from the Internet that are of suitable quality to print out and which are of a design that I like.  So I have created my own that suit my requirements.

Tournament Score Card


Generic score card suitable for both Imperial and Metric FITA style tournaments. 24 ends of up to 6 arrows per end, up to 12 dozen arrows.


Download the high resolution version of the above image (use the download option on the linked page to get the best quality) and print 4 sheets to a page or save the original Visio 2002 version (240kb zip) and modify it for yourself.


Common Target Archery Rounds

Tables of Imperial and Metric, Indoor and Outdoor target archery rounds.


Single A4 sheet with all tables, folds down to A6 size (105x149mm) with one table per A6 side.

Download the high resolution version of the above picture (use the download option on the linked page to get the best quality) and print from any graphics programme or save the original Visio 2002 version (330kB zip) for editing.

Wednesday, 20 February 2002

Archery Bowstand with Ground Quiver

This is a little add-on I have made for the Skorten Pod bowstand.

I like the Skorten bowstand, it is stable when in use and compact when taken down, but I wanted somewhere to rest my arrows while shooting indoors. So this is my solution.


The ground quiver will easily hold 10 arrows.


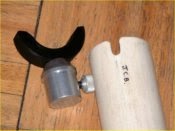
Shows the cutout to fit under the thumb screw

The top of the tube is held in place by the thumb screw which normally just holds the bow rest in place.

Shows the foam in the bottom to rest the arrows on

Foam is pushed in to the tube to rest the arrows on. With the leg in place the foam can not be pushed out.


Shows the hole just large enough for the thread of one of the legs

A notch large enough for the leg to pass through is cut in the far edge of the tube. Opposite the notch is a hole just large enough for the thread of the leg to pass through. The screw in leg holds the quiver in place.

Construction

The ground quiver is made from a short length of waste pipe held in place by the top thumb screw and one of the screw in legs. The pipe has to be at least 12" (305mm) long. The notch for the thumb screw and the hole for the thread of the leg, must be in line on one side of the pipe. A 75mm (3") length of tightly fitting foam is pushed in the bottom for the arrow points to rest on.

Dimensions:
Tube outside diameter = 43mm (1 3/4") approx.
Tube minimum length = 305mm (12")
Top notch width = 6mm (3/16")
Top notch depth = 13mm (1/2")
Hole for thread of leg = 8mm (5/16")
Centre of the hole from the lower edge of a 305mm (12") length tube = 10mm (3/8")
Lower notch width to span leg = 13mm (1/2")
Lower notch depth with a 305mm (12") tube = 13mm (1/2")