Search This Blog

Showing posts with label 3D Printing. Show all posts

Tuesday, 18 August 2026

Post processing resin prints

The trouble with the cleaning process for resin prints is that it means exposure to isopropyl alcohol (IPA) fumes and handling uncured resin. Wearing nitrile gloves is enough to solve the uncured resin risk but the fumes are more difficult. I could wear a mask while handling the models but despite having extraction the smell was obvious in the workshop for an hour or more after finishing.

Taking some advice from articles and YouTube videos I have now changed how I handle the process. I've almost completely eliminated the IPA smell and reduced the time I am handling the models before the resin is cured.

My 3D print area August 2026

I bought a wash station from Heygears. I liked the look of the double canister arrangement so that one box can easily drain the IPA into the other without any exposure to the IPA. What I hadn't expected was how much more efficient the agitating platform was at cleaning the models.


One 4 or 5 minute session in the Heygears Wash setup and the prints are completely clean. 


Tip: An important bit of the process is that the prints have to be supports downwards in the IPA. This is so that any drips of resin end up on the supports, not the models.

My Process Summary

  • Put on Nitrile gloves.
  • Turn on the extractor and position it over the wash area.
  • Fill a wash box to the max marker with IPA. This is only necessary when the IPA gets too contaminated and needs a refresh.
  • Put the prints or the entire build plate with the models still attached into an empty wash box. The print supports should be facing towards the bottom of the tank.
  • Seal the box and put the full wash box above with the drain connected to the input valve of the empty box.
  • Open the upper valve and upper air vent and wait for the IPA to drain onto the print.
  • Remember to CLOSE the valve (I keep forgetting!)
  • Put the now full box on the wash platform and run for 4 or 5 minutes.
  • Now for the reverse. Put the full wash box on top of an empty wash box and drain the IPA.
  • Remember to CLOSE the valve.
  • Open and remove the prints. If not already done, remove from the build plate.
  • Leave to dry. I only wait just enough time for the surface to dry and for anything to have drained out of hollow models.
  • Cure the prints with the supports still attached.
  • While the prints are curing I usually do any cleaning, such as residue from the emptied wash box.

With the prints now cured, they can be handled and cleaned up without gloves.

All done with very little exposure to uncured resin or IPA and no lingering smell.

Removing cured supports

On small models, I find that removing the supports can be done as they are even when cured. For models with large areas of support it is helpful to soften them in warm water.


I use a plastic food storage box. The temperature of the water is not critical. I find even lukewarm is sufficient. I usually start with water that is about as hot as I would have for a bath. Not as hot as my wife has in her bath. Just about bearable to put my hand in.

With Heygears PAF10 (PVC-like) resin, the supports become very soft and easy to remove. Much easier than they would be before curing the print.

As the models are clean, not tacky and I am not wearing gloves, the support removal has been much easier for me than it used to be.

Reusing IPA

It's not a perfect process, I'm still left with a short exposure to open IPA containers when cleaning and swapping IPA. If I wash with the build plate still attached the IPA tends to get dirtier than if the models are removed first. The extra resin from the build plate requires that I have to swap out the IPA more often. 

When the models don't come out as clean as they should or before that if I remember, I'll clean the IPA. I use a clear container that fits in the cure station. This is so I can cure the resin within the IPA. When cured the resin is easy to remove from the container. I sometimes use a silicone scraper to help. The now cleaner IPA can then be reused.


IPA cleaning process:
  • Pour the dirty IPA into a clear container.
  • Seal the container.
  • Cure in the cure station for 20 mins.
  • Drain the IPA via a filter funnel into a storage bottle or one of the wash boxes for reuse.
  • Scrape the cured resin off of the clear container ready for the container to be reused.
Sometimes I repeat the process because it is the resin on the outer edges of the container that get cured likely leaving some uncured deeper inside.

Note: Curing resin in IPA, does not get rid of the dye. The IPA retains a cloudy grey look while the resin removed tends to be a white gel.


Cleaning up resin spills

There will always be times when some uncured resin gets where it's not wanted, or just the run off from the build plate while removing the prints.
This needs to be handled and disposed of thoughtfully. The simple solution I use is to cure the resin with a small handheld 395nm UV lamp.


I was surprised how short an exposure the resin needs to become rigid. Less than a minute is sufficient.


Build Plate Lift

I've made myself a frame to help lift the build plate out of the wash boxes.

Mk2 lift frame

This is mark 2. The handles on my previous version were inadequate.


Download:

Change of plan:
Despite designing and testing the frame to lift the build plate, I have decided that removing the models from the build plate before washing them is the better option for me. The minimal time required to separate the prints from the plate adds very little extra exposure to uncured resin and no extra exposure to IPA. It means the IPA needs less frequent replacement.
I do like the nice clean build plate, but I'm still tending towards removing the prints before washing.

I can always deliberately include the build plate in the wash from time to time.

==

Reference:

==


Sunday, 16 August 2026

Heygears Reflex maintenance menus

I had cause to contact Heygears to calibrate the level of my Reflex printer. The maintenance menus are password protected needing Heygears Support to provide a temporary passcode.


The options are strictly controlled with built in checks to make it difficult to mess it up. In this case, at the time I initially tried to carry it out, it was too hot. I had to get up early the following day to carry out the calibration.


Maintenance Menus

As mentioned, the maintenance menus require a passcode supplied by Heygears support. I took the opportunity while I had access to take a record of what is available.


==

Monday, 6 July 2026

Fast printing PETG filament

In June 2025 Bambu Lab were out of stock of their PETG-HF (High Flow) filament, worldwide. Because of that, I was forced to try other makes. 

I should point out, that apart from the odd specialist filament, like TPU, I almost exclusively print using PETG. I frequently print functional parts and they are often for use inside cars. The UV resistance of PETG is needed to maintain its strength from prolonged exposure to sunlight and the heat resistance is needed to avoid warping.

As mentioned in an earlier article, I wanted to be able to use an alternative filament as a direct replacement for the Bambu Labs version, without the need to change any settings on my Bambu Lab H2D.

This page lists the filaments that I have tried and I'll start with the benchmark, the Bambu Labs filament:

==

Bambu Lab PETG-HF


  • Print settings: Automatic defaults.
  • Colours tested: Black, Red, Yellow, Green, Blue, Grey and White.
  • Print Result: Good. Negligible stringing, few blobs, tidy seams.
  • Surface: Satin to matt.
  • Spool AMS compatibility: Good (OD 200mm, ID 55mm, Width 67mm)
  • Number of kg spools used: >10.
  • Print fails: None.
  • Eco: Very good, uses refills.
  • Usage dates: May 2025 ongoing (while stocks last.) Discontinued June 2026.
  • Cost: ££ when buying in bulk or ££££ for individual spools.
==

Filament Choices

The main criteria for selecting the following filaments have been the cost at any point in time, and that they get substantially good reviews on Amazon.

If a spool is on special offer, I have taken advantage of that, as my next filament to try. 

These are in the order I tried them:

==

Sunlu Rapid PETG


  • Print settings: Same as Bambu Lab PETG-HF.
  • Colours tested: Black.
  • Print Result: Usually good. Negligible stringing, few blobs. Developed very untidy seams before the nozzle clogged.
  • Surface: Satin to matt.
  • Spool AMS compatibility: Good. (OD 195mm, ID 63mm, Width 59mm)
  • Number of kg spools used: 6.
  • Print fails: 1x clogged nozzle.
  • Eco: Poor. Reusable plastic spool but no refills available.
  • Usage dates: June 2025
  • Cost: ££
==

Tinmorry Rapid PETG-eco


  • Print settings: Same as Bambu Lab PETG-HF.
  • Colours tested: Black and Light Grey (too pale).
  • Print Result: Usually good. No stringing, few blobs. Usually tidy seams but one spool of light grey was a little ragged.
  • Surface: Satin to gloss.
  • Spool AMS compatibility: Good (OD 197mm, ID 53mm, Width 64mm)
  • Number of kg spools used: >10.
  • Print fails: 1x clogged nozzle.
  • Eco: Poor. Disposable plastic spool.
  • Usage dates: June to August 2025
  • Cost: ££
==

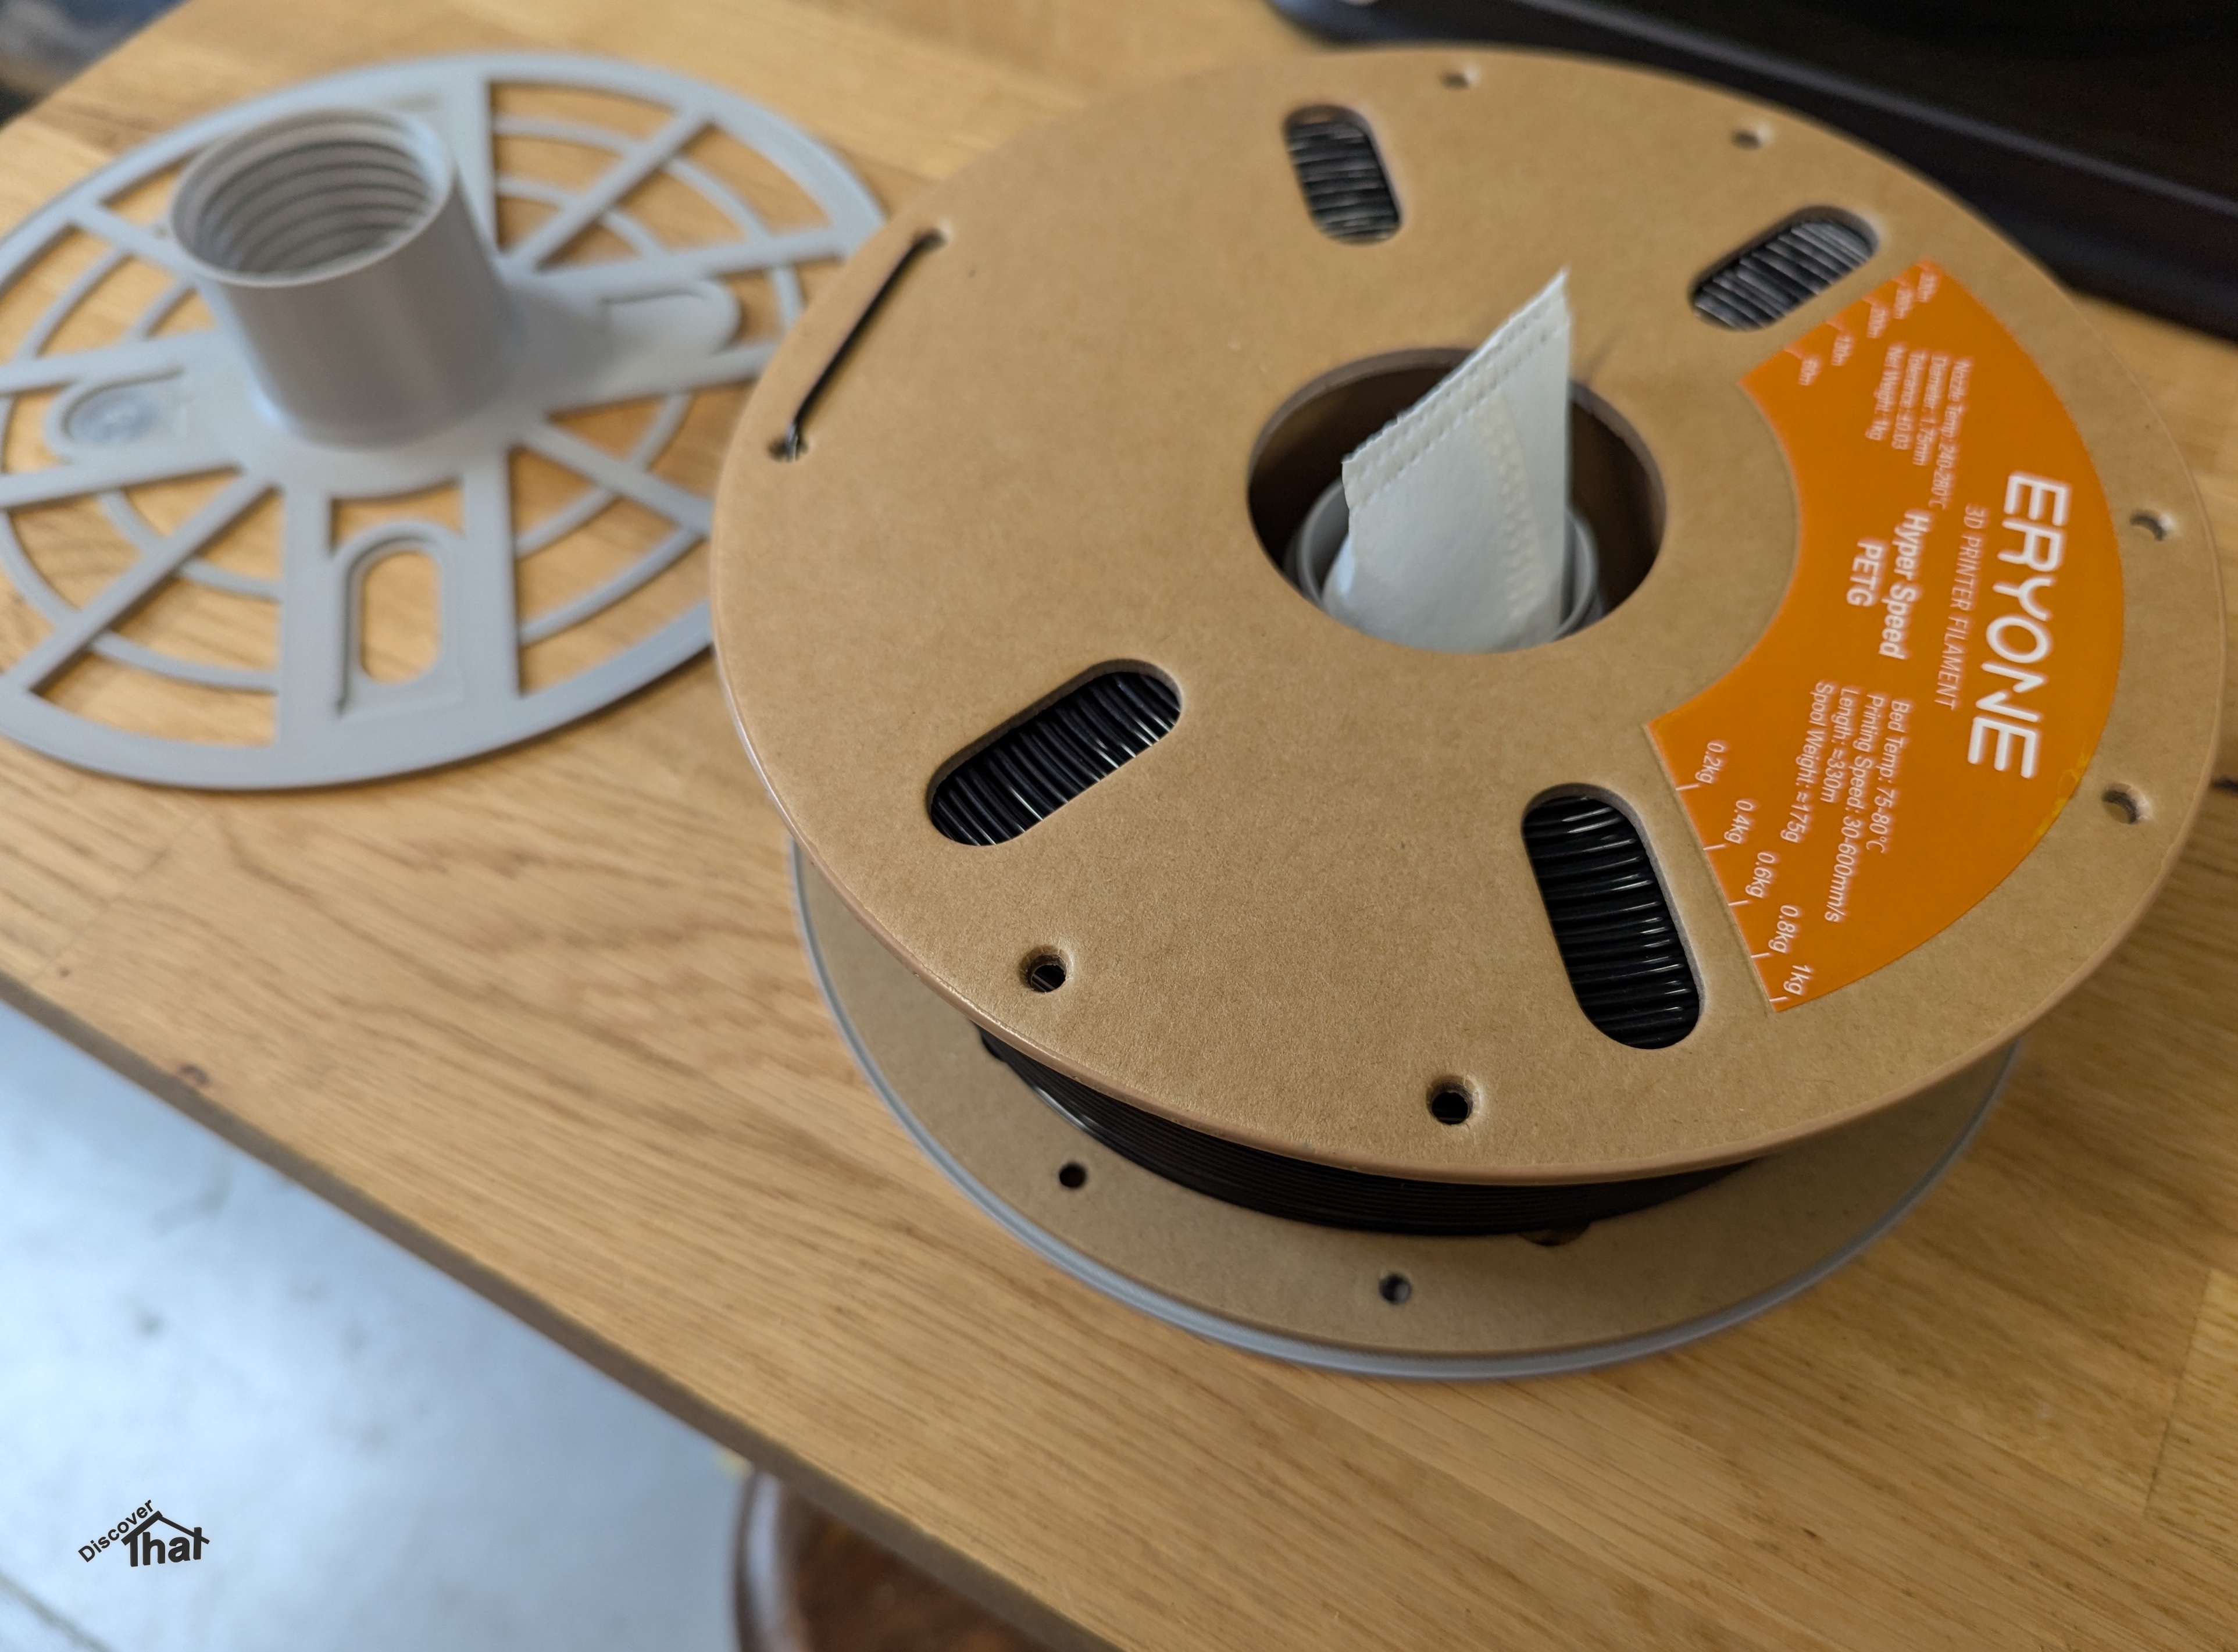
Eryone Hyper Speed PETG


  • Print settings: Same as Bambu Lab PETG-HF.
  • Colours tested: Black and Grey (dark).
  • Print Result: Very Good. No stringing, no blobs, tidy seams.
  • Surface: Gloss.
  • Spool AMS compatibility: Cardboard spool with coated edges. I used an overlay adapter.
  • Number of kg spools used: 3.
  • Print fails: None.
  • Eco: Good. Cardboard spool.
  • Usage dates: June and July 2025
  • Cost: ££
==

Deeplee Rapid PETG


  • Print settings: Same as Bambu Lab PETG-HF.
  • Colours tested: Black and Grey.
  • Print Result: Good. Negligible stringing, no blobs, tidy seams.
  • Surface: Satin to gloss.
  • Spool AMS compatibility: Cardboard spool with coated edges. Too wide to use my usual adapter. With care the inner core fits perfectly in a Bambu Lab reusable spool.
  • Number of kg spools used: >10
  • Print fails: None.
  • Eco: Good. Cardboard spool.
  • Usage Dates: July 2025 to February 2026
  • Cost: ££

Tip: When disassembling the spool, I take the end of the filament out of the notch and put it back in the notch. This is to make sure it is free to release when needed. I have found that the end of the filament is often too tight a fit in the notch in the cardboard tube and sometimes the AMS is unable to pull it out. When that happens the printer stops with a filament warning.

==

Overture Refill PETG (High Speed for Bambu Lab)


  • Print settings: Same as Bambu Lab PETG-HF.
  • Colours tested: Black and Grey.
  • Print Result: Good. Negligible stringing, no blobs, tidy seams.
  • Surface: Satin to gloss.
  • Spool AMS compatibility: Refill fits in a Bambu Lab reusable spool.
  • Number of kg spools used: >5
  • Print fails: None.
  • Eco: Very good. Cardboard core refill.
  • Usage dates: June 2026 ongoing
  • Cost: ££
Note: The first roll I used was a very tight fit in the Bambu Lab spool. It did fit but I was unable to pull the plastic wraps out. With the wraps cut short either side, it worked without issue . Future rolls have all fitted perfectly and the wraps come out easily.


==

Subjective Views

The results above are my opinions after a relatively limited number of hours printing with each filament. This is not an organised review or test, this is just a reminder to myself of how well filaments have performed for me.

I have printed everything at Bambu Labs defaults for speed and temperature. I have not attempted to establish the fastest speed a filament can print at. I want to be able to print reliably, repeatably and with minimal tinkering.

My only changes have been to affect the strength appropriate to the component I am printing. Things like wall thicknesses and infill densities.


AMS Compatibility

Being easy to use in the Bambu Lab AMS 2 Pro and AMS HT is important for me. In my results above, I am referring to those two AMS's. I have no access to any other AMS's to try them with.

The spools in the AMS's run in a guide. This limits the width the spool can be to about 68mm. There is less than 3mm between the guide and the nearest side of the AMS HT. Although this is not a problem for the spools on their own, it causes me an issue using the adapter that I fit to hold the NFC tags. There is a little more room in the AMS 2 Pro, but not much in some slots.


Cardboard Spools

Cardboard spools are not recommended by Bambu Labs for use in their AMS's. As the cardboard wears on the rollers, the dust formed is not conducive to the operation of the AMS over time. Some cardboard spools are manufactured with coated edges to avoid this concern.

Some spool cores conveniently fit the Bambu Labs or other reusable plastic spools. This works well, although I have had some issues where the end of the filament gets stuck between the spool and cardboard core. I try to ensure the end is free when assembling the spool.

For those cardboard spools where the core does not fit in a reusable spool, my preferred solution is to use an overlay spool that sandwiches the entire cardboard spool. The running edge is then plastic. As long as the cardboard spool has an overall thickness of 60mm or less and an overall diameter of 200mm or less, the result fits in the AMS.


Conclusion

All the filaments that I have tried, so far, are good and can be used as direct alternatives to Bambu Lab PETG-HF.


==

First published: 29 June 2025

This page is updated from time to time when I try new filament. Usually when Bambu Labs are out of stock.

From June 2026 I will be buying more alternative filament.

There is a note on Bambu Lab's store saying that they have discontinued PETG-HF. Their alternative is a slower printing Basic PETG, not an improvement for my requirements, so I will not be trying that.

==


Thursday, 18 June 2026

Fume extraction

Despite deliberately having an extract fan through the wall above the area that I have my 3D printers, the smell of isopropyl alcohol (IPA) persists for longer than I would like after I have finished cleaning up resin prints.


To try to reduce that, I have designed and built an extraction hood that I can position directly over the source of the IPA.


It's based on a long wall mounted monitor arm and 100mm (4") flexible ducting. Both ends and the hose clamp are printed.


I do not know yet if it will resolve the issue, but I am pleased with how it has all gone together. It folds out of the way and I can position it to where I want.


==

Sunday, 11 January 2026

Prop making

A friend of mine needed a fancy dress prop for an event. A bit of a rush job, so it needed to be ready with minimal preparation.


A Lara Croft, Tomb Raider ice axe. Printed in PETG.

My friend supplied the STL files. I decided that they needed a little bit of work. There were too many parts for my liking and split straight across, so no strength when assembled. 


I joined as many of the meshes together as I could in a hurry.  The remainder needed to be glued together.


My print bed is large enough to print most of it as one piece.

==


Sunday, 22 June 2025

Spool desiccant bag and NFC holder

Recently I was forced to buy another make of filament. My original plan was to always use Bambu Lab filament, so I could benefit from the automatic filament recognition and pre-calculated settings. What I hadn't factored in is that Bambu Labs could be out of stock.

Sunlu spool


Based on some reading, Sunlu PETG Rapid appears to be a very close match to Bambu PETG HF.

I wanted to add an NFC tag holder to the filament spool. I've already printed out a desiccant holder for my Bambu spools, so my idea was to design one with a place to fit the NFC tags. A quick look on Maker World and it appears that nearly everyone has that idea. 

There are a number of good models on Maker World but, as is typical, my requirements are not quite met by the pre-existing designs. I'd like to thank everyone else that has done similar designs, they have no doubt inspired elements of my version:

My specification:
  • Fit a range of filament spool sizes from different brands.
  • Fit a 20g (0.75oz) desiccant sachet.
  • Position the NFC tag in the same position it would be on a standard Bambu Lab spool.

Spool hub with silica bag


I prefer silica gel sachets rather than loose desiccant. A 20g bag is very similar in size to the double bags supplied with the Bambu Lab H2D, AMS 2 and the AMS HT.

Bambu spool in AMS HT


Spool thickness 75mm

Spool thickness 50mm


My design of hub fits spool thicknesses from 50mm (2") up to 75mm (3") and central hub diameters from 50mm (2") up to about 70mm (2-3/4").  Sunlu spools are 59mm thick with a central hub diameter of 63mm. Bambu spools are 67mm thick at the outer edge with a 55mm hub diameter. I have also used this with Tinmorry spools which have a lip round the inner hub. In that case, the holder fits and works well, although not very elegantly.


NFC tag clipped in

Showing the Bambu cardboard tube on the tag holder


The NFC tag is at the same radius it is on a Bambu spool. A tag from an empty Bambu Lab spool can be cut at the bend and it clips in effortlessly. I've modelled in a central undercut to help extract the tag, should that ever be necessary.

Spool hub on the printer


As a bonus, this is the first time I've created a thread to 3D print using FreeCAD, so I've learnt a new technique.

Design in FreeCAD


Using the Part Design workbench in FreeCAD 1.0, I created a simple 85 deg., thread profile and used the helix function. The depth of the thread is 2.5mm and is offset into the surrounding cylinder by 0.3mm, inside and out, to create the clearance. The helix uses a pitch of 4.5mm. The screw worked perfectly first time. It's quite a loose fit and I could easily reduce the clearance if needed on other models.

Threat profile sketch

Helix settings


==

Download:


==


Saturday, 24 May 2025

Printing TPU on the Bambu Lab H2D

A friend had need for a replacement drive belt. A good excuse to try out printing with flexible TPU.

The original belt plus the printed TPU belt.

I managed to pick the wettest day in months although luckily the humidity where my printers are only got up to 57%.  I was not expecting great results. I have not attempted to dry the filament. It's new, straight out of the vacuum sealed bag. I have an AMS HT on pre-order specifically for this purpose but that is not here yet and I still wanted to have a go.


I've used Bambu Lab TPU 90A filament through a 0.8mm nozzle, which I will dedicate to only use TPU. They are printed with a 100% rectilinear infill, solid. I've created the model of the belt in FreeCAD and deliberately put a flat base with 45 degree tangential slopes leading into the otherwise 4mm diameter cross section belt. I've sliced this with 99 wall loops so the result is solid and random seam locations for added strength.

There are contradicting instructions on Bambu's site. The filament purchase page in the store saying use glue stick for TPU and the wiki saying don't use glue stick on a textured PEI plate because it might stick too much. 

https://wiki.bambulab.com/en/h2/h2d-tpu-printing-guide


I opted not to use glue stick and I was easily able to remove the printed belt using an old plastic membership card, sharpened at one end. (I've since found that was not necessary.)


Even with a simplified filament path, approximately as instructed by Bambu but without a suitable container, the pull on the new heavy filament spool was greater than I thought suitable. I made a make shift bush out of a pipe but that barely helped. I thought about pulling out the length of filament needed and cutting, so there would be no spool to pull, but my solution for today was that I kept returning to the print while it was in progress to pull lengths of filament off of the spool by hand, so the extruder had minimal resistance.

The results, although not pretty, are very serviceable for the purpose.


This can only get better when more suitable kit arrives.

==


Update:

One of the belts has been put to good use and was left running the machine non-stop for over 2 weeks without an issue. The belt lasted another session before breaking.

Drying:

The AMS-HT arrived shortly after I had done the initial prints. I've now repeated exactly the same prints with thoroughly dried TPU 90A. The results are now perfect. Drying is well worth it with TPU.


I forgot to change the nozzle, so these belts were printed with a 0.4mm nozzle. Luckily, that's OK for TPU 90A. The results are very good.
They came off cleanly from the textured PEI print bed with minimal effort.


==