Search This Blog

Monday, 8 March 2021

Grease and thread lock for my ride

When people start out to repair their own bikes, or cars, it is obvious from their questions that they are on a steep learning curve. I grew up with cars in all states of repair because my dad was an auto electrician and a mechanic for a living. Our bikes were also maintained at home. There are many bits of information that I carry around in my head, that I take for granted.


One such bit of knowledge is what products to use on components depending on their application. This mainly relates to bikes and cars.

The information on this page is based on my experience. The best source of information is always the manufacturers service manuals, plus a little bit of general knowledge about why the manufacturers recommend what they do.


What is each product for?


Anti-Seize (copper grease)

Used to reduce the chance that threads will become too tight to remove, either through use or corrosion. In most cases it is applied to the threads of a bolt.

There does need to be a word of warning on anti-seize. It increases the stretch of the thread for any given torque so I err on the side of the minimum torque setting to avoid over stressing a thread when applying anti-seize. Manufacturers rarely recommend the use of anti-seize probably because of the risk that a bolt could be over tightened. Most people who maintain their own equipment will apply anti-seize to make the job a lot easier, next time they have to remove that same bolt.

I came across an interesting YouTube video testing various different types of anti-seize, including busting a few myths.

My choice of anti-seize is copper grease (copper slip, copper ease) because I've had the same pot for decades. There are more modern synthetic products that are likely to do a similar job but I've never needed to try them.

I use anti-seize on car wheel studs (like many do, despite the manufacturers guidance), nearly every bolt on Land Rovers, bicycle bottom bracket threads and bicycle pedal threads. Both the bottom bracket and the pedals tighten with use rather than loosen.

Most torque values for bolts are quoted dry and take in to account the friction. Using any grease could result in over tightening a bolt. My opinion is that the tolerance on most bolts is probably higher than the error caused by using grease.


Friction (carbon, assembly) Paste

A gritty substance with the consistency of grease. Used to hold components in place with less torque.

Friction paste is usually used where there is a risk of crushing a component, such as, bicycle handlebar and seat post clamps. Especially helpful with carbon parts and mountain bike dropper posts. I've never known it to be used on cars.

Friction paste should not be used on bolts or any moving component. It is gritty and would cause damage to any moving part. The paste is applied to the component being held, such as between the clamp and a handlebar or the seat post and the inside of the seat tube.


Thread lock (Loctite 243 medium)

Thread lock is used to lightly glue a thread in place to prevent it from working loose.

Any threaded component that is subject to vibration or back and forth rotation, could work loose. Most, but not all, bolts on a mountain bike benefit from thread lock. The manufacturers use it in many places, including, derailleur jockey wheel spindles, all pivot bolts, brake calliper bolts and most handlebar clamp bolts. There are a few places that the manufacturers don't use it. The seat clamp bolt, the top cap bolt and the derailleur hanger bolt are a few that spring to mind..

I've only had a need for the blue medium strength thread lock on any bolt I have fitted. When removing an existing bolt, it is usually easy to see if it had thread lock applied. When refitting or replacing a bolt, that previously had thread lock, apply a small drop of thread lock to that bolt.

This article, that I have linked to, gives a bit more detail on the use of thread lock.


Grease

Any general-purpose lithium based grease or the white marine equivalent. The same can be used for cars and bicycles.

It is used for any component that needs to move smoothly over another, typically bearings, axles and spindles.

I often read on forums where people starting out to learn how to repair bicycles often get confused by the greases that are marketed as being special just for bicycles, as if bicycles need a special grease! This rarely happens with car mechanics. If you need grease, any general purpose grease is likely to do.

There are areas, such as inside hydraulic systems, like mountain bike forks, shocks and dropper posts, where specialist grease is required but for bearings, axles and bolts, any general purpose grease will do.


Silicone Grease

Typically used on rubber parts but, apparently good between metal and non-metal components. I only use it for one purpose. I put a very thin coating over brake and gear cables before inserting them in their sleeve.

I have no idea if it prolongs the life of the cable or has any other benefit but it feels like it's worth doing.


Chain Lubrication

This is a contentious subject and going in to the detail of different brands is not the purpose of this article.

In my opinion, lubricating chain is to prevent it seizing and, perhaps, prolong the life of the chain. Any lubricating oil will do that job to some degree however there are three types of bicycle chain lube, that are popular.

Wet Lube

Typically for winter or wetter weather use. I like something that is slightly thicker but not so thick that it picks up too much grub. I use a thinner lube in the drier months. The UK always has the risk of rain, so I tend to use wet lube all year.

I add lube to the chain every time I hose down or wash the bike. In winter, that is after every ride.

Dry Lube

Typically for warmer dry weather. Goes on wet but dries to leave a waxy finish. Easily washed off, which is why it is used in drier weather.

I've used it in the summer and it was nice to keep a clean chain, however, I now ride too often in wet conditions so I don't use it any more.

Wax

I have never tried this. The time consuming application process has never appealed to me but many, mainly road cyclists, swear by it.

Variations

There are many variations of all of the above chain lubes. The manufacturers claim all sorts of benefits. For me, chains are a consumable component that, compared to other parts, do not cost very much. I do no more than protect it so it works and replace it when it's worn.


Conclusion

Use the right product in the right place and all will be well. Hopefully the above helps. 


The following chart is the reverse of the above text. Use as a quick reference:

Task = Product

  • Stop threads binding over time = Anti-seize
  • Stop threads working loose = Thread lock
  • Things that need to move over other things = Grease
  • Things that should stay in one place = Friction Paste


==

Update:

Grease

After writing this article, I came across a technical document that was easy to read and gives some useful information.

https://www.hambini.com/grease-for-bicycles-a-practical-guide/


Torque

The following article goes into more detail about tightening bolts to torque:

https://www.popularmechanics.com/cars/how-to/a6613/torque-wrench-101-how-to-get-the-right-amount-of-force/


==


Thursday, 4 March 2021

Mini anvil stand

I've wanted an anvil for a long time. A little while ago a friend found me a mini anvil, which I am very pleased with.

I have made myself a very sturdy stand for it.


It's made from a section of old sleeper and some odd bits of timber.


I used some rubber mat on the base, mainly to keep the timber off the floor so it does not get damp.


==


Friday, 12 February 2021

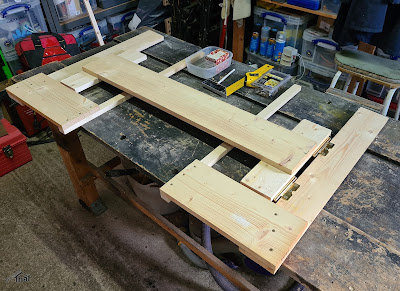
Fold up desk

We have a short term need for two desks in our study.

I've made a fold up desk from some materials I had in store. It's narrow and folds flat so that it can be tucked behind a cupboard when not in use.


I'm pleased with the result and it works well.

==

Update:

A slight change to better suit the uneven nature of the live edge top.

==


Thursday, 11 February 2021

Mac Illustrator keyboard shortcuts now working

 It has been many years since I last had to support a Mac so what I am about to say may not be very well informed.

I needed to setup a Wacom Intuos 5 graphics tablet on a Mac Pro desktop to use with Illustrator.

Downloading and installing the drivers for the older Wacom tablet were not difficult. It is still supported by the latest driver set.

During the install the driver installation requires some Security and Privacy settings to be enabled for the Wacom drivers.

The note says something like, enable the options for all of the Wacom apps.

That is incorrect or at least misleading.

If the Wacom Desktop Centre is allowed to intercept the keyboard, Adobe Illustrator shortcuts do not work.


The problem did not show up until trying to use some shortcuts, like 'Layer forward and back' 'Cmd [ and ]' It was luck that I remembered the various settings and suspected that one of them might have been the cause.

From the Mac Settings (Gear) icon, go to 'Security and Privacy' and then 'Keyboard'. Make sure there is NO tick next to Wacom Control Centre.

I unlock changes by selecting the Lock icon and entering a password.


For the various Wacom products, there should only be a tick next to the Wacom Tablet Driver in Input Monitoring and a tick next to the com.wacom.IOManager in Accessibility. 

Once the changes have been make I locked the preferences again.

Correcting that, fixed the keyboard shortcuts in Adobe Illustrator.


==


Wednesday, 3 February 2021

Sync Windows laptop to Synology NAS

There are, no doubt, many ways to backup your files to a NAS box. Synology specifically allows the installation of various apps. None of those are necessary if your aim is to keep a copy of all your data files on a Windows laptop.

Windows Built-In File Sync.

A long time ago, in the early days of Windows networking Microsoft included features to store the contents of the Windows users folders, on a network share.

There is little control, nor need for control, of how it does this. When you logon to your laptop and it can connect to the network share, it will carry out a bi-directional synchronisation of any folders setup to do so.

The sync., is limited by the speed of the components, such as network and disk drives but that's about it.


BACKUP the Files

Before I do anything like this I always take a copy of anything that could be affected. Things do not always go to plan.

In this case I simply copy ALL of the files to temporary folders, away from where I will be working. That could be off of the root of the C: drive or better still on to a removable disk.

If it is on the same machine I would create folders, similar to the following:
C:\Temp\DocumentsCopy
C:\Temp\PicturesCopy
C:\Temp\MusicCopy
C:\Temp\VideosCopy

When finished moving the folders to the network, and I am sure that the files are all where they should be, the temp folders can be deleted.


What Will The Built-In Sync., Do?

  • Copy every file in any specified folders to and from the NAS.
  • No user intervention, except in rare cases.
  • Keeps a copy on the computer. If it is a laptop, you can work on it wherever you are and when you return home, it will sync., any file changes.
  • It will sync., between multiple machines. If that is useful to you.

What Won't It Do?

  • It will not backup the operating system.
  • It will not backup applications.
  • It is not reliable at backing up user settings, so these instructions do not include that detail.
I have also not included setting this up to work remotely over a VPN, because I have not tried it.


What to do on the Synology

Connect to the Synology NAS using a web browser.

Setup a normal user account. I strongly recommend an additional account, not the default admin account.

Control Panel - User


If you are the main user, you could give yourself admin rights, at least for the duration of the setup.

Control Panel - File Services


The core requirement for Windows networking is SMB (Server Message Block.) It is probably enabled by default on the NAS box.


One thing to note is the box at the bottom that shows the Universal Naming Convention (UNC) path to the NAS box. This can be tricky to get working, so I just use the IP address.

It should work, if the following option is enabled.

Advanced TAB (not the button)


Back to the SMB/AFP/NFS TAB

If you are curious, all of the initialisms on this tab are different types of network file systems. AFP is used by Apple Mac computers and NFS is an open standard which I rarely come across being used.

SMB is widely used, including by Microsoft.

Advanced Settings BUTTON (not the tab)


I would hope that by now SMB 2 is the default and SMB 1 is disabled but worth checking. The minimum SMB protocol should be SMB 2.
The reason for this is that SMB 1 is insecure and should not be used.

Windows 10 also supports SMB 3, so if you only have Windows 10 computers you can change the Maximum SMB protocol to SMB 3.

That's all that is necessary for Windows networking and it is probably already setup for you.


What to do on the Windows computer

I find it useful to setup a Quick Access link to the file system on the NAS box. I go to it so often, especially during setup, that this saves time.

File Explorer


The IP address of my NAS box, for the sake of this example, is 192.168.1.40. If you have managed to get the UNC name to work, then you can use that instead of the IP address.

Whatever you use, type the address preceded by "\\", in to the address bar. In my case "\\192.168.1.40" Get the slashes the correct way round, the other way will take you to the internet and fail.

At this point, if it is the first time you have browsed to the NAS, you should be prompted for your Synology NAS login.


This is asking for the username and password of the account you setup on the NAS box.  This is NOT your Windows login details

Tick the box to Remember otherwise the synchronisation will be unreliable because it won't work until you login. If you tick to remember the credentials, it is all automatic.

Drag the UNC in File Explorer

Now you have logged in, drag the UNC or IP of the NAS, from the address bar in to the Quick Access list to create yourself a very convenient shortcut.

Create Folders

All being well, you should be able to navigate to your own user folder on the NAS box.


Create 4 folders under your name:

  • Documents
  • Music
  • Pictures
  • Videos

I recommend that you do not include Desktop in this list. If you are the sort of person that habitually saves to the Desktop, I would urge you to change your behaviour and use Documents, where data files are intended to be.

If you decide to do Desktop, you are on your own with that one.

There is no harm doing Downloads, as far as I know, but, in my case, I end up with a whole bunch of junk in there that would just waste performance copying to the NAS.


Enable Offline Files

This gives the option to keep a copy on the local machine, of network folders that are on the NAS box. A laptop can then be used anywhere and files sync., when returning to the home network.

Control Panel - Sync Centre


Manage offline files

Make sure offline files is enabled, if not, then press the button to enable the feature.


Change the Folder Locations to the NAS

In File Explorer in the side bar, under "This PC", one at a time, for each of the four folders we have selected, right click, go to the properties of the shortcuts in File Explorer.

Go to the Location Tab.

The image above, shows the result after the move. Prior to the move the location would be on the local hard drive.

Press the Move... button.

As all of my computers are done, I cannot reproduce the screens but what should happen is that you navigate to the corresponding folder on you NAS box, for your user account, and move.
There will be a prompt you need to accept but I can't remember what it says.

I recommend trying a folder that has the least content, just in case you need to slightly change the procedure. As you can see, there is a button to Restore Default, so you can roll this back.

Do the same for all four folders.

Always Available Offline

To keep a copy on the local machine it is necessary to set that folder to be available offline. See above to ensure that the offline files feature has been anabled.

Right clicking on the shortcut should show an option:

There should be a tick next to a heading of  'Always available offline'.

Failing that, it is available from a Tab in the properties of the shortcut.

Use the Sync now button to kick off storing a local copy.


Finished


Well, wait a while, might be a long while, if you have a lot of files.

You can follow the progress on the NAS box web interface or the full UNC path to the NAS box in file explorer.

Testing

When you think it is all finished. Create a test file in each folder, make sure it has contents, sometimes zero size files don't sync.

Make sure the files get to the NAS box. It's not instant, Windows does it in it's own time to minimise the performance impact on the machine.

Conclusion

The instructions are not fully detailed but hopefully anything I have missed is obvious when you come to do it.


Extras

Microsoft Office File Security

Microsoft Office includes security features to protect you from malicious files.
If you edit files directly on the NAS box you are likely to encounter this protection. An extra butoon in a yellow warning bar that you have to press before you can make any changes.
If you always edit files on your own computer and let the synchronisation copy the files to the NAS box then you don't need to worry about this.

If you do work directly on the NAS box file shares, the extra prompts can be annoying. The best security is to leave it enabled but I tend to turn to off.

Open Any Microsoft Office Application.
File - Options
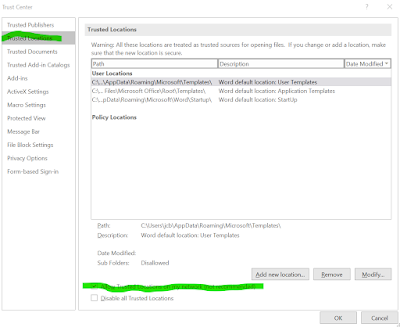
Trust Centre

Press the button for Trust Center Settings.

Tick the option, near the bottom that Microsoft does not recommend.

Network Trusted Location

Windows, by default, will not trust network locations. It will add additional warning messages when you try to do things like, copy, rename and delete when working on files directly on a local NAS box.

If you only ever save to your machine and let Windows sync the files to the NAS box, then the following is of no benefit to you.

I have network shares directly on my NAS box, lots of them and I find all the warning messages a little tiresome. They can be avoided by setting the local network as trusted. This is done from the internet options in control panel.


Control Panel - Internet Options
Security TAB
Local Intranet
Press the Sites button.


Press the Advanced button.

In the 'Add this website...' box, type in the first part of your local network IP range and use a * for the last octet. (This is not how subnets work but if you have a more complex home network, you already know that.)

Your network may not be the same as mine. Enter your IP range.

Press the Add button.

Close and OK back to the control panel.

Hopefully that will reduce the number of warning messages for working on the network.

Restoring Windows

These instructions are not for backing up a Windows computer but they can have a part to play.

It is very difficult to create a backup of a modern Windows computer that could be restored on to another computer.

To recover from a catastrophic machine failure, the operating system needs to be installed from scratch on the new machine. The user account created, then each folder moved, as per these instructions. The files will then sync., back to the computer in their own time.

While that's happening, it is an opportunity to install the required applications on to the computer.

==


Thursday, 28 January 2021

Worn bike drive train

 I've seen a few posts on Facebook which ask, "is my chainring worn out", "should I replace my chainring."

I have just replaced a crankset, probably beyond its expected lifespan, which shows clearly what a worn out chainring looks like.

Side by side, the new and the old. Surprisingly, that chainring was not skipping. I only looked at it because the whole drive train sounded clunky!

I am pretty sure this got to that stage quickly because the chain was worn out. I checked the chain a month or so ago but in that time, it has gone from acceptable to thoroughly useless. I blame the wet mud at this time of year.

A chain guide is the best way to check a chain and easy to use.

I was interested in looking at how a chain wears. I have heard people refer to chains as stretching. This is misleading because the components of the chain do not stretch but the pivots wear smaller allowing play. If you push and pull two links you can see and feel the movement of the links. A new chain has virtually no movement along the length of the chain.

In the case of a severely worn chain, if you pull it taught and offer it up against a new chain, you can see how much play there is.

==


Sunday, 24 January 2021

Ring IR beam modification

Ring Security, as far as I know, do not have an infra-red beam solution for things like driveways.


It was a fairly easy job to modify a Ring door sensor to connect to a commonly available IR beam.

I'm sure I'm not the first, nor will I be the only, person to have made this modification.


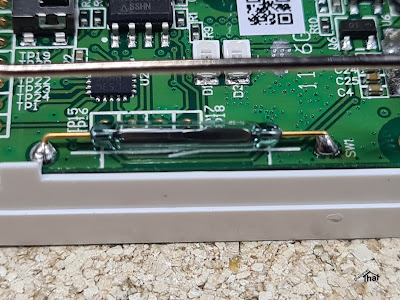
The door sensors use a standard reed switch, which is just on and off. The IR beam, that I have, just connects or breaks a relay switch, so is ideal to connect in to where the reed switch would normally be.

I soldered on a pair of wires in place of the reed switch.

I used a water proof box to house the modified door sensor and ran the lead to connect it to the IR beam. Works perfectly. 

==