Search This Blog

Saturday, 13 July 2002

Flying

My first lesson

I went 2 days before my 37th birthday on a flight Shelley had booked me as a surprise. A 1.5 hour lesson flying a helicopter! The 13 July 2002 was the first good sunny day we had had all year, so I was very lucky.


This has got to be one of the best experiences, flying an R22, 2 seater, helicopter. I have to say that I was only ever in control of one of the 3 controls at any one time and they were all very sensitive. Movements of less than 5mm could send the craft circling.


The trip was to skirt round Rayleigh, so I could see my own home and then along the Thames as far as we could get. Due to traffic at London City Airport, we could only go as far as the Queen Elizabeth II Bridge at Dartford, but that is within sight of the City.


Sunday, 5 May 2002

How to get Co-op to work with MoH:AA


This is for use with Medal of Honor: Allied Assault

What is Co-Op play?

This is where you and your friends combine forces to complete the missions within the game. You all compete against the computer.
The maps and levels have to be created or modified to be played co-op.

What needs to be done?

There is a convenient feature of the game, that allows any level to be played Co-Op, as long as both the server and the client run the same level, before the client attempts to connect to the server.
Use a few command line options to launch the map and run the server at the same time, then the client can use the console command 'connect' to join that game.

To simplify things, the shortcut is usually provided by any modified co-op level, and can easily be changed to work with other levels.

I have created some menus, to simplify the client side of things, see further on in this guide.

Although I have said any level can be played co-op, this is misleading, because the objectives and obstacles in some Single Player levels, do not function or can not be passed by more than one player! This is why most levels have to be modified to work. In addition, some levels are too easy, when a team try to complete them. For this reason I have created some scripts to help improve co-op levels. This guide does not cover those, just the basics.

Which version of MOH:AA will I need?

I have only been able to get Co-Op play to work properly, if I patch up to version 1.11 of the game. If you stick to an older version, you're on your own.
If you can't upgrade your game because it claims you have the wrong country version, there is a registry fix to correct the version number.

[HKEY_LOCAL_MACHINE\SOFTWARE\EA GAMES\Medal of Honor Allied Assault\1.1.12.200]

What files do I need to modify?

You need:
Maps\coop_yourlevel.bsp (the main compiled map file)
Maps\coop_yourlevel.scr (script file - this is the one you have to edit)
Maps\coop_yourlevel_precache.scr (this is a list of all the models and the script used in the game)
The game will create the following automatically, once created, it's worth putting them in your pk3 file:
Maps\coop_yourlevel.min
Maps\coop_yourlevel.pth

How do I get characters to fire back?

Include the modified .tik file:
models/human/new_generic_human.tik

How do I get the sound to work?

Make sure your map files start with 'coop'.
Include the ubersound files, which have been modified to include map files that start coop as well as the normal ones:
ubersound/uberdialog.scr
ubersound/ubersound.scr
These files are included in any of my modded levels, look for the lastest mod on my web site and download that. 'x_jcbmain###.pk3' contains the sound and human model fixes. The hash (#) will be the version number of that file.

Several mods will have modified these files, so if the sound does not work, remove any other mods. I have tried to get my version to work with as many mods as possible, but due to the way mods and the files in MOH:AA work, it is not possible for all mods to be compatible.

What do I need to change in the scr file?

1) Remove all the friendly troops.
Add the following line to the script file:
$friendly remove
or
$friendlybob remove
$fredflintstone remove
$friendly2 remove
They are the targetnames of the characters followed by the command 'remove'. If the friendly characters do not all have the targetname 'friendly' you will have to put one line in for each targetname.

2) Remove any model, object or door that gets in the way.
$object_targetname remove

3) Fix the guys who jump out of cabinets. (if present)
Search for any line in the script that looks like this:

exec global/cabinet.scr
Change the line to have 'remove' at the end.
exec global/cabinet.scr remove
I don't know why it works, but I found this tip in the big 5 map pack notes and was originaly found by Fatz, thanks.

4) Disable any code that does not work.
Each map will have different problems. Some maps have vehicles at the start of the level which may need disabling and removing others may have events that cause problems, for example the alarms in m6l2a get turned on by the guards but can't be turned off by the players. In this case remove the alarm code:

// exec global/alarmer.scr
The // is the comment marker, so if a line starts with // it will not be executed.
Other lines I've had to remove to get things to work:
// exec global/spotlight.scr
The following line is possibly used in other scripts, but generally I have found it can be removed with no noticable consequenses.

level.script = maps/mxly.scr
The following, and anything refering to the $player, will not work on the server, until the $player is alive. On the server it is not good enough that the player has spawned.
In the main code, the script lines will have been processed BEFORE the player is alive, so that code will not work! For simplicity, you can simply remove those lines, but if they add to the plot, you may want to spend the time re-writing them in some way!

Examples of ones that can be removed:

$player stufftext "tmstop"

5) Check lines with references to other file names.
In most cases you should LEAVE the map name as per the original level. The script that is called will only have entries for existing levels. You may want to edit the script that is called to work with your level name, although this is usually unnecessary.

exec global/loadout.scr maps/mxly.scr // this assigns player items for the level
The loadout script can be removed. In single player it adds appropriate weapons, but this is overridden by the multiplayer weapon selection when playing co-op.
Leaving it usually creates more errors than it saves, but I am undecided. If you want to leave it, use the following line in all the co-op scripts.
exec global/loadout.scr maps/m5l3.scr // CO-OP to reduce warning error messages
It should be the first line of the level script.
exec global/ambient.scr mxly // this adds suitable background sound

6) Remove or change the objectives.
This can be tricky, but the level will probably work without touching the objectives. If parts of the level are not playable in Co-Op, try just removing the objectives. If you are familiar with scripting, you can probably set up a suitable Co-Op objective for the level.

** That's it, you should now have a Co-Op level.

7) Fix the enemy skill level.
This can be labourous. Normal SP skill levels are ignored when running a Multiplayer server. Most SP levels set the accuracy of the enemy to 100% and then use the skill level to adjust it down for the SP games. This can make Co-Op levels difficult but still fun.

If you want to feel better about your skill, you can use the 'targetname' of each character and set the accuracy of each enemy:

$guard_by_the_gate.accuracy = 20
$patroller1_in_yard.accuracy = 15
$enemy.accuracy = 25

How do I find individual characters or objects in an existing map?

Use a hex editor on the .bsp file and search for 'targetname'. Look for lines of code similar to the following:
{
"balconyheight" "128"
"enemysharerange" "0"
"#fnum" "1"
"origin" "-5392.00 -2368.00 72.00"
"testanim" "idle"
"model" "human/1st-ranger_medic.tik"
"scale" "1.0"
"classname" "ai_allied_2nd-ranger_private"
"$targetname" "friendly"
"type_idle" "idle"
"type_attack" "turret"
"type_disguise" "salute"
"type_grenade" "grenade"
"gun" "none"
"maxdist" "328"
"angle" "0"
"leash" "900"
"sound_awareness" "100"
"noticescale" "100"
"fixedleash" "0"
"waittrigger" "0"
"accuracy" "20"
"ammo_grenade" "0"
"disguise_range" "256"
"disguise_period" "15"
"disguise_level" "1"
"gren_awareness" "10"
}

How do I reference an individual character in my script?

You can reference the characters by their Targetname. The targetname acts on all the characters with that targetname all at once.
"$targetname" "friendly" "$targetname" "guard1" "$targetname" "officer2"

For example, to remove all the characters with the targetname 'friendly' use:

$friendly remove
or to remove individual characters you could use:
level.guy = $guard1
level.guy remove
It might be possible to reference the characters by their friendly number, but I have never tried to get that to work...

"#fnum" "1"
"#fnum" "2"
It's probably just the array number, e.g.
$friendly[2] remove

How do I reference the players in my script?

This is tricky but possible, but requires the addition of some simple code. As each player spawns $player becomes an array with one member for each player. $player[1], $player[2] etc.
To find out the total number of players connected check the array size.

level.total_players = $player.size
In addition to that, to reduce the amount of work the server has to do, I keep track of the maximum number of clients, using:
level.maxplayers = int ( getcvar (sv_maxclients) )
You can use these in a loop similar to the following:
loopforgame:
  for(local.i = 1;local.i <= $player.size;local.i++)
    {
        if ($player[local.i] isTouching $item_targetname)
        {
 iprintlnbold "Do something here..."
        }
        waitframe //infinite loop protection
    } //end loop for players
  waitframe //infinite loop protection
goto loopforgame
end
For this to work, you will have to loop indefinetely which could slow the game down, so be sparing with this type of code and make sure you have the waitframe commands in the right places.

How do I display messages on the players screen?

iprintln "A message"
iprintln_noloc "A message"
iprintlnbold  "A message"
iprintlnbold_noloc "A message"
Using the _noloc (no localisation) avoids the 'Need Localisation' errors, see the next section.

Why do I get 'Need Localisation' errors in the console?

All text you use needs to be in the localization.txt file to stop these errors. The game looks for a substitution, between the English used and the language you want to display. It will not stop the text displaying, but is a bit messy, so you might want to always use the _noloc versions of the iprint command.

Where do I put my code?

I find that adding or removing objects and most setup code works, if it is after:
//------------------------------------------------------
level waitTill prespawn
//------------------------------------------------------
and before:
//------------------------------------------------------
level waitTill spawn
//------------------------------------------------------
If it is something that happens, rather than adding or removing objects, or it has to interact with the player, it should be after:
//------------------------------------------------------
level waitTill spawn
//------------------------------------------------------
Having said the above, I am actually still not sure if the 'level waitTill spawn' works at all in multiplayer games. I have taken to removing it from my Co-Op scripts.

How can I make the levels easier to start?

I have created menus for this purpose. I am on my second version. These add to the level script, and pop up a menu when the players run the level.
See any of my new levels, the code is right at the start. You can find these on my web site. The menus are included in 'x_jcbextras###.pk3' supplied with each of my Co-Op levels. Look for the latest version number instead of the hash (#).

Can I use DM Maps for Co-Op

Not really, I have tried and I can add lots of troops using scripts, BUT I can't get them to patrol or move about, so the gameplay is a little boring. They duck and shoot at you, but that's about the best I can get.
I have tried to add info_pathnode entities to move actors to and from but the maps always crash. I have had confirmation from other people that adding info_pathnode entities crashes maps, so at the moment I've given up with DM maps.

SP Maps

The Single Player maps have lots of useful scripting worth having a read through.

Are they any good for Co-Op Play?

The following are just a few notes I have made about each level:
A=Already Co-Op, N=Needs work, E=Easier conversion
N * m1l1 Start in moving truck
N * m1l2a training
N * m1l2b training factory cut wires bit dull
N * m1l3a Moving jeep
A * m1l3c Road to lighthouse

A * m2l1 snow meet grillo - the snow one in Norway
N * m2l2a Need to check papers
N * m2l2b inside sub (too small)
E * m2l2c Outside sub, alarms sounding (needs work, OK, but small)
E * m2l3 inside building but starts inside the air con (needs work but OK.)

A * m3l1a Omaha landing (already done by someone else)
A * m3l1b Omaha bunker (already done by someone else)
A * m3l2 Farm house, with a platoon
E * m3l3 Six barrelled (needs rocket laucher, may be worth a look)

E * m4l0 Road up to house
A * m4l1 before plane then road to tunnel under church
A * m4l2 Train depot, (avoided need to get on the truck)
E * m4l3 truck to tank park (small but OK)

A * m5l1a Snippertown (needs some more work.)
A * m5l1b Lead Tank crew (needs some more work.)
N * m5l2a Tank
N * m5l2b Tank
N * m5l3  Protect Tank at bridge (too small)

E * m6l1a Snow forest
E * m6l1b More snow
N * m6l1c Need papers to get to riffle Stg44
A * m6l2a Snow leading to town - communication blackout
A * m6l3a Starts in a train with marines (marines removed!)
N * m6l3b Fort. (Starts in a lift)
N * m6l3c Fort again. (Starts in a lift again)
N * m6l3d More in the Fort (worse, wearing Gas Mask)
N * m6l3e End game (very short)

Thanks

I'd like to thank the numerous people on Forums, Newsgroups and Web Pages who have provided useful information to help me write mods and prepare these notes. Most of you are unidentifiable or lost in the mists of re-posts and quotes. If you happen to see something that you think you originated, then you are probably correct, and many thanks.

Wednesday, 20 February 2002

Archery Bowstand with Ground Quiver

This is a little add-on I have made for the Skorten Pod bowstand.

I like the Skorten bowstand, it is stable when in use and compact when taken down, but I wanted somewhere to rest my arrows while shooting indoors. So this is my solution.


The ground quiver will easily hold 10 arrows.


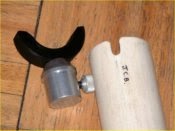
Shows the cutout to fit under the thumb screw

The top of the tube is held in place by the thumb screw which normally just holds the bow rest in place.

Shows the foam in the bottom to rest the arrows on

Foam is pushed in to the tube to rest the arrows on. With the leg in place the foam can not be pushed out.


Shows the hole just large enough for the thread of one of the legs

A notch large enough for the leg to pass through is cut in the far edge of the tube. Opposite the notch is a hole just large enough for the thread of the leg to pass through. The screw in leg holds the quiver in place.

Construction

The ground quiver is made from a short length of waste pipe held in place by the top thumb screw and one of the screw in legs. The pipe has to be at least 12" (305mm) long. The notch for the thumb screw and the hole for the thread of the leg, must be in line on one side of the pipe. A 75mm (3") length of tightly fitting foam is pushed in the bottom for the arrow points to rest on.

Dimensions:
Tube outside diameter = 43mm (1 3/4") approx.
Tube minimum length = 305mm (12")
Top notch width = 6mm (3/16")
Top notch depth = 13mm (1/2")
Hole for thread of leg = 8mm (5/16")
Centre of the hole from the lower edge of a 305mm (12") length tube = 10mm (3/8")
Lower notch width to span leg = 13mm (1/2")
Lower notch depth with a 305mm (12") tube = 13mm (1/2")

Tuesday, 3 July 2001

Keyboard Layout for Visio

For use with Microsoft Visio 2000


Use for training, samples or your own custom keyboards


Download
Keyboard Layout Visio stencils in a Zip file format [440kB]


Included
The download includes individual stencils and a whole workspace. For convenience I have included the template 'Keyboard.vst' which can be opened as a Visio library.


Public Domain 
Copyright© John C. Brown
As long as you own a copy of Microsoft Visio you may use the drawings for any purpose. 
No warranty is provided.  You use these entirely at your own risk.

Sunday, 8 October 2000

Essex Green Laning Trip

Sunday 8 October 2000


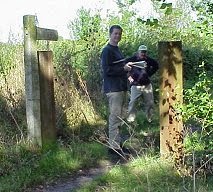
Essex has some lovely off-road locations. We were on routes which Dave had checked out at a GLASS meeting and marked up on our OS maps. We did a circular route on OS map 167 around Braintree. The total number of miles covered was 50 including both on and off-road sections.


Tuesday, 5 September 2000

Off-Road Driving Notes


The first thing I should point out is that these notes were originally typed a few years ago (11-1998) the day after attending my first ever Off-Road driving lesson. Since then I have been on a second training course and taken part in several Essex Land Rover Club trials and a few Green Laning trips, both organised and with friends. I am not an expert. If anyone finds any mistakes please leave a comment so that I can correct them.

These notes were originally to remind me of the techniques I learnt on the training days. My wife and I are now on our second Discovery and go off-roading whenever we can.

Safety First

Don't rely on these notes, go on a training course first. Contact 'Pro-Trax' or another off-road driving centre.

Keep your thumbs out of the steering wheel. Grip the steering wheel securely at all times with your fingers and the palm of your hand. Your thumbs must not be inside the wheel, if the front wheels get caught the steering wheel could spin round and hit your thumbs. It hurts, but you'll remember after the first time.

Make sure all luggage is secure. Flying tools, bags and boxes are more likely to kill or injure you than anything else. Tie it all down securely.


Always walk areas first. Unless you are sure of an area, get out and walk the track before continuing.

What types of 4 wheel drives are there?

Permanent 4 wheel drive, these use a central differential to prevent wind up (see following notes.)
Part-time 4 wheel drive, in two wheel drive mode they are more like a normal car. In 4 wheel drive mode they can only be driven a short while due to transmission wind up.

Transmission wind up, is caused by the front and rear wheels traveling at different speeds round corners. This is because the outer wheel is traveling round a larger circle than the inner wheel, so the outer wheel actually goes round more and travels a greater distance than the inner wheel.

The differentials, one in each axle, share out the power to the wheels, so that the outer wheels when turning a circle can rotate faster than the inner wheels. All cars have differentials otherwise the car would not be able to turn a corner very well. One wheel would always be dragged round rather than pushing the car round. On a four wheel drive car these differentials are still permanently attached to the engine at one point. The front pair of wheels are also traveling at a different speed to the rear wheels, when traveling round corners. This can mean that the drive shafts, which at one point are connected together, are traveling at different speeds, gears eventually mesh tightly and the drive axles twist. Sometimes a wheel will spin to release pressure, but on Tarmac with good grip this is unlikely and a drive shaft may break instead!

Part-time 4 wheel drive, runs in 2 wheel drive most of the time to prevent transmission wind up. When you engage 4 wheel drive on a surface with good grip, you must only do it for a short time.

Differentials, share out the power from the engine to the two drive shafts connected to them and then to the wheels. The way they work means that power is always sent to the wheel with least resistance. This means that if a wheel comes off the ground, you get NO power! It also means that in reality only one wheel in a pair ever has drive, so a 4 wheel drive really only has drive to two wheels at any one time, one at the front, one at the rear.

It probably sounds that differentials are more trouble than they are worth, but this is not the case. Without a differential, the vehicle would be pushed in a straight line, because all the wheels would rotate at the same speed regardless of the distance each was traveling and regardless of where the front steering wheels were facing. Some competition (and other) vehicles can lock the differentials on the front and rear axles. This is useful for some situations, but you must know the consequences of doing that. The vehicle will not steer very well, if at all!

The advantage of part time 4 wheel drive, in 4 wheel drive mode, is that regardless of the angle of the axles two out of the 4 wheels will have drive, however without a central diff. you get transmission wind up!

Full time 4 wheel drive vehicles, like modern Land Rovers, use a central differential to share the power out between the front and rear axles. Sounds good, stops transmission wind up, but as power is distributed to the wheel with least resistance, you can end up with only one wheel that has power! The answer is to have a diff. lock, which simply stops the central differential working. Now you have power to two wheels, like a part time 4 wheel drive, in 4 wheel drive mode.

You can safely engage the diff. lock while moving, but you should engage it before you approach difficult terrain. It's probably too late to engage it once the wheels start spinning and churning up the ground! Remember to turn it off when you've finished the difficult section. The dashboard should have a warning light to tell you the differential is locked. On Land Rovers (and probably other makes) the light actually indicates that the transmission has wind up. If the light does not go out after disengaging the diff. lock the gears are probably bound together and you need to drive in such a way as to free them.

I've found different amounts of wind up are freed in different ways. A little wind up will go after a short drive, the more corners the better. A lot of wind up can take a long while to clear just by driving (it's taken 15 minutes sometimes.) Better is to spend a minute or two reversing. I also found reversing round a corner, is better than a straight line.

Know your vehicle

You need to know the angle of hill it can tackle both going up, down and over.


A tow bar was recommended to protect the car. It reduces the angle at the back, but does protect from some damage. With a little momentum, and if you don't mind the bump of hitting the tow bar, you can ignore the departure angle on soft ground.

Which routes to take?

The most important thing when driving off-road is to read the terrain ahead. Look ahead and decide the easiest route. Try to avoid anything under the car that could cause resistance (drag).
You should always be in control of the vehicle. If at any time you slide sideways you are no longer in full control of the vehicle. You can not slide sideways if you are on the level. When driving always look for the most level path. Only attempt a side slope if there is no alternative.

Straddle existing tyre tracks, except going up and down hill, when they may be useful to keep you in the right direction. Remember that if you can't avoid the ruts you may be pulled in to them and they are often impossible to get out of.

If you get in tyre tracks look for the shallowest point or low edges to get out.

Cross ditches and tyre tracks at an angle, step over them slowly one wheel at a time. Never go across at right angles, when both tyres could get stuck at the same time.

Always remember, slowly, in a low gear, there's no rush.

When looking at the terrain decide in advance which wheel will have least resistance and therefore most likely to spin (See Differentials for more details.) In most cases the wheel further down a hill, or in a ditch is the one which will have the most resistance, so the highest one is most likely to spin!

How do we go up hill?

Low gear, give it a little controlled acceleration just as the front wheels start to go up the slope.
Keep the power on until just before the top and then ease off so that you are stationary at the top of the hill.


You never know what is the other side of a ridge. So you MUST always stop at the top to check.

How do we go down hill?

Put it in to the lowest gear, and let the idle revs pull you over, then drive down without touching any of the pedals.


DO NOT use the brake. The engine will slow the vehicle down to just the right speed to go down the hill.


What do I do if I get stuck or have problems climbing a hill?

This is called a failed hill climb. That's when you stall the engine or for whatever reason, stop part way up a hill.
Usually the best way out, is to get back to the bottom, safely, and start again.

If you remember that at all times you should be in control, the way out is simple. Reverse down the hill. There is going to be a problem putting the Land Rover in to reverse, because as soon as you touch the clutch, you will lose engine braking and crash down the hill!

What to do to get back down?

At this point the engine is OFF.

  • Pump the brake pedal a couple of times, the last time, pushing down as hard as possible and then then let go. This is to make sure the brakes are clear of debris and working.
  • Straighten the wheels, look out the window to make sure the wheels are straight. I can't emphasis this enough, people have died because the steering wheels are not straight, and the vehicle turns over!
  • Hold the brake down very, very hard, and pushing the clutch down, put the vehicle in to reverse gear.
  • Raise the clutch slowly making sure the vehicle is held still.
  • Slowly release the brake making sure the Land Rover is held by the engine braking.
  • Hold very very tightly to the steering wheel with one hand and start the engine with the other. (Yes, you are in gear and you don't have your foot on the brake.)
  • You should now drive slowly backwards down the hill to where you came from.

You can now try the hill again.


What's the brake for?

Getting you out of trouble on a failed hill climb. You need it to hold the vehicle still while you press the clutch down to put it in to reverse gear, for the descent.

Apart from that the brake was not used at all, everything is done at very slow speed using the low gears. The engine braking of the Land Rover will hold the vehicle stationary, even on a steep slope.

What's the clutch for?

To change gear. Never do it under load, for example, that's when you're going up or down hill.


What about side slopes?

Firstly some safety advise I was given, was to close your window. If the vehicle should role, the natural instinct is to put your arm down to save you. One arm will not stop two to three tonnes of Land Rover, so don't try it!!!!


These are potentially the most dangerous things to attempt. Only ever do a side slope if there is no alternative. Land Rovers can go along very steep slopes, but it feels, and is, dangerous.

Tackle the slope in the lowest gear, diff. lock on (if you have one). Move as slowly as possible. Keep in your mind an escape route. You must ONLY TURN DOWN HILL, never try going up hill, the angle increases and you are liable to role over! Remember you can always stop.

Always look out for indents in the ground of the lower wheels and bumps on the ground where the upper wheels will travel. Either case will change the angle of the vehicle and possible topple you over!

As I said, only attempt side slopes, if there is no other route.

How do I cross shallow water?

Slowly in to the water, like approaching a hill. As the front wheels enter the water accelerate out.
Basically you don't want to stop in the water. The momentum of over two tonnes of vehicle, should pull you out, even if you stall... if you get it right.

Always be careful with water, you never know how deep it is. If in doubt, use a pole or long stick to test the bottom. Check along the route you intend to drive, testing where the wheels will be. Remember, your vehicle is a lot heavier than you are. River beds can have pot holes, or can become deep. The mud at the bottom may not be able to support the weight of a vehicle.

Deeper and longer stretches of water can be crossed but then you need to worry about bow waves.  That's not covered here.

What do you recommend?

Have proper training, I can't repeat it often enough. It's also fun, because you are under expert supervision, it will also be safe.

You could also join a 4 wheel drive club like one of the Land Rover clubs dotted about the country. My wife and I joined a local organisation the Essex Land Rover Club.