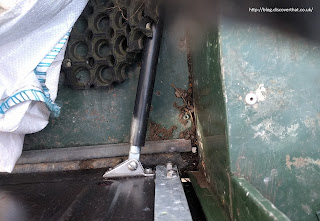
As a temporary fix, when we fitted the side opening tailgate yesterday, Shelley tied a loop of baling twine on to the hinge side so it could not swing back and damage the lights.
That solution did not have to stay long. I had already
purchased a gas strut to act as a stay. So, on another frosty morning, we fitted it.
Update: See the notes at the end. This gas strut and its replacement
did not last the test of time.
I had bought an adjustable pressure gas strut because I had no idea how many Newtons force I needed. In fact I had no idea what a Newton of force felt like.
I now know that 700N is almost like a solid iron bar when trying to compress it! I let out a lot of pressure before I could even compress the strut using a door as leverage!
I bought
stainless steel fittings because it was going to be outside in the truck. I also chose to have a protective sleeve over the piston. I selected to have
an 8mm thick rod and a 450mm long gas strut which with
the eyes on each end results in 500mm between centres. The point of the length was to have some clearance taking in to account the thickness of the door and ensure I had more than enough travel in the piston. [See the updated notes at the end.]
To fit it I selected a position on the door side as close to the hinge as I could in order to get the best clearance. The height being almost exactly central between the lower hinge bolts. Again, I didn't want the piston to be restricted by the hinge bolts.
The brackets I chose were ideal at the truck end but as I wanted the bolt head on the outside of the door I had to carefully measure and cut the M6 bolt to length so it did not foul the piston.
With Shelley's help we bolted the bracket through to the wheel arch with a strengthening plate on the back.
The bracket is positioned so the piston is fractionally under pressure when the door is fully open. Just two millimeters short of the full extension.
The gas strut can only be reduced in pressure, by letting out some gas. It cannot be increased in force so some care was needed in the adjustment. I've left it a little stronger than is perhaps ideal because I have yet to fit the wheel carrier.
 |
| The nut sticks out a bit too much, I've changed this now. |
The piston acts as a stop so the door cannot open too far. It just about sits at right angles to the back when open.
==
Update: November 2017
One end of the strut snapped off. I can only think that there was a little bit too much leverage at the door end.
I've looked at the design and made the following changes:
Change bolt: I've used a Torx head bolt from the inside so it does not stick out as much.
Grind end: I've ground down the strut end on the door so it can rotate further before it hits the above bolt.
Torque: I have tried a fixed force strut of 50Nm. This is not quite enough to push open the door but helps a little. I'll try 100Nm next time.
Length: The length of 450mm and stroke of 200mm worked nicely. I tried a 350mm long strut but it only just works and the door does not open to 90deg. I'll stick with the 450mm long in the future.
Position: I intended to move the strut across the back of the door but the bracket that would have been required would need to stick out a long way. I prefer it running along the side of the truck.
 |
| 350mm is a bit short |
Update January 2022:
This is now on a different Defender but it is the same side opening door.
Eventually the replacement gas strut also failed. I took the view that was not a long term solution. For quite a while we used a webbing strap but after we were forced to change cars, and I got a chance, I fitted something based on the standard Land Rover stay.
The tub side was the same as used on a normal full height, safari, door. The door side was the bolt on runner from the rear doors of a 110. A typical safari door as a welded on runner.
==


