It's been over 6 years since I last strung my bow so I've been doing some reading to bring myself up to speed. I was also watching the Olympic Archery on the BBC iPlayer and the TV.
Olympic Equestrian
The only events we wanted to see live was one of the equestrian events. We were lucky enough to be able to get tickets for the finals of the 3 Day Eventing at Greenwich Park.
My wife has some pictures and more info. on her blog:
http://tomandhenry.blogspot.co.uk/2012/08/greenwich-park-equestrian-eventing.html
Equipment
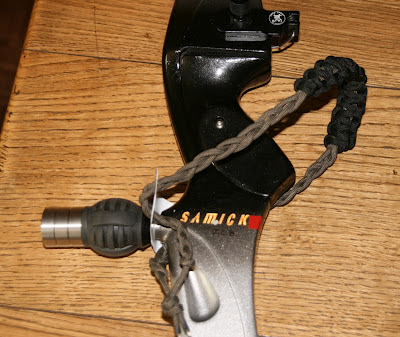
Every archer I saw on the Olympics had exactly the same setup. If there was any deviation I did not notice it. Even the arm guards were almost identical and everyone used a finger sling that looked like it was made out of a shoelace. While I was looking to find out how they tied the shoelace finger sling I came across a few braided wrist slings which I liked the look of.
The wrist slings were not expensive, even the nicest ones that would have to be shipped from the USA were only about $20 but I just fancied trying to make one.
The above picture shows what I ended up with after a couple of attempts.
Knots
Although I've tied a few knots in the past and somewhere I have a small book on how to tie them, it was much quicker to do a search on the Internet. I found loads of web sites and videos and quickly discovered that the string to use is called Paracord and the type is described as 7 strand or 550.
I bought two colours I thought would match the bow. There are lots of bright colours available as well but I decided on subtle for the time being. I found lots of choice on Amazon and finally bought from:
http://www.hunterscampingandbushcraft.co.uk/ via their Amazon store:
Very prompt delivery.
I watched a few videos but to tie the knots I ended up finding everything I needed at:
http://www.animatedknots.com/
I used a single rope braid for the main length and a Cobra lanyard knot for the thickened wrist section. Both are in the decorative section of the web site:
http://www.animatedknots.com/indexdecorative.php
The single rope braid is exactly as described on the site but I slightly changed the Cobra knot after some trial and error.
Changes to the Cobra
On the example I followed it had a loop for the lanyard part. That was unnecessary because I was using it round the braid. To start I just ignored the extended loop ending up with just the first knot round the braid.
The other change I made was the way I finished the knot to hide the ends.
On the example I followed both ends were looped back under the rest of the knot on the top. This is done by keeping the last few loops loose, tucking the ends in and then pulling tight.
I found that with both ends on the top of the braid, one side would pull the Cobra knot out of shape when I tried to tighten them. All I changed was to loop the offending end under rather than over the braid which allowed me to tighten it without distorting the rest of the knot.
A little tip if you try making this yourself. Don't make the Cobra knots too tight. I needed to slip it along the braid to get it in the centre. The first time I tried this the Cobra knot was so tight I could not even edge it along the braid. The next time I tied the knots I checked that I could just move it. Deliberately tight but it would move.
Attach To The Bow
This type of wrist sling attaches using the long rod. The more decorative slings typically used a leather tab and the more modern used a plastic plate with holes in.
Looking through my bits and bobs in the shed I settled for cutting a rectangular shape from a bit of plastic packaging. Tough and flexible, should outlast me.
The holes are just punched with the largest size on my hand punch with two holes next to each other to form an oval just large enough for the braid to pass through. It needs to be tight so the in and out has enough friction to hold the braid at the desired length.
Looks much nicer than the type of sling I used before.
==
Follow up. I enjoyed making this and tried it out a few times but I ended up preferring to use a finger sling the same as all the Olympic archers used at the previous tournament.


1 comment :
That really looks nice! I will definitely try it out, thanks. If you are interested in learning some new knots, I suggest that you check out a tutorial I found, where you can learn how to make Cobra Knot, King Cobra knot, Lanyard, and a couple more. You can find it here: http://hikingmastery.com/skills/paracord-knots.html
Post a Comment