Search This Blog

Sunday, 4 October 2015

Our patio is now a terrace

I've been very busy at work the last few weeks and I have not had the inclination to update this blog when I get home. I'll try and rectify that.


Our patio was finished about a week and a half ago. We've been talking about getting rid of the concrete paving slabs for many years.


In our heads we envisaged a brick patio with the bricks in a herring bone pattern.


That is exactly what we now have.

We'd looked at doing it ourselves a couple of years ago but once I lifted a slab I decided it would take us too long to do a good job.


Having seen Reagan Landscapes team at work, I was right to let the professionals do the job.  They had diggers, removed massive amounts of concrete to get down to an appropriate depth and then added back aggregate and layers of sand.

Old English bricks


The brickwork is excellent and they paid great attention to detail. We are very pleased with the results. The whole job from start to finish took them less than three weeks.


It had not occurred to us before but with the drop in levels and the steps it is now a terrace not just a patio.


Sunday, 27 September 2015

Synology Cloud Sync Issues

I use OneDrive for my online storage. Microsoft provide unlimited space with my account so I am keen to use it with my Synology NAS box as an online copy.

The NAS box stores everything on my home network. I have it setup with my user home drives from all the computers and have organised shared areas for projects I've worked on over the years, there are home videos and all our photo's stretching back over a decade. There are lots of files that I would not want to be without. I obviously want to keep them all backed up.

I use a large USB disk for the primary backup but I would like to have an off-site copy. Synology provide the app Cloud Sync. It's not a backup solution but is useful for synchronising files and is the only way to get files to and from OneDrive using the NAS box. Unfortunately it has some peculiarities.

I've had it running for some time now and it appears to work OK. Today I tried to synchronise an extra folder structure but it failed on every file and folder!

In the interface on the Synology, I could click a previously unsync'ed folder but the log in the history tab said 'Download Failed' for every file!


The only way I could find to fix it was to Unlink the Synology profile from OneDrive and add a new one with a different name. If I used the same name if would create new folders but none of the files synchronised.

I could select the same folder structure, so at least it appears to only be downloading files it hasn't already got.

It has started to download files now but it will be a few days or weeks before everything it should download has completed!


Monday, 14 September 2015

Q5 Mini DV Camera Settings

I have bought some very low cost video cameras. Ideal for use where using a mobile phone is inconvenient, too large or might get damaged. The model is a Q5 HD720P or so the instructions claim.


I have some issues with the description of the ebay advert but dealing with that is not the purpose of this post. The little camera suffer from having the time stamp permanently displayed in quite a large font in the top left hand corner. Hunting on the internet has shown me that lots of people are trying to turn this off but no solutions are available.

I have also not found a way to turn this off but I can set the time and get it to remember the time for the next recording without having to reset it each time.


The very bad English instructions provided with the camera are just wrong but the few bits of English visible in the Chinese instructions appear to be correct.

Set the Date and Time

To set the date and time it is necessary to create a small text file and save it in the root of the SD card. Whenever the camera is turned on it reads the file and sets the date and time from that. However, if you don't edit that file, the next time you start the camera it will use the old time!


To set the time create a text file called TAG.TXT. This can be created with any text editor such as Notepad in Windows.

It should have a single line with the date and time in the following format:
YYYY-MM-DD HH:MM:SS


Save that to the root of the SD card and if the camera is already on then turn the camera off and back on again. The TAG file is only read when the camera starts up.
Note that the camera does not read the file, nor does it record video, if it is connected to the computer via the USB cable. If you have saved the TAG.TXT file via the USB cable you must disconnect which usually reads the TAG file but just in case I always turn the camera off and back on again just to be sure.

Now for the bit not shown in the instructions.
The camera reads the tag file every time and sets the date and time AGAIN! Deleting the file does not solve the problem!


To get the camera to keep track of the time itself and not reset it each time it is important that the TAG.TXT file is changed so that it does not have a valid date. I found that setting all the numeric values to zeros worked to keep the existing date and time.

0000-00-00 00:00:00

Save that file back to the SD card and now when the camera is restarted it will not reset the time.

It's a bit of a faff because you have to deliberately set the time and then immediately following that put the SD card back in to a computer to edit that file to have zeros otherwise the time is reset the next time the camera is restarted! You will only have to do this every now and then if the time drifts too much.

Other Ideas

Another alternative to avoid having to ever set the date would be to use an old date and always start the time at zero:

2000-01-01 00:00:00

I tried other years such as 1111 but that was treated as invalid!

Using the Camera

Another bit that is very poorly written in the English instructions are what the buttons do and what the lights mean. Here are my descriptions of the functions.

Buttons
Turn On - Hold the ON/OFF button for about 1 second until the red and blue lights flash
Start recording or take a photo - Press the ON/OFF button. Needs a positive press for a moment.
Stop recording - Press the ON/OFF button.
Turn Off - Hold the ON/OFF button for about 2 seconds until the red and blue lights flash
Still mode - From video mode, press the mode button once, the light will change to blue
Audio mode = From still mode, press the mode button once, the light will change to red and blue
Standby mode = From audio mode, press the mode button once, the light will change to red

Do not remove the SD card until the lights have stopped flashing. It needs that time to finish saving the file.

Lights
Red and Blue both flashing - powering on or off
Red steady - video camera mode ready but doing nothing
Red slowly flashing - recording a video
Blue steady - stills camera mode ready
Blue off then back on - taking a still image
Red and blue steady - audio recorder mode
Red flashing and blue steady - recording sound only
Red and Blue both flashing but then goes off - you need to insert an SD card

Resolution
Video = 720x480
Still = 1280x1024


As mentioned above, the advert states the video is 1280x720 but I have been unable to find a way to set that and I am awaiting details from the supplier.

==
Edit: 17 Sept 2015
The supplier has agreed with me that the camera does not support the advertised resolution and has sent a refund.


I've ordered a different but similar camera. This one claims full HD 1920x1080 but the sticker still only says 1280x720, which is the lowest resolution I would like. Hopefully, this one will do what I need.


Monday, 31 August 2015

Vacuum form windows

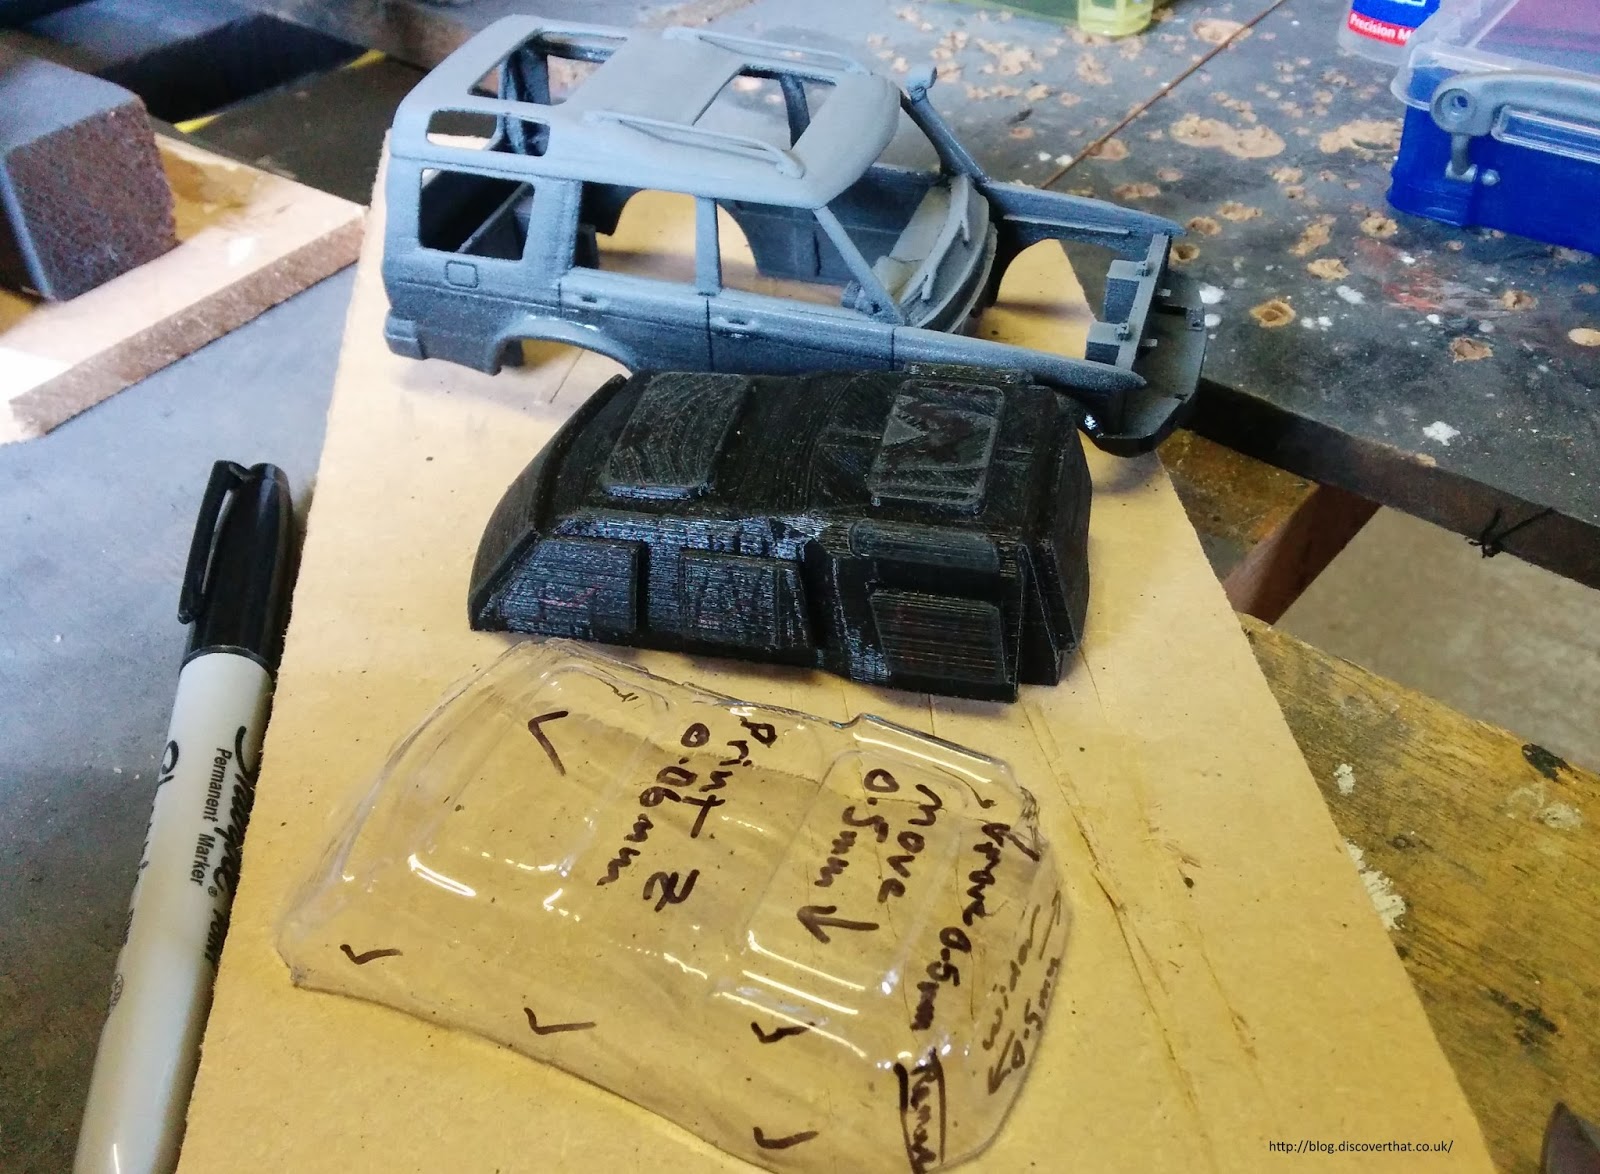
I used my home made vacuum forming setup yesterday to create the first draft of the windows for my Land Rover Discovery model.


The use of the kitchen oven and the remnants of the plastic smell afterwards had not go down well after I first tested my vacuum forming machines so before I did any more I spent just under £11 on a single ring electric hob. This is my first use of that hob. It's only 1500W but is more than hot enough to melt the plastic for vacuum forming.


I am much happier with the whole process being in the shed.

I didn't quite heat the plastic up for long enough yesterday but it was sufficient to get most of the mould covered. In future I think it needs to have drooped by at least 15mm before taking off the heat.


Trimmed up, I fitted it to check alignment. The front windows all fitted perfectly but towards the rear they are a fraction out.


I marked up the changes needed and adjusted the 3D model. I have increased the resolution to the best for my printer which is down to a Z height of only 0.06mm however that means the mould will take 12 hours to print.


I also vacuum formed the head lamps glass and I've offered them up. With a bit of trimming they fit as intended.


In both cases the lines from the 3D print were visible in the finished components so I am going to sand down the next moulds to have a better finish.


Talking of sanding down. I've probably done as much as I can without too much detail being lost so now the body just needs a final top coat of paint.

Tuesday, 25 August 2015

Smoothing progress

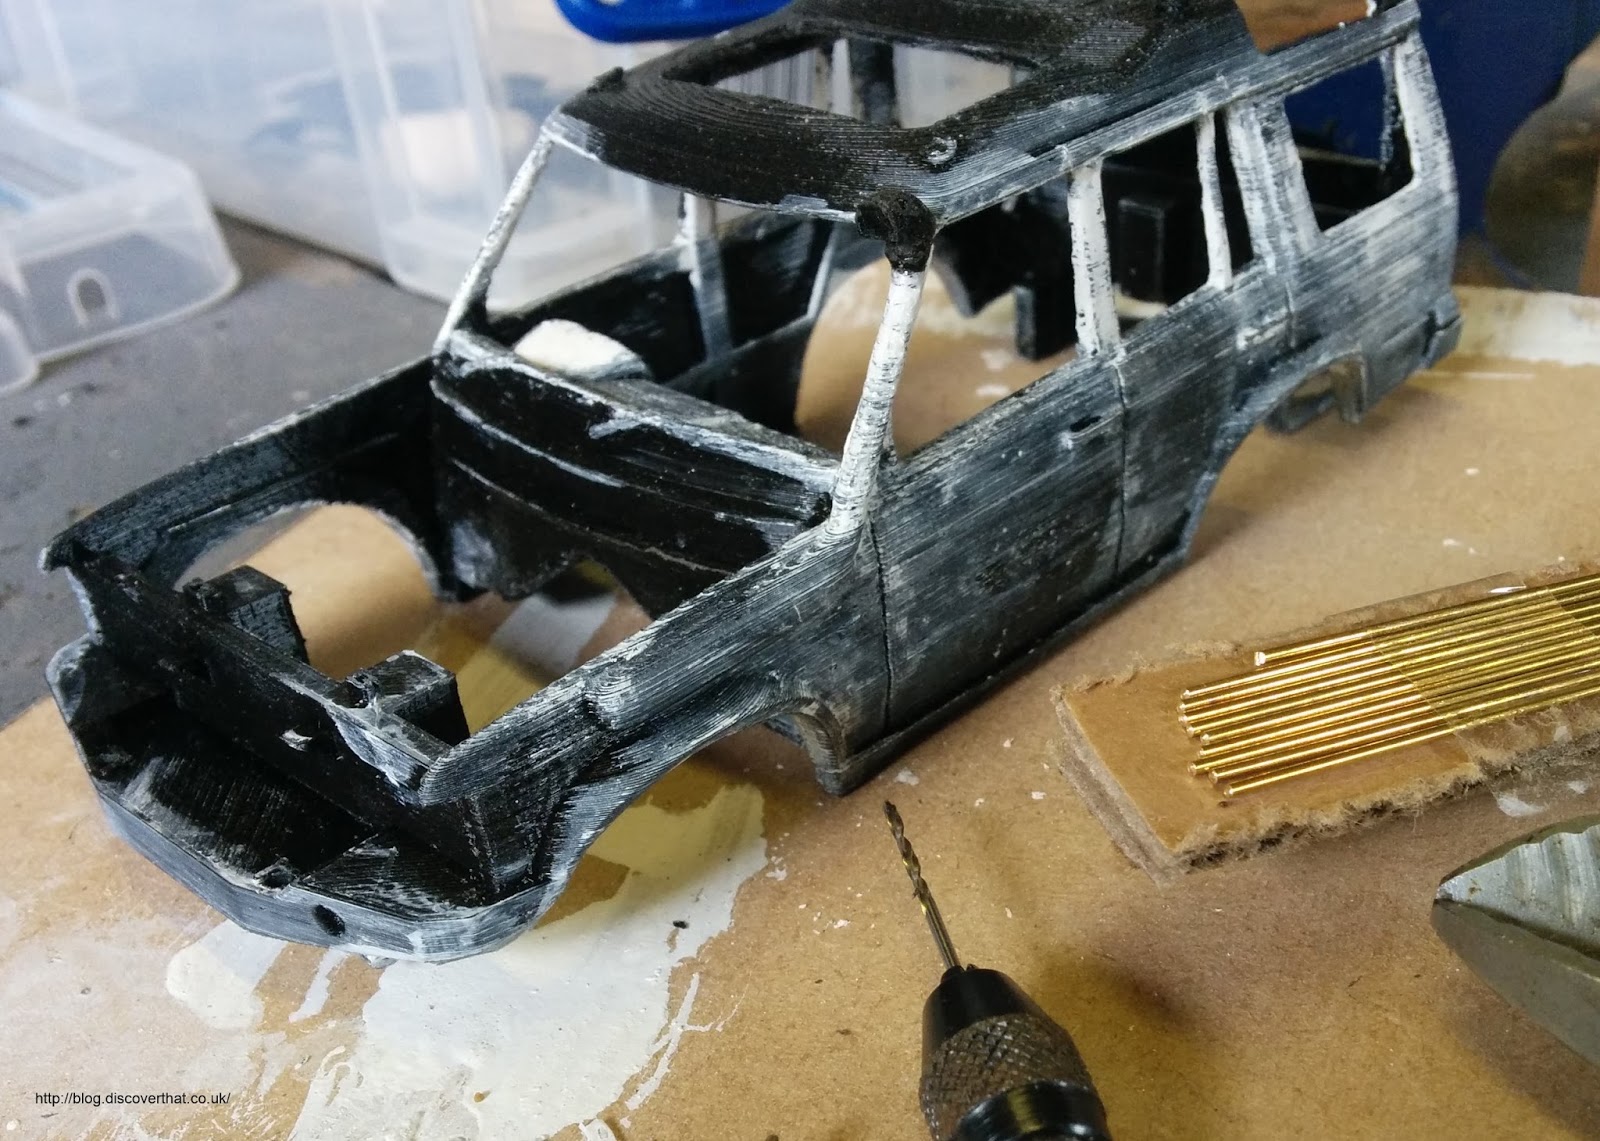
Most of the time since printing the car body shell has been spraying layers of high build primer or paint and sanding it back down.

First off, I offered up all the parts and trimmed them to fit where necessary. Then glued on the roof.


I wanted the roof on fairly soon because it gives the thin pillars a lot of extra strength.


I used Milliput to fill the fine edges round the windows and rear lights.  This is where the rows of melted plastic from the 3D printing process end and are most visible. I also fitted the top of the raised air intake using a small hole and a brass dowel to keep it in line.


I built up the paint with three thin layers at a time, wait 24 hours then sand down and repeat. I've done that twice with the high build primer and once with gloss black paint. The trouble is I am now starting to loose some of the fine detail.


I will probably reprint the bonnet, as it is still separate, because the bulge detail has been completely lost after sanding. I will also print it at a smaller Z thickness. I deliberately printed the body at 0.12mm to minimise the number of lines on the vertical surfaces however I used the same settings on the horizontal roof and bonnet not thinking that this would leave noticeable steps. My printer can go down as thin as 0.06mm layer thickness, so I will try that on the bonnet.


The paint plus the Milliput made the already oversize mullion on the rear passenger window a bit too prominent. I decided to cut this off and add it back as a fine painted line on the windows.


Before finishing the painting I've added the roof bars. I left the stub ends of the bars on the 3D print attached to the roof with a groove for the brass rod.  After sanding little of that is left. It would have been easier and stronger to have a smooth roof and fit the brass rod for the roof bars in to holes. Either way I'm still going to have to form the ends from glue or Milliput or both.

Summary of lessons learned:
- Exaggerate the depth of any fine details so they are still visible after sanding.
- Don't try to add fine window mullions, just paint those on to the glass.
- Don't include tiny details that could be molded with Milliput or fitted afterwards.
- 3D Print curved near horizontal surfaces with as fine a detail as possible (Z = 0.06mm.)


Monday, 17 August 2015

Printed at last

Ever since I printed and assembled the prototype of my Discovery slot car, I have been trying to print another version.

Prototype

I've made a few changes to make it fit the chassis better and to be able to fit an interior plus a few other minor cosmetic changes like increasing the door gaps.


The main significant visible change was adding the raised air intake.


Every print failed. However after enough fails to convince me it was not entirely the printers fault I took a closer look at the failures.

They had all failed in one of two places.

The first was at window height and the other by far the more common was half way up the doors.
Both faults coincided with changes I have made to the model!

At the window height it looked like it was running out of filament. I concluded that the tiny little blobs of plastic that form the pillars was not enough to keep a good feed flowing.  I added back the window support structure that I had deliberately thinned out to make cleaning up easier.


It's mainly a thin solid sheet as shown in orange in the above image.

The second fault, of which I have at least four stringy messes, was at the height of a little bar I had added to fill the gap between the doors and the interior floor panel that would be glued in.


I had originally included a simple rectangular step, where the blue section is shown in the above image. It only sticks out by about 1mm but I guess that was enough to weaken the model and cause it to split at that point. The model looked like the head had touched the work and broken the bond with the glass bed. From then on, it was all wrong, probably freely sliding about as it printed!


I fixed this in several ways. I changed the rectangular bar to have a long sloped lead in and I reduced the thickness so it only just overlapped with the inner door panel. That last bit was in the hope it would change the path of the head. On the print settings I used a raft, instead of a brim to give it even more adhesion.


The areas in blue in the above image are structural additions. They are bits that are needed to make it in to a slot car or to join the separate parts of the model together.

The parts shown in yellow are supports needed to be able to 3D print it. They have to be trimmed off to complete the finished model. These are in addition to the automatic support structures that can be added by the Ultimaker Cura software.


I used the following printer settings in Cura 15.04:
Layer height = 0.12mm
Border width = 0.8mm
Speed = 40mm/s
Support = From the build plate
Adhesion = Raft

I'm using ColorFabb PLA/PHA filament at a temperature of 210C on my Ultimaker 2 printer.


I am very happy to have another finished print of the Discovery shell.