Search This Blog

Monday, 15 September 2014

Off-Road Damage

I am not a stranger to damage from off-roading.  Although I like my car to look tidy most of the time that is not an excuse for us to ease off while off-road.


We bought our first and all subsequent Discoveries with the desire to drive them off road.

Yesterday we went to an off road pay and play site in Canewdon run by the Essex Rochford and District 4x4 club.


Their web pages are quite clear on the fact this is an extreme site and one of the first people who spoke to me when we arrived had kindly come over while I was signing in to point out that we would get the paint work scratched.

When we arrived it was nearly shiny, new looking wheels, new bumper and new steering guard.  Even the rope was new because I had bought one about the right length to neatly drape over the light bar.  I can imagine that people thought 'this guy has never been off road before.'

It was kind of them to caution me but only the car was new to this type of off-roading.

Sadly I have no photos of us while driving the course.  We were both in the car so have to stop to take photos.


We only went on the less extreme side of the site.  Even that is still aggressive.  Not for people who worry about damage.  Some of the trees are very close and the CB aerial spent most of the time horizontal until I gave up with it and took it off.

There was only one track we tried and could not get through.  Shelley managed to progress about 10 foot further than where we originally got stuck but eventually had to admit defeat and reverse out.  We nearly hit a 90 in our blind spot while reversing out and probably only just missed him due to his quick reactions.

He had come round to see if we needed a winch out.  I think he might have been disappointed that he didn't need the winch but we all had a good laugh at our luck for not colliding.

We had done well not to need a tow from anyone so decided not to push our luck.


Back at the start area we assessed the damage.  The front heavy duty bumper and steering guard were undamaged with just some drag marks on the steering guard.


The rear protection I had rushed to fit that morning under the tow bar had done it's job well.  The idea was to allow the back to slide instead of the tow bar digging in the ground.  Based on the scratch marks I am sure it worked.


Above the tow bar was another matter.  The rear bumper had been torn off one side and the offside reversing/fog light was missing.  Two of the reversing sensors had been pulled through the bumper.


I made the rear bumper safe for the journey home.  We jet washed some of the mud off but left all the splatter up the sides as evidence of our fun day.

The journey home felt like we had done some more damage.  My best guess was that we had jet washed off some wheel balance weights.  It vibrated a lot at some speeds and was smooth round most corners.

The good news is that I was able to clear out about a kilo of mud and stones from the front wheels using a screw driver.  A test drive proved that the mud had been the cause of the vibration.


I was able to straighten the bumper, once I'd removed a bent bracket that was in the way and secure it properly using screws instead of the plastic trim clips.

The quarter bumperette bits were also only held on by luck and although you can only see when offering up the plastic corner, the rear panel was slightly pushed in and needed to be pulled back out.


Shelley had told me when I fitted the front bumper that I should fit a matching heavy duty rear bumper but I thought I knew better!  I'm now looking for a new stronger rear bumper.


Saturday, 13 September 2014

In-Car Fire Extinguisher

The Association of Land Rover clubs (ALRC) uses similar rules to the Motor Sports Association (MSA) in the UK regarding fire extinguishers.  The requirement is for quite a large size fire extinguisher for competitive events.  The sort of event I am likely to do with our Discovery is only going to be for Road Taxed vehicles and the fire extinguisher is only a recommendation according to the ALRC rules but better safe than sorry.


The requirements are for larger than a 1.75 litre capacity foam (AFFF) fire extinguisher. The nearest larger size I could find was 2 litre.


That is quite a big bottle to fit securely inside the car where it can be reached.  I was able to make a bracket to fit it, at a slight slant, under the rear of the drivers seat after having removed the ancient CD changer.  I used the bolts previously used for that CD changer to attach the bracket to.


The fire extinguisher is released by a catch and to avoid it snagging on the wire springs of the seat base, I fitted a plastic sheet simply held in place by cable ties.


This all works well and the fire extinguisher is out of sight most of the time.

Wednesday, 10 September 2014

Painted Wheels and Mud-Terrain Tyres

This post is not in order but lots happened on the same weekend and I'm catching up with posts.


I spent a couple of weekends and evenings over the summer cleaning up and painting an additional set of wheels to fit Mud-Terrain tyres on.

My original wheels are 18" alloys with a good set of All-Terrain tyres already fitted.  I could not find any Mud-Terrain tyres of the right size for 18" wheels so I bought a used set of 16" Land Rover wheels, also for a Discovery, to have Mud-Terrain tyres fitted to.

Not being content with just any old wheels I have taken the opportunity to paint them black.

The shape of wheels is awkward to work round but the process for painting them is fairly straight forward.


I decided to leave the tyres on to avoid damaging the rim while working but I know some people would prefer to have the tyres removed.  I deflated the tyres and masked them which has worked well.  I could angle the spray to cover all visible parts of the bead.


I painted the inside of the wheels where it can be seen from the outside through the spokes. I was careful to mask the back of the wheel where it rests against the hub.  You don't want to end up with a layer of paint sticking and the wheel not being true!

Cleaning the brake dust off took as long as keying the existing paint.  The wheels had some surface corrosion on the back and I scraped the worst of this off to help the paint stick better.  Cosmetically it cannot be seen once the wheels are on the car so I only did the worst.


I used 600 grit wet and dry paper and a drill mounted nylon sanding brush to key the surface inside and out.  Alloy is notorious for being difficult to get paint to stick to but in most cases this is not bare metal so that is not a problem.  Having said that I still put a layer of Adhesion Aid and a couple of layers of primer before the colour.


I just followed the instructions on the tins of spray paint regarding drying time with at least a day between coats of different colours.

On the side of the wheel that you can see when it is on the car I finished off with wheel lacquer to give a nice shinny and strong finish.


I found for all layers it is important to do the inside of the wheel first.  The paint drips through the spoke holes but is easily incorporated in to the paint layer if the outside is covered very shortly after the inside, before it has had a chance to cure.

I gave it a good few days to dry before attempting to remove the masking tape and I also cut round the seam.  The tyre bead was not a problem but where I had masked the wheel nut holes I had some areas to touch up.  I just used a small brush and some of the paint sprayed in to the lid.

In total for the 5 wheels I used one 400ml can of Adhesion Aid, 5 of primer, about 8 of Gloss Black paint and 2 cans of spray wheel lacquer.

Now for the tyres.


For the first time ever I used a mobile tyre fitting service.  I called round several places and the lowest cost was the mobile service I had come across on the Internet.  Ordering was easy online and staying at home to have the job done was so convenient.  I will always do it this way in the future, I don't know why I haven't tried it before.


The end result with the new tyres fitted looks very nice, especially with the finishing touch of some hub centres I found on e-bay.  The advert said they were originally for a Range Rover model.


==

Edit:

We went off-roading today and finished off with a jet wash to clean the wheels and bits.  The jet wash was so powerful it stripped off the lacquer from the wheels!  My guess is that the wheel lacquer is not intended for use over paint but is supposed to be used on alloy wheels.

Anyway the black gloss paint is fine so in future I will just add an extra layer of the gloss paint without any lacquer.

Sunday, 7 September 2014

Daytime Running Lamps

It's been a busy weekend for Discovery stuff.  I've got new tyres and finished installing several lights.  The tyres and revamping the wheels is for another article.

With the installation of the new heavy duty bumper on my Discovery 2 I had the choice of driving lights or fog lights.  The existing wiring is for fog lights in the bumper but I selected to connect neither of those.


I have ignored the lamps that came with the bumper and purchased some Daytime Running Lamps.


All new cars in the UK have had to have them for the last couple of years.  I suspect this is the case throughout Europe.  I am sure all drivers have noticed the bright LED rings and patterns at the front of new cars on the road.  When I first saw them I thought they were just manufacturers decorative lights but I now know better.

Apparently the EU believe that a lot of accidents would be prevented if all cars had them.  I am dubious about the reliability of the statistics but as I have never found front fog lights to be of any use I would prefer to fit something that will get used.


The kit I bought came with all the wires and a unit that cuts off the Daytime Running Lamps (DRL) when the main lights are turned on.  This is a requirement because DRLs are very bright to enable them to be seen during daylight but this makes them dazzling to other drivers at night.


I originally planned to run all the wires as supplied but on further thinking I realised I could reuse the fog lamp wiring that would otherwise be redundant and which conveniently already ran to exactly where I was going to fit the new DRLs.


After printing out the circuit diagram from the Land Rover RAVE manuals I made a few sketch modifications ending up with the above.

This adds very little new wire and has a lot of re-use of the existing loom.  I worked out from that circuit and the header details from the RAVE manuals that I could even swap the fog lamp switch for a rear wiper switch to turn on and off the DRLs using the same switch connector and wiring.

A switch for DRL is not required because they are on all the time and automatically go off when the side lights are on.  I complicated the fitting by adding a switch for use when wading or fording.  I would rather not have any powered items under water for long periods even though I am using waterproof connections.


My version only requires cutting the output of the front fog lamp relay to power the DRL circuit attaching the DRL circuit orange trigger wire to the side light cable and hooking up a switch.

The lamps themselves are connected to the existing fog lamp leads with new waterproof Econoseal connectors.

To keep the cables short I wanted to do all the connections near the fuse box.  This requires lifting the fuse box to get under it.  Before trying to remove the fuse box it is essential to disconnect the positive feed on the battery terminal.

One of the fuse box bolts is right under the main positive cable connection and as I can testify trying to get a socket down there without disconnecting the battery results in nearly welding the socket to the head of the bolt!

With the battery disconnected removing the fuse box is easy however there is little play on the cables which restricts access under the fuse box.  I used a block of wood to wedge it up and disconnected some of the sockets to get just enough room to work.  It was a bit tight but was possible.


The red with orange stripe side light feed can be found fairly easily where a smaller bundle of cables emerges from the thick bunch.  About an inch of unwrapped bundle was visible at the corner.  I had to pull back a bit more of the tape to get enough slack to be able to join in the extra lead.


I carefully cut back the insulation without cutting the wire and crimped on a joining cable.  This is not normal practice because it is way too fiddly for all but us obsessive types.  It would be just as good with a straight crimp joiner.  The more time conscious could use a convenient but in my opinion horrid looking Scotchlok (TM) or snap lock connector!

The rest of the job is fairly straight forward and identifying the cables is fairly easy if you use the connector diagrams from the Land Rover RAVE manuals or TOPIx.

Remember to replace the front fog lamp fuse with something more appropriate.  Most DRLs use LEDs so their power usage will be much lower than the factory fitted fog lamps.  The circuit or relay and the wires that come with the DRL kit will have a lower rating.  Just look at the fuse that comes with the DRL kit and fit a similar amperage rating fuse in place of the front fog lamp fuse. It does not have to be exactly the same as long as it is close but not a smaller rating.


As a bit of fun and to document my car properly I have produced the DRL circuit diagram in the same style as the rest of the Land Rover RAVE circuits.

This is not to be confused with the Daytime Running option included in the Body Control Unit (BCU) program. That BCU option is used in some jurisdictions to keep the headlights on all the time.  It is not enabled on UK models.  My version is specifically to enable me to re-use the fog lamp cabling for Daytime Running Lamps.

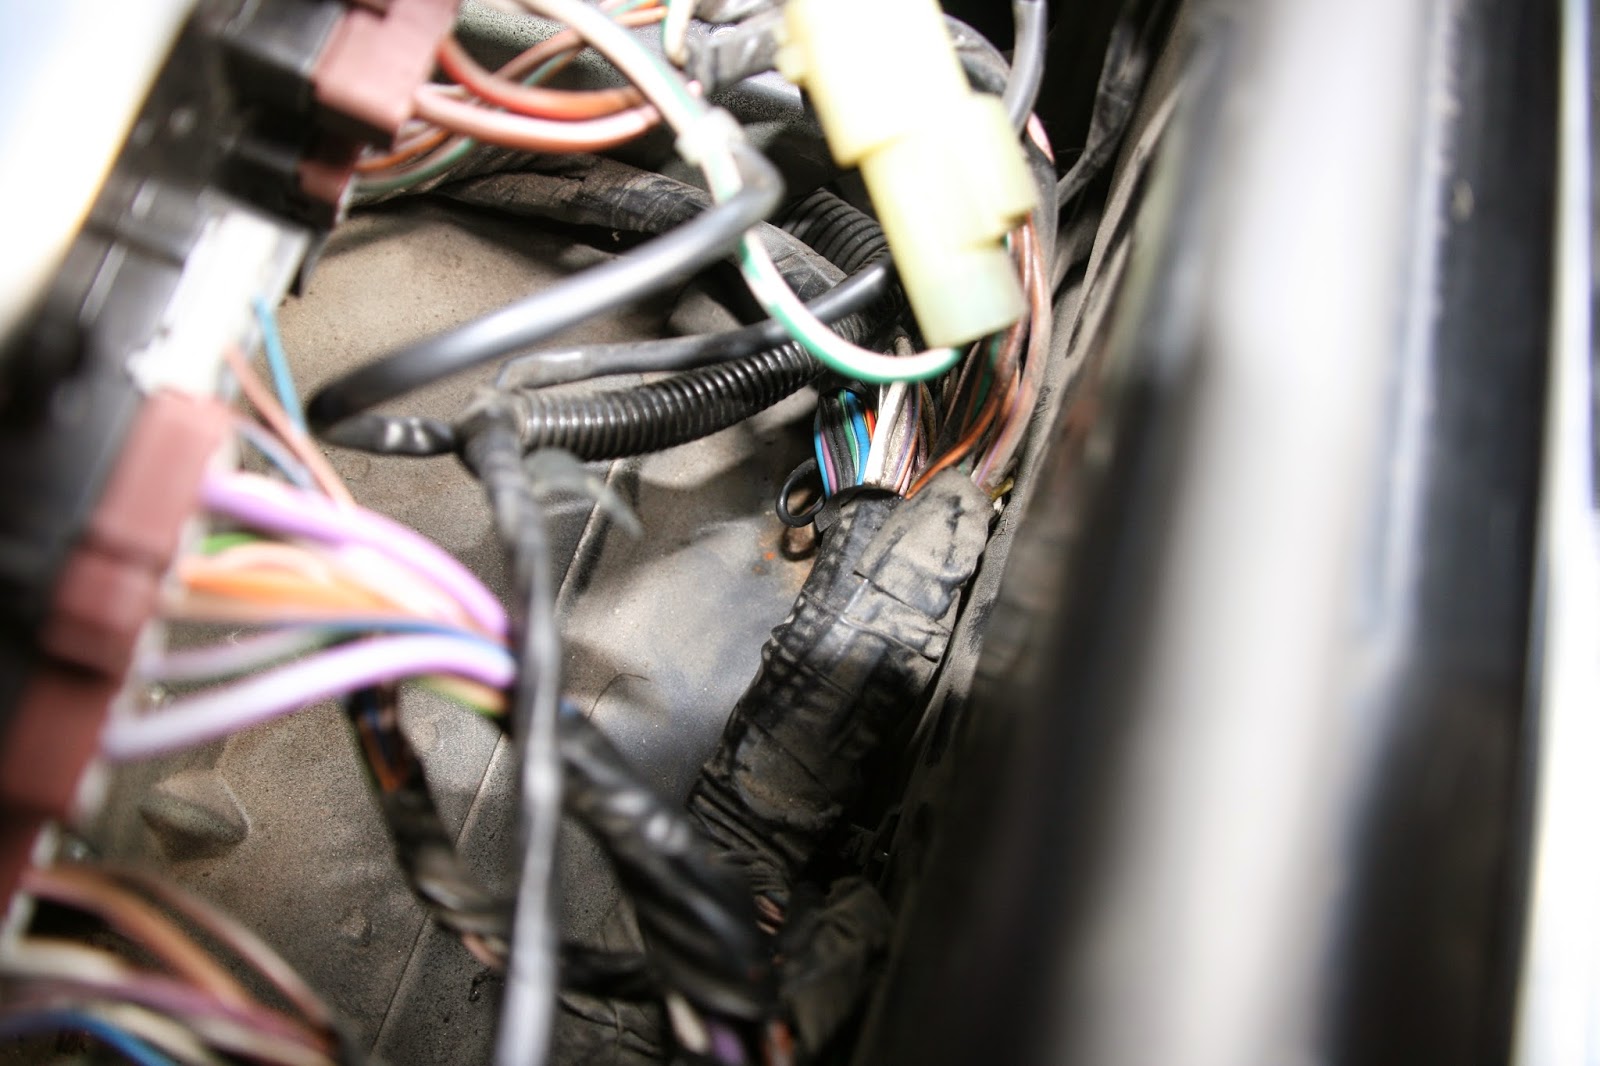
Under the dash I just cut and joined two wires near to the Body Control Unit.  This is on the near side of a UK Discovery.  There are a lot of wires but if you know the colours and the connectors they come from, it is fairly easy as there is enough slack in the cables.


I used a rear wiper on/off switch in the position of the front fog light switch.  Using the circuit I worked out, the switch can just be swapped over and plugged in without any changes to the pins at the switch end.  I changed over the key cap because they are a different shape.  I also changed the legend to one of my own design (that was a separate job that could do with its own post when I come up with a better method.)


I mounted the DRL circuit on a simple bent metal bracket next to the fuse box using the existing fuse box bolts.


I spend a lot of time making the cables neat on any wiring I do.  I can't bring myself to just connect it up.  I have to wrap the wires and cable tie where necessary. I am pleased with the results.

The lights worked first time. On when the ignition is fully on and off when the sidelights or headlights are on. The circuit that came with the DRL kit I used must include voltage detection because the lamps go out after a few seconds if the engine is not running.  That's an added bonus to avoid the battery discharging unnecessarily.


The spot lights I ordered arrived while I was doing the DRLs so I fitted the spot lights the same day.


Looking good.


==

References:
http://en.wikipedia.org/wiki/File:A27_Daytime_running_lights.svg
http://en.wikipedia.org/wiki/Daytime_running_lamp
http://en.wikipedia.org/wiki/Automotive_lighting
http://www.landroverresource.com/

Download a higher quality DRL circuit image using the download link on the following page:
https://drive.google.com/file/d/0B6KA9qkK3ar5ZnRNa0Z5a0dXcGc/edit?usp=sharing

Monday, 1 September 2014

Brake Light Test Tool

Most people working on cars end up making some tool or other for a specific job.


I am sure the above pictured tool has been in use for as long as cars have had brake lights.

Shed Flood Defences

A shed is a very important thing.  At least it is to me and I suspect many other men and women.

We have been fairly lucky with the floods and up until recently it has just been a seasonal issue.  There are many people worse off than we are.  At least our house does not flood.  Our flood problems will be fixed with a wall and perhaps some improved drainage.

For the last couple of Winters the floor of my shed has got damp and more recently got a shallow river of water flowing through it.

Having water flowing through the shed in the summer was a bit of a shock.

I don't have any pictures inside the shed while it was raining but here are what the fields looked like next to the shed.

The first picture shows what the field normally looks like.


This next picture shows how it looked with the sudden heavy downpour in less than 20 minutes.


And as it was coming down a few minutes before!


Shelley and I ignored the river because it only happened after those rain showers that the weather forecasters said would only happen once in 1000 years.  This most recent 'once in a 1000 year flood' left a 4cm tide mark inside my shed and orange clay residue everywhere!  The garden path and yard were worse.


The shed is raised on a 4 inch concrete plinth with 3 inch bricks round it!  An inch and a half tide mark that high up is a lot of water.  I had to pour water out of my socket sets that sat on the floor.  Luckily after the previous river I had put anything that could get damaged by water raised up on blocks of wood.

It's not clear in the above picture of the side of the shed but there is a step down in to the yard in front of the sheds so that water is over 3 inches deep.

The main cause of the water in the shed is that it is lower than the garden and the water flows over the lawn and hits the back of the shed.

I already knew it was rotting the back of the shed so the decision to have to dig out round the shed and do something about it did not come as a surprise.


My brother-in-law had a previous problem which flooded his house.  The solution was to build a retaining wall that diverts the water away from his house.  He was very pleased he had done that before this rain as he did not have a problem this time.  We decided to do the same for our shed.

We have never build a brick wall before but have laid a few bricks from time to time and seen it done a lot.  Shelley was knocking up mortar for her granddad, a builder, almost as soon as she was able to hold a shovel, so we were confident we could do the job.

I ordered some very heavy blocks for the wall as it needed to hold back the soil from the garden and any flood water.


The Jewson lorry driver did an excellent job getting his 17.5 ton truck down our drive way to unload.  He was the first driver of that size lorry to be up for the challenge.  Prior to that the biggest lorry had been a 7.5 ton and other larger lorry drivers had said they would not fit.

We cleared all the roots away from the back of the shed over the bank holiday weekend.  We were therefore ready to dig out and form a shallow foundation for the blocks.


We got the foundation dug, repaired the rotten back of the shed and one layer of block done on Saturday.  The blocks are heavy and where possible both of us had to lift each block in to place.


The remaining three layers of blocks we put down on the Sunday and all the joints pointed.  Shelley's granddad would have been proud of the mortar she mixed up.


It's very nearly straight and it is level.


By Monday night the mortar was dry enough so Shelley decided to paint it black.  In a couple more days we can level the ground putting the soil up against the wall and I can finish tidying up the electric cables that we had to work round.


For our first attempt at a wall we are very pleased.