Adding 3D text to a model in FreeCAD version 0.19 is fairly easy but it has a few steps.
Start in the Draft workbench.
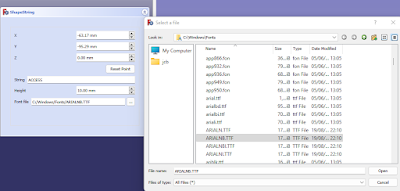
Create a ShapeString.
I always position them at Zero, Zero, Zero, and move them afterwards. The cursor automatically repositions the text and is a nuisance, making that bit of the user interface unusable, in my opinion.
Type the text to display in the String field and choose a font file. In windows, this can be selected from the "C:\Windows\Fonts" folder. Alternatively, the font files can be copied and saved elsewhere for more convenient use.
All text is initially drawn facing the top.
To align it to a model, go to the properties of the ShapeString.
Select Map Mode and then the face on the existing model to align the text to.
To change the position, select Attachment from the properties and change the Position x, y and z values. These are relative to the original position, so it is a bit of trial and error to work out which moves in what direction.
To attach or remove the text from the model, go to the Part Design or Part, workbench, depending on your preference, select the ShapeString and use the usual extrude or pocket options.
In Part Design, the ShapeString object will need to be dragged in to the body, in the tree, before using the tools.
In the Part workbench you will additionally have to use a binary join, after creating the lettering.
==
Circular Text
To include text following a curve, either poking out of curved plane or round a face like a clock, I have used the Add-On Macro FCCircularText.
I find its user interface a little confusing but I managed to achieve what I wanted.
As a reminder to myself the start and end angles go in an anti-clockwise direction. Zero degrees appears to be along the X axis and the rotation about the Z axis. That means 90 degrees is straight up, along the Y axis and 180 degrees is back along the negative X axis.
Look out for the big Mode Flat or Mode Stand button. It's the press button among radio button choices. It's easy to miss that it changes the behaviour of two of the radio buttons! I always make the mistake of selecting the Clock radio button, instead of pressing the button to get flat.
Once I get my head round the options, I find the FCCircularText macro to be very handy.
==


