Search This Blog

Wednesday, 31 December 2014

Carried Away with Scalextric

Before Christmas I had not thought about Scalextric for years.  This must be the year for Scalextric because as a coincidence our firm's Christmas party had a track setup this year.


Now that I had a Scalextric of my own I started thinking and, of course, got carried away.  I wanted to extend the track to fit a longer circuit in the small attic room. This would need lots of corners and multiple levels to make the best use of the 2.4 x 1.2m space in the tray I had made.


I tried the Scalextric official track design programme but it made my Windows 8 laptop screen flash and the laptop was unusable.  So bad I had to go in to recovery mode and reset back to an older recovery point.  I wasn't going to try that again.

A bit of hunting found several other programmes that did a similar thing.  For the one off use I had I settled on the free Slot Manager app.


It did what I needed and I was able to work out the bits I would then buy.


I've had to make all the supports strong enough to take the weight of a cat because we have discovered that for one of our kittens Scalextric is the best cat toy ever.


I've also added some extra bits for convenience.


The track is now so much longer and great fun.

==

Reference:
http://www.scalextric.com/
http://www.johndutfieldmodelrailways.co.uk/
http://www.jadlamracingmodels.com/c-1-scalextric.aspx
http://www.slotcarmanager.de/en/all_frames_e.html
http://www.slotcarillustrated.com/portal/forums/showthread.php?t=70951

Monday, 29 December 2014

Scalextric Surprise

This Christmas had a surprise present.  I had no idea and had not mentioned anything.

Shelley decided to get me something completely out of the ordinary.  Under the tree were three very large boxes. You already know what was in them by the title but I had no idea.


Up until that point I didn't know there was even a new Scalextric type.  Digital control of the cars with multiple cars in the same lane and lane changing.


Christmas day was too busy but I got a bit of time Boxing Day morning to set it up on the floor of our little attic room.

Great fun changing lane but I'm getting too old to crawl around the floor for very long so I hatched a plan.

The day after, just after having returned home from off-roading, I bought some MDF sheets and timber from our local DIY store.


The size of the sheets determined the size of the tray I made to fit over the attic room bed. 2.4m x 1.2m.


Much more comfortable and much easier to place the cars back on the track.


Sunday, 28 December 2014

Christmas Pud Shakedown

Every year for as long as I have known the Essex Land Rover Club they have done a pay and play day just after Christmas.  It is titled 'the Christmas Pud Shakedown.'


We had not been members for years but with the events of this year we re-joined.  We arranged to meet Andy with 'Joe' , his Defender 90, at the site to have a drive round.


The video shows it was yet another sandy wet site.  Slippery and great fun.

There were quite a few trees but with basic care it was easy to drive round with no damage.

Shelley opted for a more difficult route.


A steep hill at the end of the video that few people, if any, had attempted that day.  Our Discovery using only traction control and low box just crawls over the peak and down the other side.

A great day off-roading with a slight dampener at the end because 'Joe's' brakes failed.  The usual heads crowded round the engine bay to pronounce that the brake master cylinder seals had failed.  We all agreed that it was nothing to do with the off-roading and that it was lucky they did this at 5 mph off-road and not on the motorway.

Brake failure, being one of the few things where you can't tow it home, Andy waited by the side of the road for the AA transporter to take him home while we gave his two teenage children a lift back.


The whole day gave us lots to talk about and our Discovery is left covered in mud as evidence of a fun time.


Saturday, 29 November 2014

TD5 Key Fob Programming with a Nanocom

I've just bought a refurbished key for my Discovery Series II. These come without the bar code required by a main dealer to link them to the car but instead use the 6 digit code that is printed on a sticker on the chip inside the fob.


Not all diagnostic tools can use that code to programme a key but I had already checked that the Nanocom Evolution can before purchasing the key.

The refurbished unit is a new looking plastic case a new key blank with a circuit board, no doubt from a scrapped Discovery or other vehicle using the same security system.


I had the key cut at a normal high street key cutting shop.  The first shop I tried refused to cut a customer supplied blank but the second shop didn't hesitate. It was not a perfect fit but I got it to work.

There is a good video tutorial produced by Nanocom on YouTube about how to programme the key fob to your own car and some vague instructions in the BCU information downloaded from their web site.


It is difficult to play a video while sat in the car trying to use the Nanocom so I have transcribed a reminder of the important bits here so I can print them out.

An important requirement is that the immobiliser is disarmed before any keys can be programmed. That can be done using either an existing working key fob or with the Emergency Key Access (EKA) code, using a key in the drivers door lock.

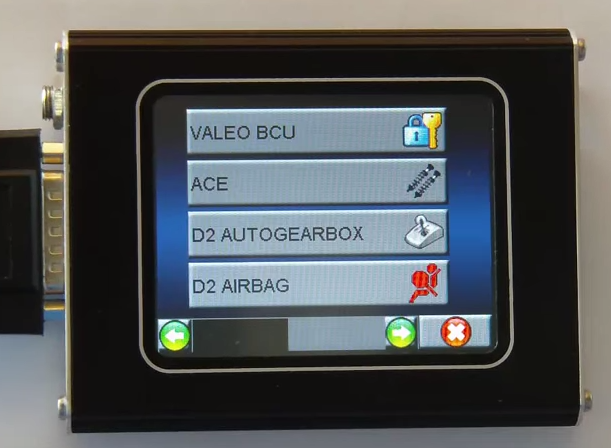
Using a Nanocom Evolution

With the doors closed and the Ignition in at least position 1.

Main Menu
- Discovery II
-- TD5
--- Valeo BCU


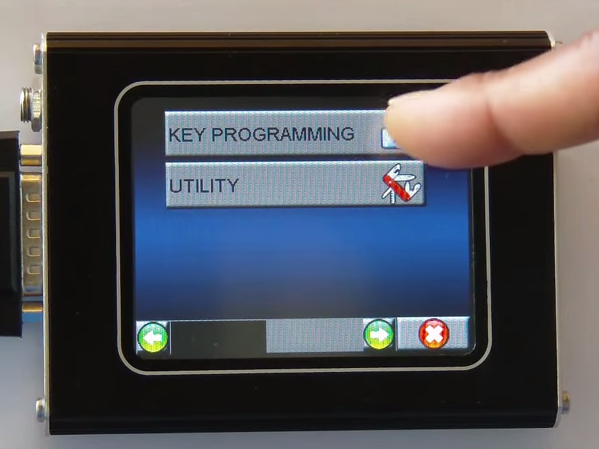
On the SECOND page of the Valeo BCU menu select:
- Key Programming


The Nanocom will display all the existing codes.


Obviously you only want to add your new fob but not overwrite your existing.  I had to open my fobs to confirm the exiting 6 digit codes.  On my list they were in sequential order and were in the first two key code slots.  All my key codes in use start with the number 3.

The third and forth slots contained codes beginning with 6.  I have no idea what those last two codes were so I assumed these were the available slots and I used slot 3 for my new key.

- On the slot you have established is your first available, press on the code, not the set button but press on the white area with the code in.  Obviously avoid overwriting any existing keys you want to keep working.  Be careful, the touch screen may not be aligned very well to your finger pushes.  Check that the screen displays one of the spare numbers not one of your existing numbers.  Press OK to go back if you you need to.


- Once you are sure you are on the edit screen for the correct spare code, erase the existing code.
- While still on that screen enter the new code from the sticker on the chip inside the fob.  (Mine came with the code written on a card to save having to open the fob.)
- Press OK to enter that code and return to the previous menu listing the codes.
- Press the SET button next to that code just entered.

Scroll to the second page


- Press the SYNC button next to the key being added.
Read the instructions on the screen to press any button on the fob, the video shows using the unlock button.
After having pressed the button on the key press the OK to write this to the BCU.
Once written you will be prompted to press OK again.

- Now press the KEY DETECT button.
Again press a button on the fob when prompted and after pressing the button on the key press the OK button on the Nanocom.


Once written to the BCU the word DETECTED will be displayed next to the new key.

That's it.  The key fob should now be registered to the car.

I disconnected the Nanocom and checked all three of my key fobs to ensure they locked and unlocked the car and they did :-)

==

April 2018:

For the benefit of those with other diagnostic tools
A Nanocom can use the short code that should be on a sticker inside the key fob, other diagnostic tools need the longer barcode that is nearly always missing when you buy a used key fob.
Someone else created a spreadsheet that can convert from the short code to the long code.

The original spreadsheet has been marked to say it would stop being hosted from December 2017 although, at the time of writing, it is still available as read only and can be downloaded to use it.

I have taken a copy and made it available to download from here:
disco2_fobcode_20130409.ods
disco2_fobcode_20130409.xlsx

Both versions are the same, just different file formats for use depending on what spreadsheet application you use. Microsoft Excel and Google Docs will open both of them.

There is no point in asking me about the functionality. I did not create the spreadsheet and I have never needed to use it.

==


Wednesday, 15 October 2014

Curry Rescue

Nothing gets in the way of our takeaway.


We had ordered a takeaway from, Omars, our usual Bangladeshi restaurant in Hatfield Peverel.  We order often enough that most of the delivery drivers know where we live but we are out of the way and new drivers usually have to phone to get directions.

Shelley took the call and as the driver said he was stuck she handed it to me to give my usual directions. Turns out it is our regular driver but he is unable to get to us.  He is just the other side of the river but the road has flooded.

No hesitation, I ask how deep it is.  The sign shows one foot.  Easy, "I'm on my way, you wait there."

The alternate route is another 20 minute or more journey so the curry would be getting cold.  It's much better if I go through the flood and pick it up.  The river is only 3 or 4 minutes away.


It's completely dark out in the countryside.  There are two cars and a van at the other side, I guess waiting to see how deep it is.  I can already see from the landmarks that the depth is OK for the Discovery because this is my local flood and I've been through it much deeper.

All my lights on, main beam and extra spots, I know the road and there are no man hole covers or other obstacles, first gear, hi-box and push on through.  It's deep enough to show off a bit but not enough to get a bow wave.

I turn round first, have a chat to our delivery guy and his daughter, who is along for the ride, collect our dinner and head on back through the water to home.  Curry rescued.

A nice dinner and a bit of fun to go with it.

Monday, 13 October 2014

Introducing the Kittens

I know the Internet is already overloaded with cute kitten photos but I can't resist.


How many kittens come with their own letter of introduction?


As they explain in their own letter they were born on 16 August.  Tooey, on the left of the picture, and Tiger, on the right, needed to be hand reared until they were on hard food.

Now they are with us, getting more adventurous every day.

Tuesday, 30 September 2014

Air Springs and Hoses

The mornings after we took the Discovery off road we awoke to find it sitting on its haunches.

We have been to off-road courses twice in the last month and it has happened both times.  Its not a big problem because in both cases starting the car pumped up the suspension and it drove properly. After that the springs remained inflated and behaved as expected.

I did a bit of reading and apparently the air spring should be replaced every 5 years.  I've had the car over 5 years so I know they have not been done.  Swapping the springs for new ones sounded relatively straight forward.  There are several other sites with guides plus the workshop manual is clear.


I ordered the air springs (RKB101200) and the clips to go with them plus a few spare clips (NTC9449) just in case I dropped any.  


The genuine Land Rover air springs are very expensive but there are OEM versions for considerably less.  My original Land Rover air springs have the manufacturer stamp of Contitech in addition to the Land Rover stamp and part number.  The Britpart OEM versions are made by the same people.  According to various forums the Dunlop springs were never fitted to Discoveries but have been used on other models and are frequently used on lorries.


Having the parts I thought I needed I started the job.  After jacking it up and getting the axle stands under it I spotted two snags!


Snag One

The air hose on just the drivers side of my car was already very taut and all the instructions and some advice on the phone from Torque Performance, who I had phoned on an unrelated matter, confirmed that the only way to remove the old spring was to cut the hose. 

The cut should be close to the brass collet and this would not normally be a problem but on mine the remaining hose would be too short to fit the new spring!

I tracked the hose back and removed some clips but getting any extra slack was going to be tricky.

Snag Two

You need to deflate the spring to be able to remove it!

The official method is to attach the TestBook computer and instruct the Self Leveling Anti-lock Braking System (SLABS) ECU to deflate the springs.

That was the final confirmation that I needed my own Nanocom which is now on order.

There were three other methods to deflate the springs.  Cut the hose, stab the spring and remove the connection from the compressor.  Two out of three of those are destructive and the other assumes that the collet removed would go back in and seal when refitting.

I did not want to take the chance of having the vehicle undriveable because I did not have any replacement hose or connectors.

I carefully put the vehicle back on the ground and checked it was all still functioning correctly.

What Next?

I could buy the Land Rover replacement air hose harness.  Not just one hose but you have to buy the whole lot!  That appeared to be unnecessarily expensive and a fiddly job under the car to fit.

After a bit of investigation I found that the hose can be repaired with  standard 4mm pneumatic hose and some straight push fit joiners.  I could use the same idea to extend it.

As this is a significant part of the suspension I was being safety conscious and not just trusting a single eBay advert.

Further investigation into the air spring setup indicated that the compressor can reach just over 10 bar.  I cannot confirm that by other sources but as I could only find two types of hose, polyurethane and Nylon, the choice was easy.

The polyurethane is only rated at 10 bar but the Nylon had ratings starting at over 26 bar and it had a more appropriate working temperature range typically from -35C to +70C.


The easiest place I found that could supply the 4mm Outside Diameter with 2.5mm Inside Diameter Nylon tube was on eBay.  


I also found the Legris straight joiner from RS was probably the better choice for the joiner because theirs are rated at 20 bar where the more common make available on eBay and other places appear to be only rated at 10 bar.

But What Did I do?

I decided, after having done all that research, to let the garage do it.

With it up on their ramp they were able to find enough slack in the existing tube and they replaced the air springs.


==

Appendix


Suspension bits:

Sunday, 28 September 2014

Matching Rear Bumper Fitting

Shelley has wanted me to get a rear bumper that matches the front heavy duty bumper ever since I fitted the front one.


The damage caused by our earlier off-road trip has forced the issue.  At the LRO Show in Peterborough the other weekend I finally selected one I liked.  After a lot of back and forth I selected the Torque Performance (TP4x4) one.  That is the same make as the front bumper I have.


One of the reasons I liked it was because it looked easy to fit. The other bumpers available used two of the towbar bolts but this one uses two spare holes near the existing bumper mounts.

The people on the stand did mention that it needed some body work cutting to finish the job but a bit more on that towards the end.

Removing the existing bumper is easy.  I won't repeat myself too much as the removal details are shown on my post about fitting a tow bar.

In summary:
  • Remove the rear bumper lights
  • Disconnect the light and reversing sensor cabling
  • Undo two bolts
The old bumper should now be off.


I then tidied up the now redundant reversing sensor connector with a bit of tape and cable ties.


With the TP4x4 bumper the plastic sill cover is not used.  The new bumper overlaps the chassis and does not need and will not fit with the cover in place.


This is held in with trim clips which need to have the centres pushed through and the clips pulled out of the body.


With that out of the way the bumper can be bolted in.  But STOP!


If you want to fit towbar electrics to the inset mounting on the bumper do that BEFORE fitting the bumper.  Once the bumper is on the car you cannot get behind to get the towbar socket bolted in!  Guess how I found that out!


Back to fitting the bumper.

There are two spacers one either side.  The bolt passes through the bumper, through one of the bolt holes in a spacer and in to the original threaded bumper mounting hole.  I spray painted the bolt heads black to match the bumper before fitting.


Attach both of the bolts in to the threaded holes first but do not tighten.  You need a little bit of free play to get the other bolts through their holes.  Fix those with the washer and nut.

Tighten them all up.  I assumed a torque setting of 45Nm as per the original bumper bolts.  This very slightly indented the metal so perhaps a little less torque might be better.

[Update: see my newer post in September 2016 where I make my own spacers that I think work better.]

Connect up the lights and clip them back in and the bumper is on and ready to go.


As you can see from the photo, the line of the bodywork does not meet up with the bumper.  My intention was to do as the person from Torque Performance had suggested and trim the body work back to the wheel arch in line with the bumper.

So far I have not done that.  The step looks fine and the only thing I think it needs is some form of plastic end cap to finish off the trim.  If you don't have a towbar then trimming the rear panel will give you a better departure angle but it will make little difference for me.  I may still trim it but at the moment I am happy with the result.

==

Update September 2016: The powder coat had fallen off and the bumpers rusting so I have cleaned them up and coated in U-POL Raptor load bed liner.

Saturday, 27 September 2014

Self Fixing Reversing Lights

My reversing lights have not been working for weeks.  After having done the normal stuff the garage assumed that the fault is something to do with the reconditioned gear box and it is booked in on Monday to have an investigation under the gear box warranty.

I know the reversing lights were not working on Friday evening because I remember thinking its getting dark and it would be easier with reversing lights.

Today, Saturday, they have started working.  I first noticed them when my wife was manoeuvring to hook up the harrow in the field, first thing this morning.  Since then the reversing lights have worked every time!

They must know they are booked in to the garage on Monday!  :-)

==

Update Sunday:

The reversing lights are still working.

The only thing I did to the Discovery between Friday night and Saturday morning before I notice the lights were working, was to connect my new Nanocom.  I did not make any changes, I just had a nose round to see what the Nanocom could read and make sure it was working.


I have checked the circuit diagram and the reversing lights do not rely on the Body Control Unit (BCU) or any other Electronic Control Unit (ECU) in the car.  There is a feed to the BCU but the switch in the gearbox is what should turn on and off the lights.

I'm still puzzled!

==

Update Tuesday:

The reversing lights stopped working again yesterday after I had told the garage there was nothing to fix.  The mysterious self correction was only temporary for the weekend.

Before taking it back to the garage this morning I wanted to check the cables for myself.  I made up and plugged in a simple test loop to short where the switch would normally be.  The lights worked therefore it must be a switch fault...

When I plugged back in the switch it now worked!

As I had not touched the switch just the connector it now pointed to a problem with the joint where the switch cable joined the main loom.   That was difficult to check on my own and Shelley was already at work, so I took it in to the garage as planned. With one person wiggling and another watching the lights the garage confirmed the fault and narrowed it down to the exact point.

With hindsight this should probably have been one of the first things to try but what with having already had a worn out switch a faulty new switch and now faulty cabling it was just too many things going wrong at the same time.

Fingers crossed it is fixed now.

Sunday, 21 September 2014

Under Towbar Slider

Having a towbar can be an issue when used for competitive off-road events or pay and play days. The metalwork significantly reduces the departure angle and digs in to the ground. In the worst cases it stops you moving.


I have selected a towbar that has the minimum height and no unnecessary overhang but it still has the potential to act like a drag anchor.

To reduce this effect I came up with the idea of fitting under body protection under the towbar to also act as a smooth surface to drag along the ground rather than the towbar digging in.

The design is simple and based on the typical steering guards.  A big thick bit of alloy plate mounted on a steel frame.


I used a bit of stainless steel angle drilled to fit the tow ball mounting holes and two more bits to fit where the towbar side brackets fit on to the chassis. I added some extra holes in those as additional rescue tow points.


I hit a snag with the construction in that my own tools were not capable of making any holes, let alone large holes, in 6mm stainless steel!  Oops!


Luckily our Farrier is also a blacksmith and had a workshop full of tools capable of doing the job. Thanks to Dean the bits were made in no time at all.  He also had a giant guillotine to cut the 6mm alloy to shape.  I drilled the alloy and fitted the bits together on the car.


The alloy is fixed to the steel using stainless steel M8 round head bolts at the chassis end and counter sunk head bolts at the tow ball end to minimise the collection of mud.


The initial fitting was a bit rushed as we were going off-road that day and I finished drilling the vent holes another day.

I can see how effective the plate has been by the scratch marks, bend and burrs on the plate.

Saturday, 20 September 2014

LRO Show Peterborough

What a day.


We headed for the off-road course first.  I joked that if we damaged anything we could then buy any spares we needed at the show.


The course was excellent fun as we expected for something Vince Cobley had organised.


We managed to slash a tyre.  One of the marshals flagged us down.  As it turned out we were not far from the end of the first trip round.


The tyre had a 5cm vertical gash and was completely flat.


The marshals were incredibly helpful.  They changed the wheel for the spare for us and found a working bottle jack because mine had a leak!  Back up and running for the next time round.


Many thanks to all the marshals who were excellent.


I thought the idea of getting a replacement tyre at the show was a good one but as it happened we did not see a tyre fitter there!

We did not spend much time looking at the arena events but spent most of the time doing the shops.


We treated the Disco to a new Torque Performance rear bumper.

Poor guys at the stand.  I visited 3 times before I made my mind up then had trouble getting enough cash together because the cash machine was out of order!  Got there in the end courtesy of some cash back at the sweet shop.

Came home with completely empty pockets.


A few jobs to do after the off-roading, including drying out one of the head lamps.


A fantastic day.


==

Reminders:
MCB 4x4 for custom roof racks
Armson Automotive Engineers for chassis rust treatment