Search This Blog

Monday, 19 April 2021

Bike tyre air nozzle

When fitting tubeless bike tyres it is usually necessary to have a fast blast of air to get the beads to seal enough to hold air then more to seat the beads in the rim. This is easiest done with a compressor.

Most tyre inflators, for compressors, use a rubber hose with a Schrader, car, valve end. In to which a small Presta valve adapter has to be fitted. That combination can be difficult to hold in place on a Presta valve while also trying to hold the wheel when it is not on the bike. 


I have designed an adapter that fits an air blower tool, which can be easily held on a Presta valve with or without the valve core installed.

An early version

It took a few attempts to get it right. The first version only fitted when the valve core was removed. It worked and didn't need a washer but it is more convenient to be able to use the same tool to complete the inflation, so I designed some more.

Disappointing adapter

Another attempt used a standard Presta valve adapter. This was disappointing. It was hard to hold in place and, as is typical with these adapters, the rubber O-ring kept being pulled off when removing the tool.


The latest design uses a rubber O-ring that fits tightly in a deep groove.


The metric O-ring has a 5mm internal diameter with a 2mm cross section, making it a 9mm outside diameter. It is a snug fit and needs something like a blunt needle or small nail to help get it in.


It is designed to 3D prints without any supports. I used 2mm thick walls and a 30% fill. My preferred filament is ColorFabb nGen.

==

Download 3D models:
Tyre Air Nozzle, STEP and STL (Zip)
Licence attribution - small business exception

My models in the GrabCAD library.

==

Saturday, 17 April 2021

VW T28 reversing sensor housing

The plastic shrouds that hold two of the reversing sensors in the rear bumper on a friends van, had broken. A search to get hold of the right size replacement, had proved fruitless.

An original

It is a VW T28 Transporter from 2008. Based on a T5.

The reversing sensor fits in a 20mm diameter hole in the bumper and the sensor has a 15mm outside diameter with some alignment keys and clips to fit a specific housing.

A 3D printed solution

I've made a 3D printed version of the housing that holds the sensor to fit in to the bumper.


It fits both the sensor and the bumper well. It's tight pushing it in to the bumper.


The production is not perfect but that does not affect it's appearance or ultimate function. The lack of flex in the 3D filament, that I used, means that the inner clips tend to snap off. The sensor fits snugly in to the shroud so as long as one clip is holding this secures it in place. A bit of tape could also be wrapped round the housing, to hold the clips in but that has not proved necessary.


The end result works well, so far.

==

3D Printing Method


  • Filament: ColorFabb nGen. Used to survive the possible outside temperatures.
  • Walls: 2mm thick
  • Infill: 30%
  • Supports: From the build plate, only where the overhang angle is greater than 80 degrees.

I printed it, outside uppermost. This was to get the best finish on the curved edges of the part of the lip that would be visible when fitted to the van. That required the use of supports for the print.

Download 3D models:
VW T28 Reversing Sensor Housing, STEP and STL (Zip)
Licence attribution - small business exception

My models in the GrabCAD library.

==


Thursday, 15 April 2021

Workshop bike stand

I'm lucky enough to have a large shed to use as a workshop however, there is not quite enough space for me and a portable bike work stand, to work comfortably. I kept tripping over the legs.

To get over the issue of the legs getting in the way, I decided to wall, or bench mount a bike work stand. Through use of the portable stand, I had worked out the most suitable space for a fixed stand. I just needed to find a way to secure it. 


None of the wall or floor mounted stands, that I could find, did everything that I wanted at a price I was prepared to pay. For me, the best option was to use a portable stand but remove the legs.


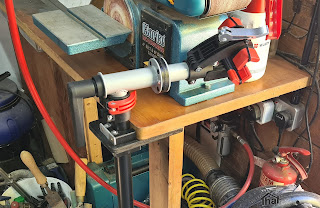
I made up some brackets out of ply, timber and 3D printed clamps.


It is secured to the corner of the bench and to the floor.


It has worked out very well, it rotates out of the way when not in use and is very sturdy in use. Just what I was after.

==

3D printed Parts


Printing Method:

Filament: ColorFabb nGen
Walls: 2mm thick
Infill: 30%
Supports: None

Download 3D models:

Pipe Clamps 38mm, STEP and STL (Zip)
Licence attribution - small business exception

My models in the GrabCAD library.

==


Monday, 12 April 2021

My FreeCAD preferences

I've used FreeCAD, on and off, for a while. Usually for specific tasks that it is better suited to. Recently I have started to use it more frequently, so it is worth my time setting it up how I like it.

This page is a reminder of how I prefer to configure FreeCAD. It is a work in progress and I will update this page from time to time.

Navigation

There are many ways to move the view of the objects on the screen and everyone has their own preference. I find using a middle mouse button uncomfortable and sometimes use a trackball. With a trackball, I find mouse button combinations are not always easy to operate while also trying to move the ball. Therefore, I prefer Pan, Zoom and Rotate to be somewhat independent of the mouse buttons or only use the left mouse button.

Luckily, FreeCAD has a pre-configured setup, called 'Touchpad' that does exactly what I want. 

In Touchpad mode, the Pan function, is to hold the SHIFT key while moving the mouse.

The Zoom function has multiple choices, including, PAGE UP and PAGE DOWN as well as a CTRL + SHIFT combination. I find the mouse wheel quicker. 

The primary Rotate option, in the Touchpad mode, is to hold the ALT key while moving the mouse, however, when using a mouse, I prefer the alternate method of, SHIFT + LEFT MOUSE BUTTON combination. By just covering the shift key, all the operations can be carried out easily.

It's easy to swap between modes, using the dropdown on the Status bar.


Addons


Using the Addon Manager, I add the following as part of my standard setup. Details of each can be found under External Workbenches in the FreeCAD documentation.

  • Fasteners Workbench - create ISO standard bolts and washers. When creating threads, enable the thread property to True, for the geometry to be cut in to the model.


==

FreeCAD version 0.19
==

Tuesday, 6 April 2021

Fox shock air sleeve service

Shelley's Merida originally came with a remote lockout for the forks and shock. That set the climb, trail or descend (CTD) mode. The remote was troublesome and I removed that not long after she got the bike. This left the rear shock permanently in the descend setting.

I've been looking for a way to convert that to have the shock mounted levers for control. I eventually found out, from the exploded diagrams, that there is not a conversion, it needs a complete replacement top. To that end I've been on the lookout for a compatible shock at a low enough price to be a donor. I bought a 200x50mm Fox FLOAT shock of the same generation, off of eBay, that will do the job.

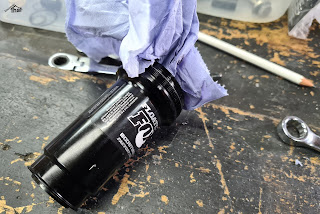
I've carried out an air sleeve service but swapped parts between the two shocks as I went. There is an easy to follow official service video on the Ridefox site for the service.


I removed the mounting hardware.


The service was as easy as it looks in the video.


The original shock is a 190x50mm but by swapping the air sleeve, I've ended up with a 192x50mm, which I think is close enough. It'll add about 5mm to the height at the rear. That will easily be lost when the sag is adjusted.


==