I can fit three bikes and three people inside our Discovery 4. I would like to have the option to fit 4 people and 4 bikes. That would need two of the bikes on the outside.
I was not happy with any of the bike racks I could find for a Discovery. The tow ball mounted type were probably the best but I'd like something that is more secured to the car. I also don't have a tow ball on this car.
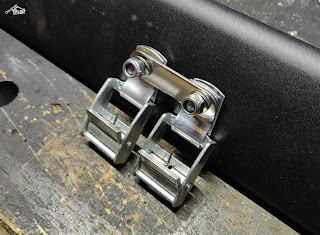
I decided I could make something that hung from a roof rack.
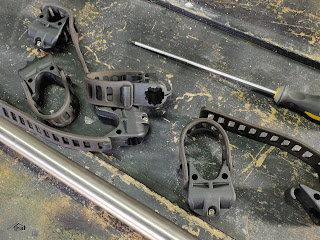
I used the fittings from a budget strap on rack.
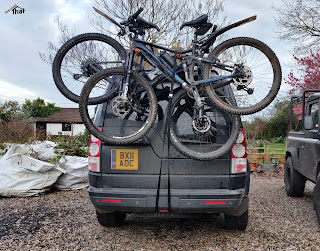
The end result is very secure, which is one of the goals but the bikes overhang the sides more than I would like. Especially my bike because it is so large.
It's not easy to come up with a simple solution to re-position them because the geometry of my bike is so different to that of Shelley's.
I've offered up the bikes a few ways and decided that straight out the back is the simplest. They'll stick out a little bit further than I originally intended but this arrangement will not obscure the lights in any way.
I work on this another weekend, see my newer post.
==
Search This Blog
Saturday, 22 February 2020
Sunday, 16 February 2020
Replacement headset and forks
Shelley's bike had two issues. It had started to pull to one side and the steering was very rough. In addition the forks were not performing as they should.
Today Dean and I fitted a new headset and new forks. Mainly I watched and learnt while Dean fitted them.
The forks came out easily. The bottom bearing came out just by pulling however the top bearing fell apart and the casing had to be levered out.
That bearing probably had a lot to do with the poor performance Shelley had been experiencing.
Getting the old bearing cups out was tricky. I tried with a bearing cup removal tool and just managed to bruise my knuckle. Dean removed them by drifting them out with a punch a little bit at a time, round the edge.
To fit the new one, we put the cups in the freezer for half an hour and used a heat gun to warm the head. We were not sure how much that helped but did it anyway.
Inserting the cups straight was the tricky bit, even with a bearing press.
We cut down the fork head tube to the same length as the forks that had been removed.
I used a star nut inserting tool to get the star nut in to the end of the tube.
To fit the crown race on to the fork crown we heated that slightly and used a home made tool, made out of a large aluminium tube, to seat it. The end was ground down, to fit over the angle on the crown race.
We greased the bearing cups and inserted the bottom bearing and the fork tube, followed by the top bearing, the split upper race, the spacers, the stem and finally tightened the top cap to pull it all together.
Fitted the brake and the wheel.
Once on the ground, Dean straightened the handlebars and tightened the bolts on the stem.
Job done.
We set the fork damper up for Shelley and she took it for a test ride up the driveway. She was very pleased with the improvements.
==
FSA Headset
Frame cup diameters:
Upper: 44mm (43.7mm measured. 44.1mm cup fitted)
Lower: 55mm (54.9mm measured. 55.1mm cup fitted, FSA H5064)
Bearings:
Upper: 41mm O/D (40.9mm measured) 7.3mm thick. 45 deg outer and 36 deg inner angle. (FSA MR0401-1/8)
Lower: 52mm O/D (51.7mm measured) 7.5mm thick. 45 deg outer and 36 deg inner angle. (FSA MR019 1.5)
==
Forks
SR Suntour Aion 150mm travel. 27.5" wheel. 100x15mm axle.
==
Today Dean and I fitted a new headset and new forks. Mainly I watched and learnt while Dean fitted them.
The forks came out easily. The bottom bearing came out just by pulling however the top bearing fell apart and the casing had to be levered out.
That bearing probably had a lot to do with the poor performance Shelley had been experiencing.
Getting the old bearing cups out was tricky. I tried with a bearing cup removal tool and just managed to bruise my knuckle. Dean removed them by drifting them out with a punch a little bit at a time, round the edge.
To fit the new one, we put the cups in the freezer for half an hour and used a heat gun to warm the head. We were not sure how much that helped but did it anyway.
Inserting the cups straight was the tricky bit, even with a bearing press.
We cut down the fork head tube to the same length as the forks that had been removed.
I used a star nut inserting tool to get the star nut in to the end of the tube.
To fit the crown race on to the fork crown we heated that slightly and used a home made tool, made out of a large aluminium tube, to seat it. The end was ground down, to fit over the angle on the crown race.
We greased the bearing cups and inserted the bottom bearing and the fork tube, followed by the top bearing, the split upper race, the spacers, the stem and finally tightened the top cap to pull it all together.
Fitted the brake and the wheel.
Once on the ground, Dean straightened the handlebars and tightened the bolts on the stem.
Job done.
We set the fork damper up for Shelley and she took it for a test ride up the driveway. She was very pleased with the improvements.
==
Merida ONE-TWENTY 7.800 model year 2015
Forks: Taper tube 1"1/8" to 1.5"FSA Headset
Frame cup diameters:
Upper: 44mm (43.7mm measured. 44.1mm cup fitted)
Lower: 55mm (54.9mm measured. 55.1mm cup fitted, FSA H5064)
Bearings:
Upper: 41mm O/D (40.9mm measured) 7.3mm thick. 45 deg outer and 36 deg inner angle. (FSA MR0401-1/8)
Lower: 52mm O/D (51.7mm measured) 7.5mm thick. 45 deg outer and 36 deg inner angle. (FSA MR019 1.5)
==
Forks
SR Suntour Aion 150mm travel. 27.5" wheel. 100x15mm axle.
==
Fitting a tubeless bike tyre
As mention in a previous post, the hub on my bike made a grinding noise and the freewheel had a large angle between teeth. For those reasons I have changed the back wheel.
I am a fan of tubeless tyres. Mainly, I like being able to ride without having to stop for punctures.
First job was to fit the tube tape to the rim. The tape supplied with the Hope wheel was a thin plastic which was fairly stiff. I found this a bit of an odd choice because it has to curve in both directions and this tape didn't want to do that.
I fitted it as best I could, working round the wheel to get as many of the bubbles out as possible. Mainly I made sure I had sealed round every spoke hole. I used a cloth to keep going round the rim and attempt to bend the tape to the shape of the rim.
The result was not as tidy as I was expecting to be able to achieve but eventually had to accept I wasn't going to get it any better.
I cut out the hole for the valve and tidied up the edges, as best I could.
I tried to get the tyre off the previous wheel without loosing too much Stan's Tire Sealant. The tyre was easy to get off with a couple of tyre levers. I lost about half of the tyre sealant, transferring the tyre to the new wheel. It made a mess on the workbench so I ended up putting a wadge of paper towel under the tyre to soak up what came out.
I had watched the Stan's video on how to fit tubeless tyres and was following their suggestions for the most part.
I got most of the tyre bead inside the wheel rim but before closing the last bit, I sloshed in a fair quantity of Stan's No Tire, Tire Sealant, to the bottom of the tube. I'd guess, over 100ml (about 4 oz).
I used two tyre levers to get the last bit of the tube lip inside the wheel rim. I lost a bit of sealant doing that but not too much. I rotated the wheel a couple of times to spread the sealant about.
From what I have read, getting the bead to seat is the bit that people have trouble with. I have a full size car air compressor, which makes that job fairly trivial.
I have modified an air blower, with a thin nozzle and a rubber grommet. I set the air compressor to near it's maximum 90 psi (6 bar).
I inflated the tyre without the valve core in, so that I could inflate it as quickly as possible. To my mind this helps to get the beads to seal on the edges of the rim, which helps to inflate the tyre.
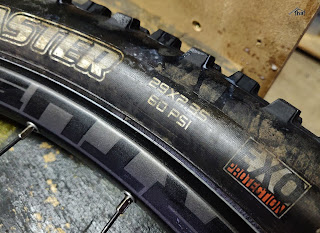
I rapidly inflated the tyre to it's maximum 60 psi (4 bar) and checked round both sides to see if there was any sign of leaking. My own tip is to let the tyre deflate and see where the rim comes away from the bead and inflate the tyre again until I am sure the bead has seated. I pulled on the side walls at any point that did not look completely even.
I was pleased that my poor looking rim tape was sufficiently sealed to hold the air in.
As I had done this without a valve core, the tyre deflated when I released the air blower. As that was obviously going to happen, I made sure that the tyre was not pulled off the rim, by laying it horizontal.
I fitted the valve core and inflated it again. This time finishing off with my normal track pump which is easier to fine tune the pressure.
I left it for a while, over pressure, at 3 bar (about 40 psi) to make sure the tyre was holding air and then once I'd finished fitting the brake disc and cassette, I dropped it down to about 2 bar (about 30 psi).
Once on the bike, the gear change had to be adjusted. The cassette probably sat no more than a millimetre different to the previous but that made it necessary to redo all the setup.
The following morning and the tyre is still fully inflated.
:-)
==
I am a fan of tubeless tyres. Mainly, I like being able to ride without having to stop for punctures.
First job was to fit the tube tape to the rim. The tape supplied with the Hope wheel was a thin plastic which was fairly stiff. I found this a bit of an odd choice because it has to curve in both directions and this tape didn't want to do that.
I fitted it as best I could, working round the wheel to get as many of the bubbles out as possible. Mainly I made sure I had sealed round every spoke hole. I used a cloth to keep going round the rim and attempt to bend the tape to the shape of the rim.
The result was not as tidy as I was expecting to be able to achieve but eventually had to accept I wasn't going to get it any better.
I cut out the hole for the valve and tidied up the edges, as best I could.
I tried to get the tyre off the previous wheel without loosing too much Stan's Tire Sealant. The tyre was easy to get off with a couple of tyre levers. I lost about half of the tyre sealant, transferring the tyre to the new wheel. It made a mess on the workbench so I ended up putting a wadge of paper towel under the tyre to soak up what came out.
I had watched the Stan's video on how to fit tubeless tyres and was following their suggestions for the most part.
I got most of the tyre bead inside the wheel rim but before closing the last bit, I sloshed in a fair quantity of Stan's No Tire, Tire Sealant, to the bottom of the tube. I'd guess, over 100ml (about 4 oz).
I used two tyre levers to get the last bit of the tube lip inside the wheel rim. I lost a bit of sealant doing that but not too much. I rotated the wheel a couple of times to spread the sealant about.
From what I have read, getting the bead to seat is the bit that people have trouble with. I have a full size car air compressor, which makes that job fairly trivial.
I have modified an air blower, with a thin nozzle and a rubber grommet. I set the air compressor to near it's maximum 90 psi (6 bar).
I inflated the tyre without the valve core in, so that I could inflate it as quickly as possible. To my mind this helps to get the beads to seal on the edges of the rim, which helps to inflate the tyre.
I rapidly inflated the tyre to it's maximum 60 psi (4 bar) and checked round both sides to see if there was any sign of leaking. My own tip is to let the tyre deflate and see where the rim comes away from the bead and inflate the tyre again until I am sure the bead has seated. I pulled on the side walls at any point that did not look completely even.
I was pleased that my poor looking rim tape was sufficiently sealed to hold the air in.
As I had done this without a valve core, the tyre deflated when I released the air blower. As that was obviously going to happen, I made sure that the tyre was not pulled off the rim, by laying it horizontal.
I left it for a while, over pressure, at 3 bar (about 40 psi) to make sure the tyre was holding air and then once I'd finished fitting the brake disc and cassette, I dropped it down to about 2 bar (about 30 psi).
Once on the bike, the gear change had to be adjusted. The cassette probably sat no more than a millimetre different to the previous but that made it necessary to redo all the setup.
The following morning and the tyre is still fully inflated.
:-)
==
Subscribe to:
Comments
(
Atom
)


