It's been over 30 years since I last painted miniatures. In between I've painted model cars and some artwork on bikes, but not very often. I was inspired by a friends Warhammer hobby to try painting a few miniatures again, for a bit of relaxation. I have not started yet, but the world has changed.
When I last did this, I learnt one technique at a time from a magazine or by talking to other people at clubs. While tidying up my old paints, I found my little blue book. This contains my notes on mixing specific colours, what they worked for and what techniques to use. I had just started to get the hang of washes and dry brushing when I stopped.
Now, whatever I want to know and more techniques than I can even remember, let alone master, are available at the click of a button with an almost endless choice of video tutorials.
For my own benefit, I'm keeping this list of resources for reference:
Layer painting colour charts:
Layer painting is the most common technique used for miniatures. Simple to understand, but still needs practice. It uses multiple layers, usually starting at the darkest and working up to the highlights. Each layer covering less and less of the area with brighter and brighter tones.
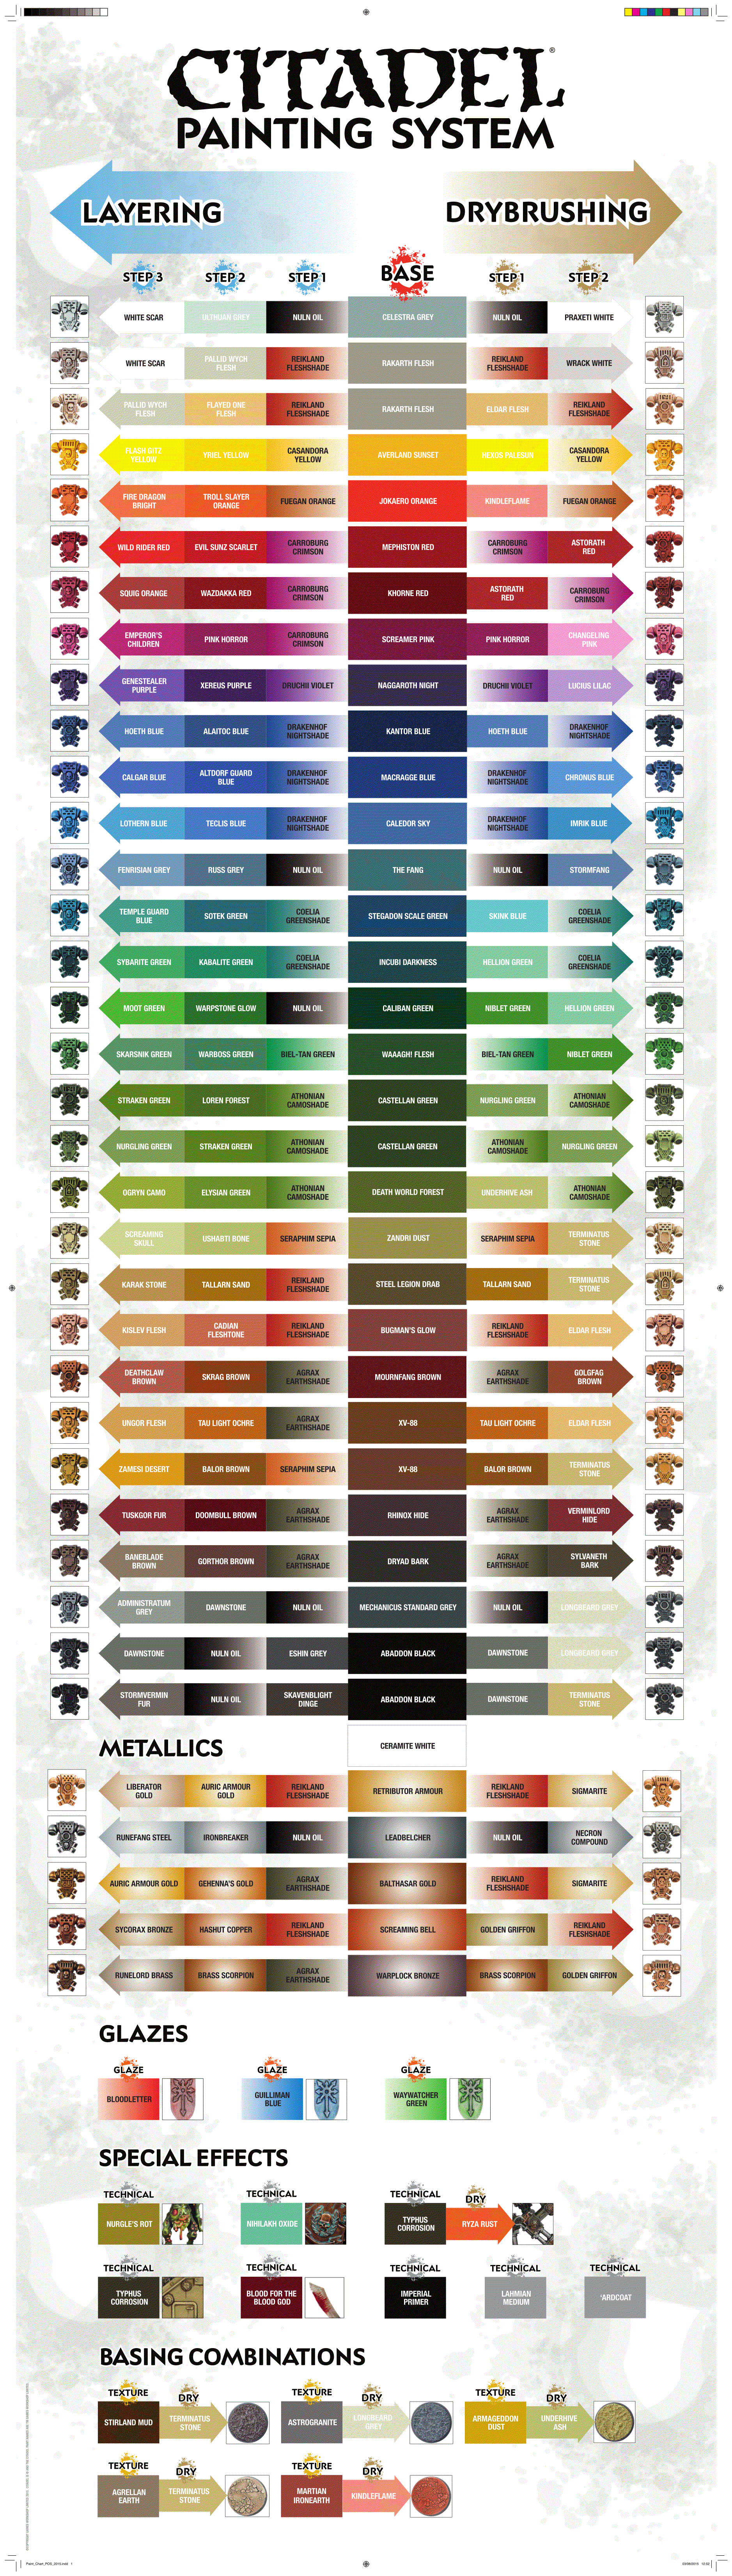
To help pick the colours, there are a number of charts and guides available.
Citadel do an app, which I might use. Pick a base colour and it will suggest, from their range of paints, the base, mid-tone and highlight layer colours to use. With an example image. Very handy.
https://citadelcolour.com/citadel-colour-the-app/
They also do a handy chart, which I need to find a large enough wall to display it on.

I can't find an official link, but there was a copy to download from this site:
https://spikeybits.com/wp-content/uploads/2024/09/Citadel-Painting-Chart-pdf.pdf
or a higher res image from this site:
https://amulettejewelry.com/wp-content/uploads/2018/08/citadel-paint-chart-datas.jpg
Colour Theory
I used to mix some of my own paints based on a very vague understanding of pigments and colour theory.
Although I buy miniature specific acrylic paints, I also buy tubes of artists acrylic colours because they tend to come with a better range of hews in the primary colours.
There are articles that explain this:
Exploring Color Theory: How to Create Stunning Art with Acrylic Paints — Body Kun
The following article includes this handy colour wheel:

How to Mix Colours When Painting in Acrylics - Blue Beach House Art
Colours next to each other on the colour wheel are secondary colours and the next away is a tertiary colour. That is, they have equal amounts of the colour between them and their neighbour mixed in.
Temperature is used to describe the colours. Warmer colours are towards the red and yellow and cooler colours are towards the blue and green. So a slightly purple red, is called a cool red but a slightly orange red is called a warm red.
Opposite colours on the colour wheel are complimentary colours. When complimentary colours are mixed they produce black, browns and greys.
Acrylics vs Oils
I only use water based paints, except when I have no alternative. For whatever reason, prolonged exposure to oil based paints, or their thinners, always make it hard for me to breath. This applies to decorating the house or painting miniatures.
For that reason I use water based acrylic paint and did, even 30 years ago.

Aside
While I was tidying up my paints and sorting out the, over 30 year old, acrylic colours I had, I was surprised that quite a few of my paints were still in a usable state. Some had set solid, but a number had formed a gel. With a bit of water and mixing they returned to a usable pigment.
==


