If you are curious, all of the initialisms on this tab are different types of network file systems. AFP is used by Apple Mac computers and NFS is an open standard which I rarely come across being used.
SMB is widely used, including by Microsoft.
I would hope that by now SMB 2 is the default and SMB 1 is disabled but worth checking. The minimum SMB protocol should be SMB 2.
The reason for this is that SMB 1 is insecure and should not be used.
Windows 10 also supports SMB 3, so if you only have Windows 10 computers you can change the Maximum SMB protocol to SMB 3.
That's all that is necessary for Windows networking and it is probably already setup for you.
What to do on the Windows computer
I find it useful to setup a Quick Access link to the file system on the NAS box. I go to it so often, especially during setup, that this saves time.
File Explorer
The IP address of my NAS box, for the sake of this example, is 192.168.1.40. If you have managed to get the UNC name to work, then you can use that instead of the IP address.
Whatever you use, type the address preceded by "\\", in to the address bar. In my case "\\192.168.1.40" Get the slashes the correct way round, the other way will take you to the internet and fail.
At this point, if it is the first time you have browsed to the NAS, you should be prompted for your Synology NAS login.
This is asking for the username and password of the account you setup on the NAS box. This is NOT your Windows login details
Tick the box to Remember otherwise the synchronisation will be unreliable because it won't work until you login. If you tick to remember the credentials, it is all automatic.
Drag the UNC in File Explorer
Now you have logged in, drag the UNC or IP of the NAS, from the address bar in to the Quick Access list to create yourself a very convenient shortcut.
Create Folders
All being well, you should be able to navigate to your own user folder on the NAS box.
Create 4 folders under your name:
- Documents
- Music
- Pictures
- Videos
I recommend that you do not include Desktop in this list. If you are the sort of person that habitually saves to the Desktop, I would urge you to change your behaviour and use Documents, where data files are intended to be.
If you decide to do Desktop, you are on your own with that one.
There is no harm doing Downloads, as far as I know, but, in my case, I end up with a whole bunch of junk in there that would just waste performance copying to the NAS.
Enable Offline Files
This gives the option to keep a copy on the local machine, of network folders that are on the NAS box. A laptop can then be used anywhere and files sync., when returning to the home network.
Control Panel - Sync Centre
Manage offline files
Make sure offline files is enabled, if not, then press the button to enable the feature.
Change the Folder Locations to the NAS
In File Explorer in the side bar, under "
This PC", one at a time, for each of the four folders we have selected,
right click, go to the properties of the shortcuts in File Explorer.

Go to the Location Tab.
The image above, shows the result after the move. Prior to the move the location would be on the local hard drive.
Press the Move... button.
As all of my computers are done, I cannot reproduce the screens but what should happen is that you navigate to the corresponding folder on you NAS box, for your user account, and move.
There will be a prompt you need to accept but I can't remember what it says.
I recommend trying a folder that has the least content, just in case you need to slightly change the procedure. As you can see, there is a button to Restore Default, so you can roll this back.
Do the same for all four folders.
Always Available Offline
To keep a copy on the local machine it is necessary to set that folder to be available offline. See above to ensure that the offline files feature has been anabled.
Right clicking on the shortcut should show an option:
There should be a tick next to a heading of 'Always available offline'.
Failing that, it is available from a Tab in the properties of the shortcut.
Use the Sync now button to kick off storing a local copy.
Finished
Well, wait a while, might be a long while, if you have a lot of files.
You can follow the progress on the NAS box web interface or the full UNC path to the NAS box in file explorer.
Testing
When you think it is all finished. Create a test file in each folder, make sure it has contents, sometimes zero size files don't sync.
Make sure the files get to the NAS box. It's not instant, Windows does it in it's own time to minimise the performance impact on the machine.
Conclusion
The instructions are not fully detailed but hopefully anything I have missed is obvious when you come to do it.
Extras
Microsoft Office File Security
Microsoft Office includes security features to protect you from malicious files.
If you edit files directly on the NAS box you are likely to encounter this protection. An extra butoon in a yellow warning bar that you have to press before you can make any changes.
If you always edit files on your own computer and let the synchronisation copy the files to the NAS box then you don't need to worry about this.
If you do work directly on the NAS box file shares, the extra prompts can be annoying. The best security is to leave it enabled but I tend to turn to off.
Open Any Microsoft Office Application.
File - Options
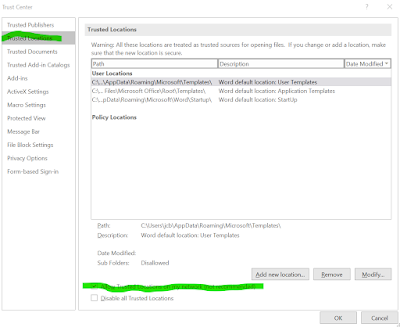
Trust Centre
Press the button for Trust Center Settings.
Tick the option, near the bottom that Microsoft does not recommend.
Network Trusted Location
Windows, by default, will not trust network locations. It will add additional warning messages when you try to do things like, copy, rename and delete when working on files directly on a local NAS box.
If you only ever save to your machine and let Windows sync the files to the NAS box, then the following is of no benefit to you.
I have network shares directly on my NAS box, lots of them and I find all the warning messages a little tiresome. They can be avoided by setting the local network as trusted. This is done from the internet options in control panel.
Control Panel - Internet Options
Security TAB
Local Intranet
Press the Sites button.
Press the Advanced button.
In the 'Add this website...' box, type in the first part of your local network IP range and use a * for the last octet. (This is not how subnets work but if you have a more complex home network, you already know that.)
Your network may not be the same as mine. Enter your IP range.
Press the Add button.
Close and OK back to the control panel.
Hopefully that will reduce the number of warning messages for working on the network.
Restoring Windows
These instructions are not for backing up a Windows computer but they can have a part to play.
It is very difficult to create a backup of a modern Windows computer that could be restored on to another computer.
To recover from a catastrophic machine failure, the operating system needs to be installed from scratch on the new machine. The user account created, then each folder moved, as per these instructions. The files will then sync., back to the computer in their own time.
While that's happening, it is an opportunity to install the required applications on to the computer.
==


