 |
| Tom |
I've converted a couple of much simpler models with Blender just using the 3D Printer Tools add-on to highlight the incompatible areas and manually repair the few minor bits found.
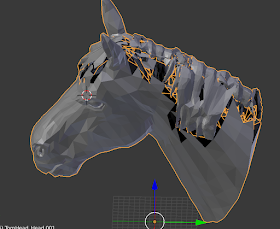
The horses heads have far more problems. They are made of several non-manifold components and have hundreds of overlapping faces. This is mainly as a result of creating the windswept looking mane and forelock.
After experimenting with the shrink wrap and subsurface modifiers I concluded the only way to end up with a good reliable solid was yet more manual work.
The first job was to use the Boolean modifier on the components to get them to either join or at least have a seam where each component meets. Then join them all together (Ctrl-J in Object mode.)
Boolean Union in Blender is not as reliable as I would like. One component distorted and lost detail.
I used the subsurface modifier to adjust the mesh and then it joined without significant loss.
 |
| Limit selection to visible |
To get rid of the unwanted internal structure, I found a tip on a forum. That was to use the option to only select visible vertices. By rotating the model and using the 'B' block select in Edit mode I was able to get just the surface vertices. I separated them (Ctrl-P) to create a new object.
That just left me with the job of filling the holes where the components did not meet at a visible vertex.
Labour intensive but the quickest method I could find to get a clean result.
==
I eventually completed the horses head models in 4 separate components. I cleaned each of those up in Blender and made them individually manifold without any loose bits.
I imported them all as OBJ files in to Fusion 360 and converted them to BRep. I then combined those bodies in Fusion 360.
==


No comments:
Post a Comment